Configuring SSL Certificates in SharePoint – Step by Step
Introduction
SSL certificates provide secure connectivity between client-server. Setting up HTTPS in SharePoint 2010 sites is a security addition. Generally, it’s a best practice to secure SharePoint Central Administration and External web applications with SSL (HTTPS access).
This article covers: How to configure SSL certificates in SharePoint 2010 for HTTPS access. There are different types of SSL certificates available. We can pick one among them whichever applicable to our environment.
Steps overview
- Get the SSL Certificate
- Obtain from a Trusted Certificate authority or
- Create a Self-signed SSL certificate
- Edit the Binding of the web application in IIS
- Change the alternate access mapping(AAM)
1. Get the SSL Certificate
To start with SSL certificates either we have to obtain the certificates from any trusted certificate provider like
Or we need to create our own certificate, known as “Self Signed Certificate”.
1(a). Obtain The Certificate from Trusted Certificate Authority
If you have the .PFX file already, just import the .pfx file in “Server Certificates” under IIS, and skip the following steps
There are two steps involved in provisioning the certificates from trusted certificate authority:
- Create Certificate Signing Request
- Complete the CSR by Installing the Certificate in IIS
Create Certificate Signing Request
The First step to obtain the Certificate from a Trusted certificate authority is to create a certificate signing request. Follow these steps to create SSL certificate request :
- Click on the Start menu >> Administrative Tools >> Internet Information Services (IIS) Manager.
- Click on the Server name in the Connections column on the left. Double-click on Server Certificates.
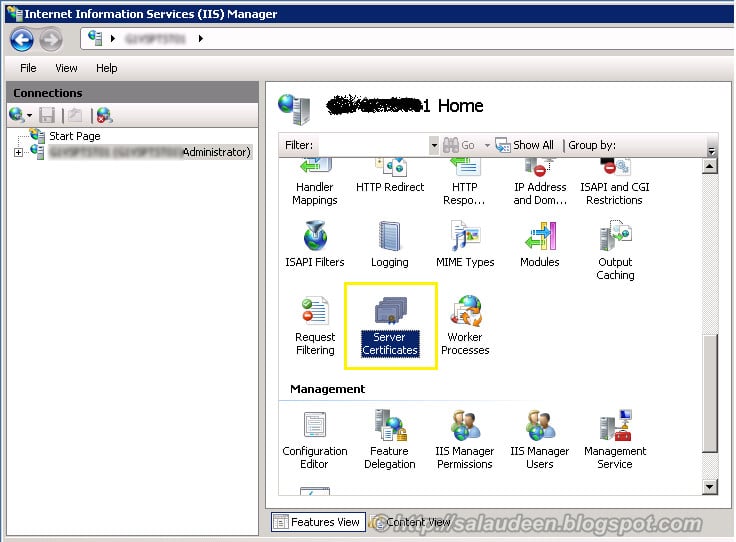
3. In the Actions column on the right, click on Create Certificate Request… Link

4. Enter all of the information about your company and the domain you are securing and then click Next.
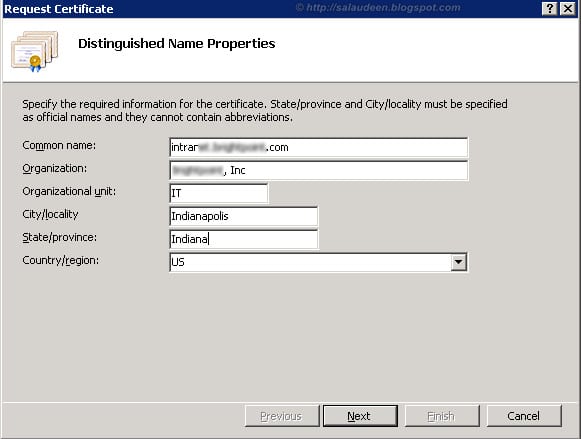
5. Select the Cryptographic provider and bit length

6. Give a Name for the CSR file and click on Finish.
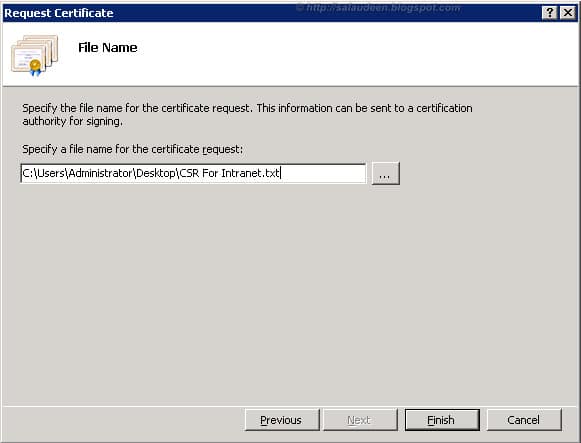
To validate CSR, use the online tool at: https://www.sslshopper.com/csr-decoder.html
Complete the CSR by Installing the Certificate in IIS
Once we generated a CSR, We can send it to a certificate authority, Pay and then get the SSL certificate file. The next step is completing the request by installing the certificate.
1. Click on the Start menu >> Administrative Tools >> Internet Information Services (IIS) Manager.
2. Click on the Server name in the Connections column on the left. Double-click on Server Certificates.
3. Click on “Complete Certificate Request” under Actions tab at right.

4. Browse to the location where the .cer file is located (The one you received from Certificate authority), click on OK

5. You should see your certificate appear in the list of server certificates once completed successfully!
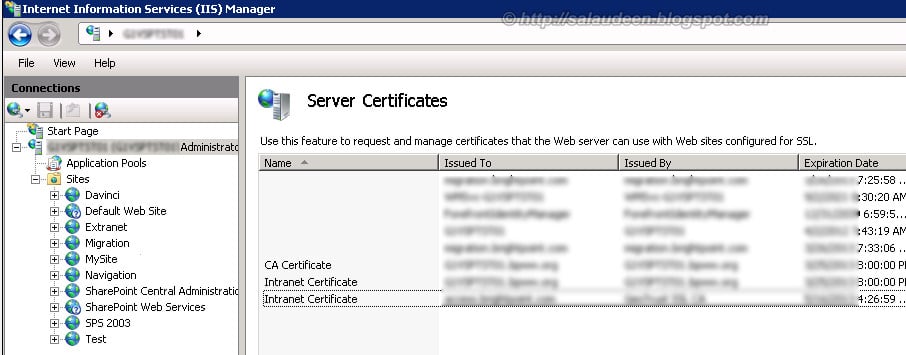
Done! We have installed SSL certificate in IIS.
1(b). Creating Self-signed SSL certificate:
On development/Intranet servers we can use Self-signed certificates. By default, Self-signed SSL Certificates have an expiry date of 1 year. You can further provide custom parameters to SelfSSL.exe and generate Self-signed SSL certificates.
Steps to Create Self-Signed Certificate:
1. Logon to your Web Front End Server
2. Click on the Start menu >> Administrative Tools, and then click on Internet Information Services (IIS) Manager.
3. Click on the server in the Connections column on the left, Double-click on Server Certificates. 4. In the Actions column on the right, click on Create Self-Signed Certificate…
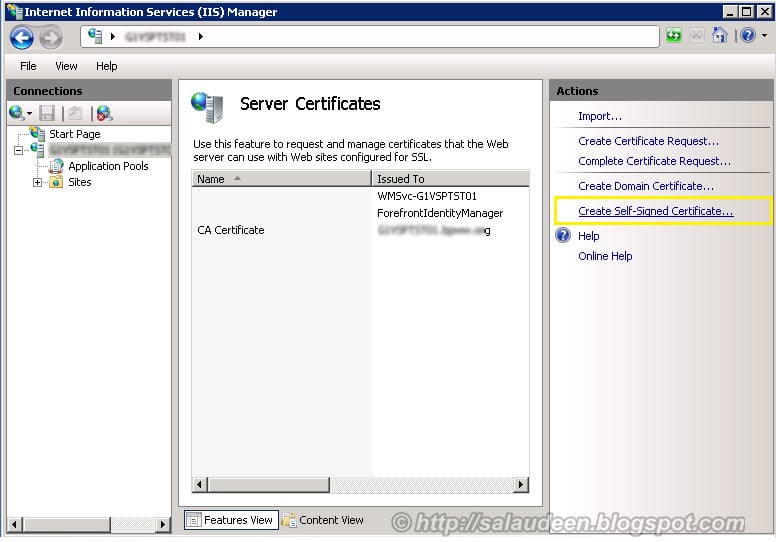
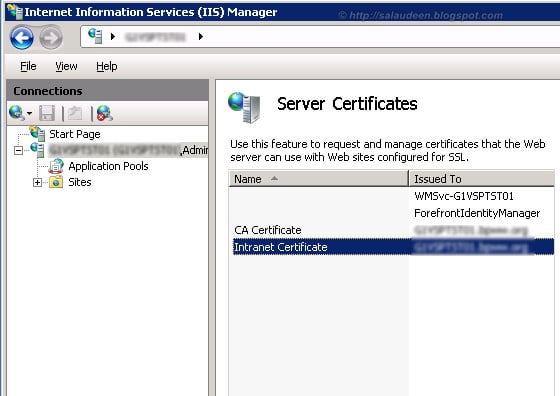
5. Enter any friendly name (e.g. “Intranet Certificate” and then click OK.

6. This will now create a New Self Signed Certificate valid for 1 year listed under Server Certificates. The certificate common name (Issued To) will be the server name.
2. Edit the Binding of the web application in IIS
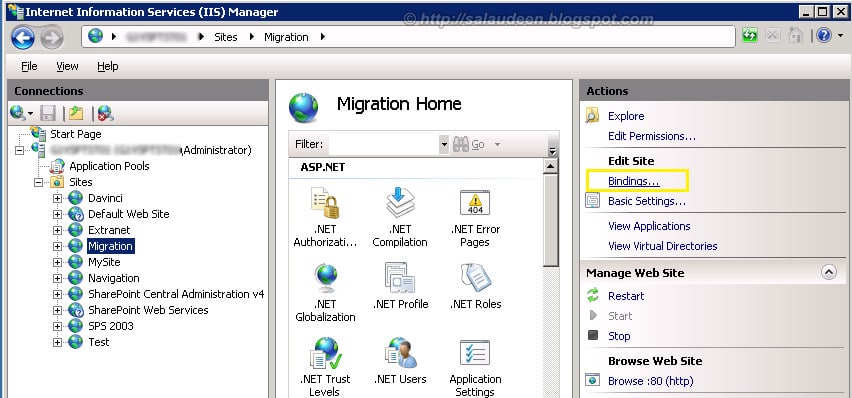
1. The next step is to: install SSL certificate in IIS of SharePoint site. In the IIS Manager Console: Expand the Server and Site nodes and click the website you want to assign the certificate to. Click on Bindings… in the right column.
2. Click on the Add… button in Site Bindings dialog box

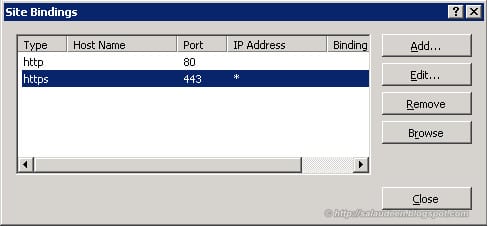
3. Change the Type to https and select the SSL certificate that you just created. Click OK. You can also replace SSL certificate for your SharePoint site by choosing from the drop-down.

4. Now, you will see the binding for port 443 listed. Optionally, you can remove the HTTP binding in order to tighten the security. Click Close.
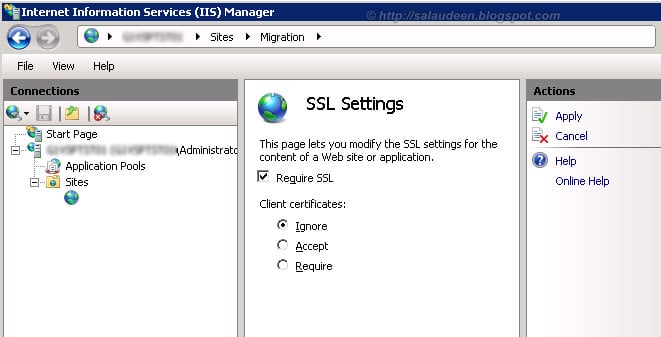
We can force the website to use ONLY HTTPS protocol by selecting SSL Settings of the website and then choose “Require SSL”
Fixing the Common Name in self-signed SSL
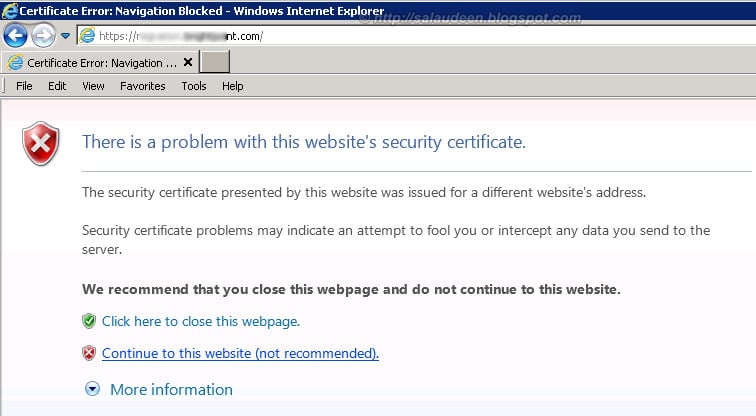
Once we open the site with Self SSL, it will display an error message: The security certificate presented by this website was issued for a different website’s address”. This is because of the common name mismatch. The self-Signed Certificate wizard uses the server name as the common name when it creates a self-signed certificate. So when we have a different host name other than the server name, this causes the mismatch. In fact, this isn’t a problem. We can just ignore this error and click “Continue to this website” each time.
To completely get rid of the error message
To get rid of the warning message displayed because the common name on the self-signed certificate doesn’t match the website’s host name. In order to resolve this problem, we’ll need to create the self-signed certificate using the SelfSSL.exe which comes with instead of through IIS.
1. Download and install the Internet Information Services (IIS) 6.0 Resource Kit Tools from https://www.microsoft.com/en-us/download/details.aspx?id=5135

2. Once installed, open the command prompt, Navigate to “C:\Program Files (x86)\IIS Resources\SelfSSL\” – CD “C:\Program Files (x86)\IIS Resources\SelfSSL\”
3. Execute the command line: SelfSSL /T /N:CN=migration.crescent.com /V:365 /k:2048
Where:
- /T – Adds the Self-Signed certificate to the “Trusted Certificate” list. If you don’t use the /T key, you have to manually copy the certificate from the Personal node to the “Trusted Certificates” folder from the Certificates MMC.
- /N – Common name, Must be as same as our custom host header, Otherwise you will see an error!
- /V – Validity in days
- /K – Key size, by default 1024 bit

4. Now, assign the new certificate to the Web application.(Follow the steps under: Edit the Binding of the web application in IIS)
3. Configuring Alternate Access Mapping for SSL
So, we have configured IIS to allow SSL connections, but we need to instruct SharePoint to map the requests to the correct web application. As final step, let’s configure the alternate access mapping by changing URL from HTTP to HTTPS.
1. Navigate to Central Administration >> Application Management >> Configure Alternate access mappings

2. Click on “Edit Public URLs”
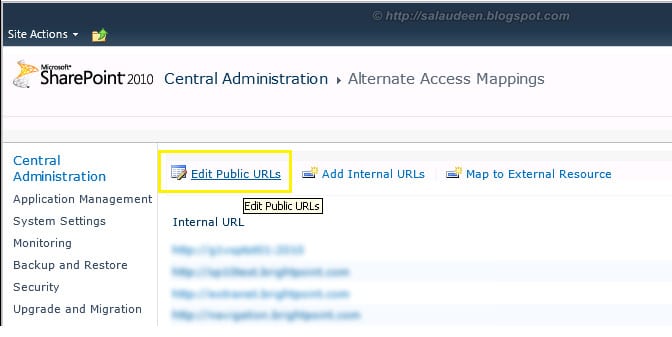
3. Select the desired web application

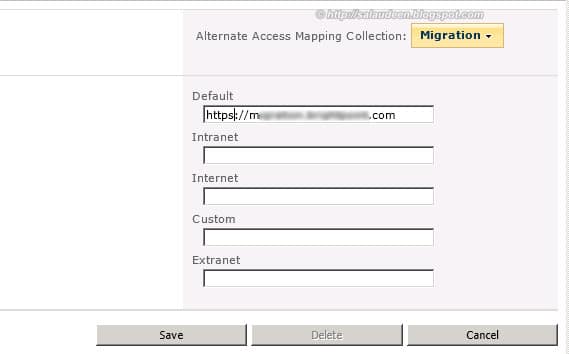
4. Change the HTTP to HTTPS and click on Save button. Once done, this will automatically change the HTTP to HTTPS.
Other considerations:
SSL Offloading: It’s a good idea to offload the SSL at the firewall or Publishing servers (like F5) so that you can reduce the burden on the Web Frond Ends.
If you have SSL enabling Central Admin: don’t forget to Change Central Administration Port: STSADM -o setadminport -port 443 -ssl
Intermediate Certificates Some SSL providers issue server certificates with an Intermediate certificate, so you will need to install this Intermediate certificate to the server as well. Otherwise, users will receive a Certificate Not Trusted Error. Just double-click the certificate and choose to install.
Validate the changes
Alright, we are done with configuring HTTPS in SharePoint 2010. Browse to the site by typing the URL in the browser. Make sure it doesn’t give any certificate errors.
Here is the output: SharePoint 2010 site configured with https! That’s all! We’ve successfully configured SSL Certificate with SharePoint 2010 site.

Tail: Different Types of SSL Certificates:
Domain Validated Certificates: Only the domain owner is validated using an email to an address at the domain using WHOIS record of your domain. It’s simple and fast and cheap.
Extended Validation Certificates This is the highest level of authentication available with an SSL Certificate. They are more expensive than other types of certificates. Web browsers will display the organization’s name in a green address bar and show the name of the Certificate Authority that issued.
Wildcard Certificates Wildcard certificates can be used to secure an unlimited number of subdomains on a single domain name. For example, a certificate for *.domain.com will work on my.domain.com, www.mydomain.com, intranet.mydomain.com, etc.
SAN Certificates
Subject Alternative Names let you protect multiple host names with a single SSL certificate. It allows you to specify a list of host names to be protected by a single SSL certificate.
Code Signing Certificates
To provide protection of software code and content for the software publishers and the users downloading. It allows you to sign an application or executable so that users know the identity of the organization that made the application.
Self-Signed Certificates
Can be created by our self, Users will receive a warning if the certificate is not trusted (or expired!).

1. Is this the same process for SharePoint 2016 version
2. what if we have OWA server, should we follow the same process or shoule we detach while configure and attache later.
This is really great article. However, after following these step when i trying to browse my site using https i got access denied error, if i using http it open fine. Do you have any idea what happening?
Thank you so much.
Tam
Hello,
Could you please clarify me on below point.
1. If you have SSL enabling Central Admin: don’t forget to Change Central Administration Port.
Also do i need to perform the same step for Central Admin? Please suggest.
Thanks
If you want to SSL Enable your Central Admin, You’ll be changing its port. Follow How to Change Central Administration Port in SharePoint to change Central admin port!
Thanks for your response.
Could you please suggest me the best option to implement the SSL certification in SharePoint.
1. Edit the Public URL as mentioned in your post.
or
2. Extend the web application.
In few of the blogs its suggested to extend the web application instead of editing the public URL. When the microsoft foundation web application service is restarted, all the changes which has been done manually will be lost and also there are chances that custom solution can break.
Also i have around 20 web application and while creating the CSR file i have choosen *xxxx.com. Is this correct?
Thanks in Advance.
Hi there! glad to drop by your page and found these very interesting and informative stuff. Thanks for sharing, keep it up!
Can we use same wild card ssl certificate for registering STS providers for different sharepoint web apps?
We are getting Microsoft.SharePoint Exception Message: The trusted provider certificate already exists when we try to register second STS for second web app using same wild card certificate
This is great information, thank you very much!
Can you share any additional information related to SSL Offloading to F5 or other Load Balancers. Is this a MS recommended approach for SP2013 & what are the complications, if any? Are there any cost reductions as far as # of certificates or any other saves? Any additional information will be highly appreciated.
1. SSL Offloading simply reduces the Web Server’s load of Encrypting/Decrypting Traffic. My pick is: F5 Big IP!
2. If you are looking for cost reductions – Go for Wildcard certificates! For intranet sites, Have your own Certificate Authority in your domain.
its awesome,
Thanks Sir
the /T is giving an error: /T is not recognized as an internal or external command, operable program or batch file. I am in the directory you stated. I can run selfssl.exe and the program asks if I want to replace the ssl settings for site 1 (y/n) why isn’t the /T recognized?
An Comprehensive of SSL certificate installation with step by step process. Being Platinum Certificate Authority that We would like to recommend your blog to SSL Installation Education from our end. If you wish you can reply us with this comment, so we will publish your blog soon on SSL education. We are sure that your post will help users to their installation process.
Sure EV SSL! As long as you give credit and link to my post, I’m pretty OK!
Regards,
Salaudeen Rajack
Can u please give us how to configure authentication based on client certificates ???
This may help you: https://blogs.msdn.com/b/zwsong/archive/2010/02/16/how-to-configure-client-certificate-for-sharepoint-authentication.aspx
I Love the step by step approach and the detailed screenshots. Great job!
Excellent Post!
Clear, complete. The best I have found so far.
Thanks for spending the time and sharing.
Greg