Change Distributed Cache Service Account in SharePoint with PowerShell
Distributed Cache service caches data for fast retrieval across several features in SharePoint Server 2013, such as Newsfeeds, Authentication, Security Trimming, OneNote client access, Page load performance, etc.
When SharePoint 2013 is installed, AppFabric service is installed as part of the SharePoint prerequisites and configured to run under the credentials of the Farm account, Which is not ideal and triggers an alert in SharePoint 2013 Health Analyzer.
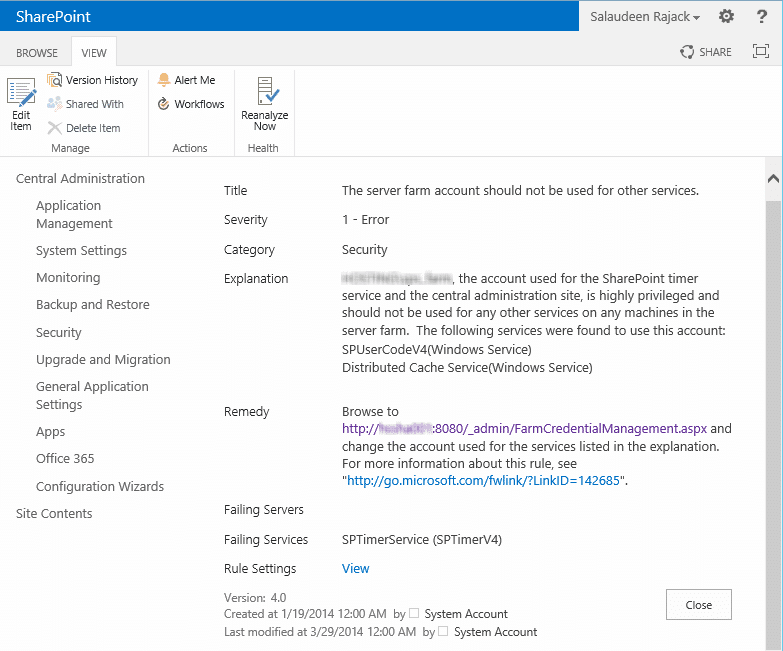
“The server farm account should not be used for other services.”
Domain\Account the account used for the SharePoint timer service and the central administration site is highly privileged and should not be used for any other services on any machines in the server farm. The following services were found to use this account: Distributed Cache Service(Windows Service).
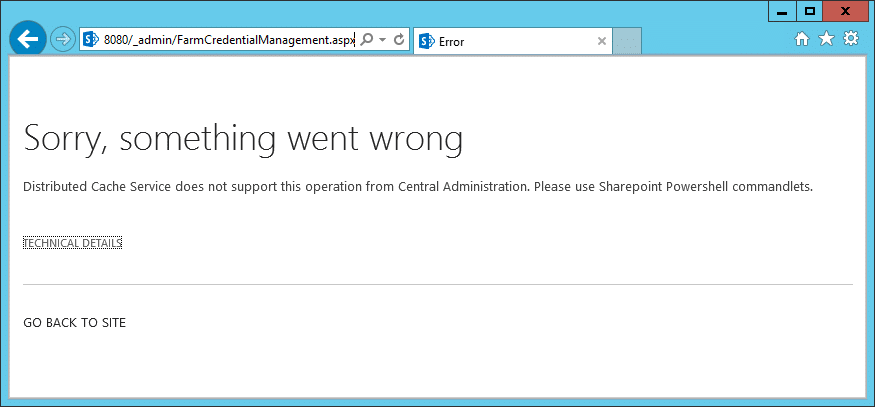
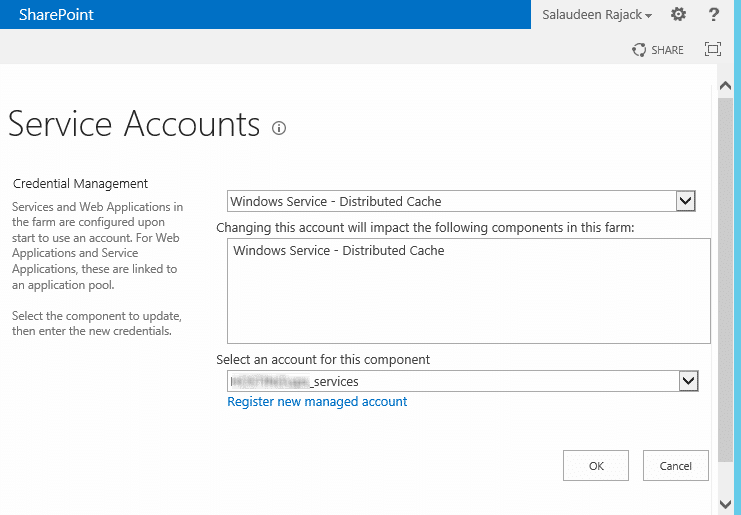
It also gives the remedy to change the service account. So as per the advice, if you try to navigate to the page (or via Central Admin >> Security >> General Security >> Configure Service Accounts) and try to change the service account for “Distributed Cache Service”, you will experience an error:
Sorry, something went wrong
Distributed Cache Service does not support this operation from Central Administration. Please use Sharepoint Powershell commandlets.
Set SharePoint 2013 distributed cache service account
So, You cannot change SharePoint Server 2013 Distributed Cache service account using the Central Admin site. We got to use PowerShell to change Distributed Cache Service Account in SharePoint 2013. Log in to a farm server using your administrator account, register a managed account and run these PowerShell cmdlets.
PowerShell script to Change Distributed Cache Service Account in SharePoint 2013:
Add-PSSnapin Microsoft.SharePoint.PowerShell -ErrorAction SilentlyContinue

#Get the Farm
$Farm=Get-SPFarm

#Get Distributed Cache Service
$CacheService = $Farm.Services | where {$_.Name -eq "AppFabricCachingService"}

#Get the Managed account
$ManagedAccount = Get-SPManagedAccount -Identity "Crescent\SPS_Services"

#Set Service Account for Distributed Cache Service
$cacheService.ProcessIdentity.CurrentIdentityType = "SpecificUser"
$cacheService.ProcessIdentity.ManagedAccount = $ManagedAccount
$cacheService.ProcessIdentity.Update()
$cacheService.ProcessIdentity.Deploy()

Write-host "Service Account successfully changed for Distributed Service!"
Verify the change:
Once completed with the script execution, verify the change by navigating to: Central Administration > Security > Configure Service accounts > Select Windows Service – Distributed Cache. Make sure the new service account is displayed.
If the change is not reflected, you may have to stop, remove and re-add distributed cache instance:
Stop-SPDistributedCacheServiceInstance
Remove-SPDistributedCacheServiceInstance
Add-SPDistributedCacheServiceInstance
Microsoft’s Technet Article on changing distributed cache service account: https://technet.microsoft.com/en-us/library/jj219613.aspx#changesvcacct
Thanks a lot 🙂
Thanks much.. it helped
Amazing! thanks Salaudeen