How to Move Files in SharePoint: Quick Guide
Requirement: SharePoint Online PowerShell to Move files from one library to another.
Moving Files in SharePoint Online
Are you looking for a way to move files between SharePoint Online sites? Maybe you need to move a file out of a document library and into your Files area, or perhaps you need to move a large number of files all at once. As your organization grows and evolves, you may find the need to reorganize your files and move them from one location to another within SharePoint. In this comprehensive guide, we’ll walk you through the various methods of moving files in SharePoint, including, how to move documents from one document library to another, how to move files between sites, and how to use PowerShell to automate the process.
Here is how to move files between document libraries in SharePoint Online as an end user:
- Log in to your SharePoint Online site in the web browser >> Navigate to the SharePoint library.
- Select Files and Folders you want to move by ticking the checkboxes next to them >> Click on “Move To” in the command bar. (You can also Right-click on a document or click on the ellipsis icon and choose “Move To” as an alternate method.)
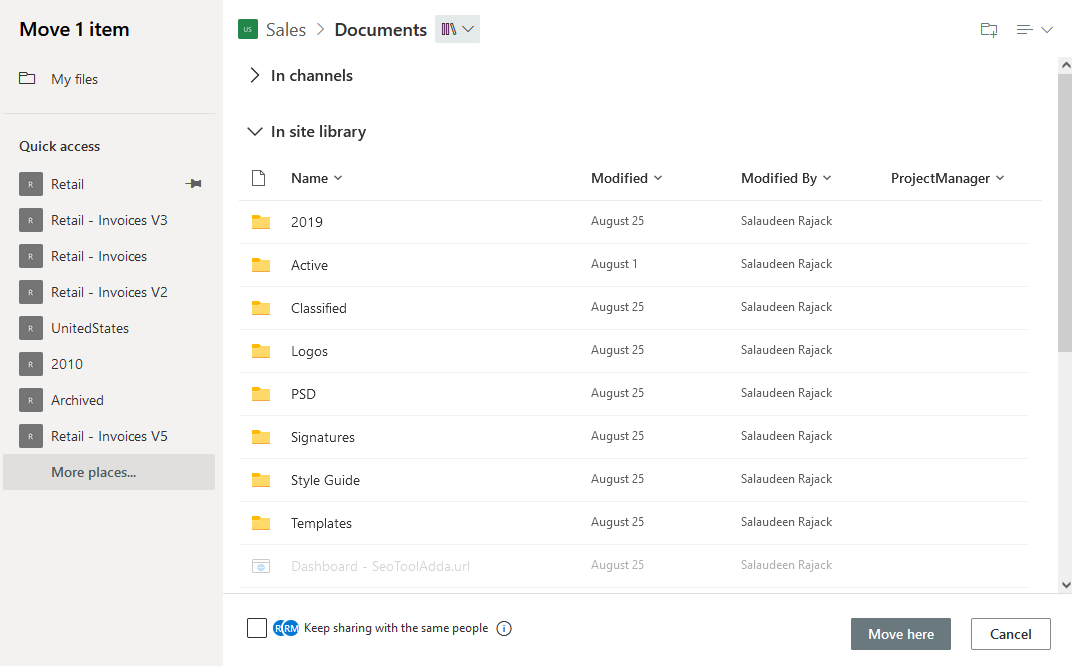
- This opens the information panel on the right. Select the destination library to which your file needs to be moved. You can select the new location as any folder in the current library, any other library on the current site, or even a library in different site collections.

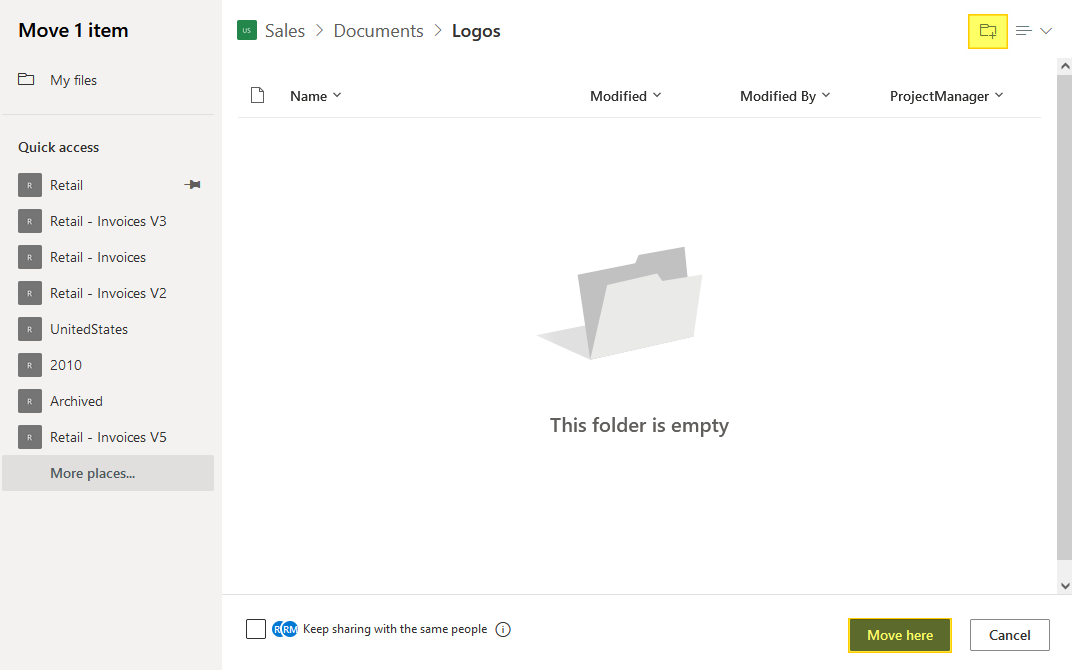
- Pick the target location to move the document and click on the “Move Here” button to start moving the file. You can also create a new folder in the destination by clicking the folder icon in the top right corner.
You’ll see the “Moving” message in the toolbar and the confirmation, and your file will be moved momentarily from the source site to the new destination site. This method can transfer files between SharePoint document libraries or move files between site collections, including your own OneDrive. By using the “Move to” command, you can ensure that all associated metadata stays with the document and that the version history is maintained.
If you don’t see a site listed under the destination, the custom script may not be enabled on the destination site. It’s a prerequisite for cross-site copying! So, please enable it in your tenant using SharePoint Admin credentials. Similar steps apply to copy files in SharePoint.
It is worth mentioning that this feature is not available in the classic experience of SharePoint. Although you can move files with “Explorer View / File Explorer” in Windows Explorer, you will miss version history (only the latest version will be copied), custom metadata, etc.
How do I move with drag and drop files in SharePoint?
Do you know you can move files and entire folders just by drag and drop? You can move multiple files by selecting them, dragging them, and dropping them into the destination folder on the same level or to a different level in the breadcrumb!
Here’s a step-by-step guide on how to do it:
- Open your SharePoint site and navigate to the document library where the file is located.
- Locate the file you want to move and click on it to select it.
- Hold down the mouse button and drag the file to the desired location within the library or to a different library altogether.
- As you drag the file, you will see a green plus sign, indicating that you are moving the file.
- Release the mouse button to drop the file into its new location.
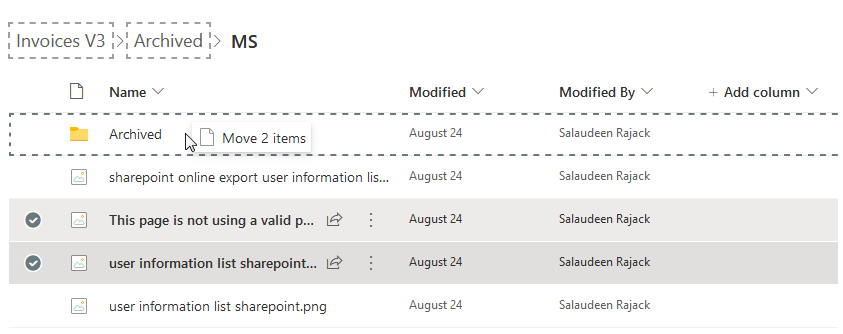
This drag-and-drop method is not only quick and convenient but also allows you to move multiple files at once. Just select multiple files before dragging them to the new location. This feature makes it a highly efficient way to transfer documents within SharePoint.
You can also use the OneDrive Sync to move files and Folders in SharePoint. Alright, let’s see how to use PowerShell to move files quickly!
Move SharePoint Online Files with PowerShell
Here is the SharePoint Online PowerShell to move documents between SharePoint sites:
#Load SharePoint CSOM Assemblies
Add-Type -Path "C:\Program Files\Common Files\Microsoft Shared\Web Server Extensions\16\ISAPI\Microsoft.SharePoint.Client.dll"
Add-Type -Path "C:\Program Files\Common Files\Microsoft Shared\Web Server Extensions\16\ISAPI\Microsoft.SharePoint.Client.Runtime.dll"

#powershell script to move files in sharepoint online - Function
Function Move-SPOFile([String]$SiteURL, [String]$SourceFileURL, [String]$TargetFileURL)
{
    Try{
        #Setup the context
        $Ctx = New-Object Microsoft.SharePoint.Client.ClientContext($SiteURL)
        $Ctx.Credentials = New-Object Microsoft.SharePoint.Client.SharePointOnlineCredentials($Cred.Username, $Cred.Password)

        #sharepoint online powershell to move files
        $MoveCopyOpt = New-Object Microsoft.SharePoint.Client.MoveCopyOptions
        $Overwrite = $True
        [Microsoft.SharePoint.Client.MoveCopyUtil]::MoveFile($Ctx, $SourceFileURL, $TargetFileURL, $Overwrite, $MoveCopyOpt)
        $Ctx.ExecuteQuery()

        Write-host -f Green "File Moved Successfully!"
    }
    Catch {
    write-host -f Red "Error Moving the File!" $_.Exception.Message
    }
}

#Set Config Parameters
$SiteURL="https://Crescent.sharepoint.com/sites/Marketing"
$SourceFileURL="https://Crescent.sharepoint.com/sites/Marketing/Shared Documents/Discloser Asia.doc"
$TargetFileURL="https://Crescent.sharepoint.com/Shared Documents/Discloser Asia.doc"

#Get Credentials to connect
$Cred= Get-Credential

#Call the function to Move the File
Move-SPOFile $SiteURL $SourceFileURL $TargetFileURL
This PowerShell can transfer files to another library or between site collections.
PowerShell to Move Files Between Document Libraries of the Same Site
You can use this PowerShell in SharePoint Online to move files to another library on a site.
#Load SharePoint CSOM Assemblies
Add-Type -Path "C:\Program Files\Common Files\Microsoft Shared\Web Server Extensions\16\ISAPI\Microsoft.SharePoint.Client.dll"
Add-Type -Path "C:\Program Files\Common Files\Microsoft Shared\Web Server Extensions\16\ISAPI\Microsoft.SharePoint.Client.Runtime.dll"

$SiteURL="https://crescent.sharepoint.com"
$FileURL="/Project Documents/Active Users.xlsx" #Server Relative Path to the source File
$DestFileURL="https://crescent.sharepoint.com/Project Docs/Active.xlsx"

#Setup Credentials to connect
$Cred= Get-Credential
$Credentials = New-Object Microsoft.SharePoint.Client.SharePointOnlineCredentials($Cred.Username, $Cred.Password)

#Setup the context
$Ctx = New-Object Microsoft.SharePoint.Client.ClientContext($SiteURL)
$Ctx.Credentials = $Credentials

#Get the File
$File = $Ctx.Web.GetFileByServerRelativeUrl($FileURL)

#sharepoint online powershell move documents
$File.MoveTo($DestFileURL, [Microsoft.SharePoint.Client.MoveOperations]::Overwrite)
$Ctx.ExecuteQuery()
PnP PowerShell to Move a File in SharePoint Online
By using the Move-PnPFile command, You can automate the process of moving files between libraries, sites, and even site collections. In the below PowerShell example, It moves the file “Recipient KSA.pdf” from “Shared Documents” to the same library’s subfolder “Active”.
#Config Variables
$SiteURL = "https://Crescent.sharepoint.com/sites/marketing"
$SourceURL= "Shared Documents/Recipient KSA.pdf"
$TargetURL = "Shared Documents/Active/Recipient KSA.pdf"

#Connect to PnP Online
Connect-PnPOnline -Url $SiteURL -Credentials (Get-Credential)

#move files in sharepoint online using powershell
Move-PnPFile -SiteRelativeUrl $SourceURL -TargetUrl $TargetURL -Force
Similarly, you can move a file to another library or between site collections. Please note that if the file name specified in the Target URL already exists, it won’t perform the move. Use -OverwriteIfAlreadyExists to overwrite! The “AllowSchemaMismatch” switch ensures the target library can have a different set of metadata columns.
#Config Variables
$SiteURL = "https://Crescent.sharepoint.com/sites/marketing"
$SourceFileURL= "Branding/Technical Design.docx" #Site Relative URL from the current site
$TargetFileURL = "/sites/Purchase/Shared Documents" #Server Relative URL of the Target Folder

#Connect to PnP Online
Connect-PnPOnline -Url $SiteURL -Interactive

#move file between sites in sharepoint online using powershell
Move-PnPFile -SiteRelativeUrl $SourceFileURL -TargetUrl $TargetFileURL -Force -AllowSchemaMismatch
As a side note, You need the necessary permissions to move files in SharePoint Online. Moreover, moving a file can break links to that file if it was previously shared or linked in other places.
Best Practices for Moving Files in SharePoint
When moving files in SharePoint, keep these best practices in mind:
- Plan your document structure carefully to minimize the need for frequent file moves.
- Communicate with your team members before moving files to ensure everyone is aware of the changes.
- Use meaningful and descriptive file names to make it easier to locate and manage files.
- Consider using metadata and columns to categorize and filter files, making it easier to find and move them when necessary.
- Be cautious when moving files between sites or site collections, as it may impact file permissions and sharing settings.
Conclusion
Moving files in SharePoint is an essential skill for effective document management and collaboration. Whether you need to move documents from one library to another, relocate files between sites, or automate the process using PowerShell, this guide has provided you with the knowledge and tools to get the job done.
By following the step-by-step instructions and best practices outlined in this article, you’ll be able to manage and organize your files in SharePoint confidently. As you continue to work with SharePoint, remember to keep your document structure clean and intuitive, making it easier for your team to find and collaborate on files. Don’t forget to keep your links updated, communicate the changes to your team, and check permissions.
If you want to move all files between folders, use: SharePoint Online: Move All Files from One Folder to Another using PowerShell
The main methods to move files in SharePoint include using the ‘Move to’ option in the SharePoint web user interface, utilizing the drag-and-drop functionality in the browser, employing OneDrive Sync, and using PowerShell scripting for advanced management.
To move files using the ‘Move to’ option, select the desired files or folders in a SharePoint document library, click on the ‘Move to’ option in the command bar, choose the new location in SharePoint, and click ‘Move here’.
Yes, you can move files between different SharePoint sites using methods like the ‘Move to’ command, ensuring that metadata and version history are preserved during the transfer.
Yes, you can move multiple files at once in SharePoint by selecting them all and following the same process, ensuring that permissions are maintained and files are successfully transferred before deleting them from their original location.
To move a file from one document library to another within the same SharePoint site, select the file, click on the “Move to” button in the toolbar, choose the destination library, and click “Move here”.
Yes, to move a file to a different folder within the same library, select the file, click “Move to”, navigate to the desired folder within the current library, and click “Move here”.
To move files between SharePoint Online and OneDrive, you can use the “Copy to” or “Move to” options in the OneDrive web interface. Alternatively, you can use the OneDrive sync client to sync the files locally and then move them to the desired location.
SharePoint Online has a maximum file size limit of 15 GB. If you need to move larger files, consider using a third-party tool or splitting the file into smaller parts.
Yes, when you move documents within SharePoint, their version history is preserved. This ensures that you maintain a complete record of document revisions, even after the move.
To move files between SharePoint document libraries using PowerShell, you can use the Move-PnPFile command. This requires connecting to your SharePoint site with Connect-PnPOnline and then using the Move-PnPFile command with the source and target URLs of the files.
Hi,
Can we move file from SharePoint to OneDrive like this :
Move-PnPFile -SourceUrl “Shared Documents/General/Test/Document.xlsx” -TargetUrl “personal/personal_user/Documents” -Connection $OneDriveConneciton -Force
I use OneDrive connection or site connection and i have “Move-PnPFile: Access denied.” all time.
Best regard
As of today, only this approach works: downloading the file, uploading to the target site (and deleting the source, if it’s move). More here: How to Copy Files from OneDrive to SharePoint Online?
Do you know are the limitations the same for PowerShell scripts?
Does this script move file with versions too?
Yes! Move operation moves the file along with its versions. (But copy doesn’t!)
Hi Saludeen!
Thank you for so many useful tricks!! A couple of questions:
1. The .MoveCopyUtil]::MoveFile creates the file in the destination as “new” (newly Created and LastModified fields) … is there a way to preserve this information?
2. The Move-PnPFile cmdlet is not moving files across sites as per today (it errs out) do you know anything about it?
Hi There,
1. You can update the metadata after the move in CSOM, But confirmed the PnP PowerShell method preserves the metadata.
2. Confirmed the PnP PowerShell to move a file between – just works fine as in the given script.
What if you want to move more than one document? You have to explicitly call out each file?
Call the “Move-SPOFile” function twice as in the First script with different parameters!