How to Connect to Microsoft Graph API with Connect-MgGraph from PowerShell?
Introduction
Microsoft Graph API is a RESTful web API that consolidates access to various Microsoft 365 services, allowing developers to create applications that interact with data across multiple platforms, including Azure Active Directory, SharePoint, OneDrive, Outlook, and more. Microsoft Graph PowerShell works on all platforms, including Windows, macOS, and Linux. Supports modern authentication. PowerShell, a widely used scripting language and automation tool, can be used to connect to and interact with Graph API, making it an essential skill for IT professionals. In this beginner’s guide, we’ll provide a comprehensive overview of the Graph API, discuss the prerequisites for connecting to it, installation and configuration, authentication, and a step-by-step guide to connect to the Graph API using PowerShell, providing examples and explanations.
Table of contents
Installing the Microsoft.Graph PowerShell Module
To get started, you’ll need to install the Microsoft Graph PowerShell module. This module provides a set of cmdlets that allow you to interact with the Graph API. Run the following command in an elevated PowerShell session:
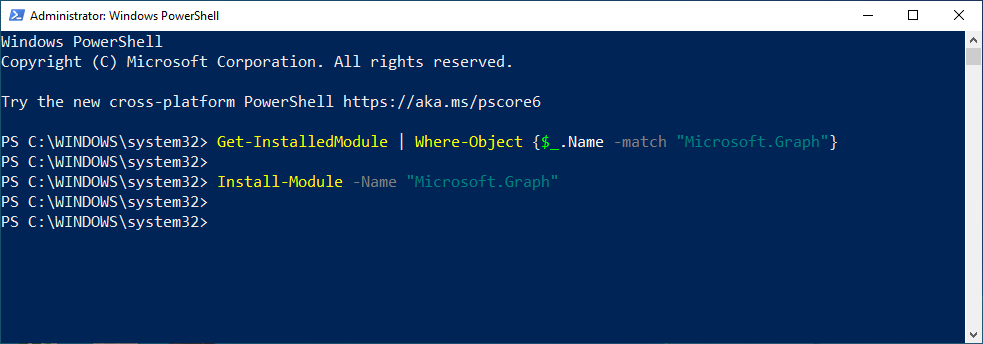
Check if the Microsoft Graph PowerShell module is installed already, using this PowerShell command:
Get-InstalledModule | Where-Object {$_.Name -match "Microsoft.Graph"}
Install the Microsoft Graph PowerShell module:
Install-Module -Name "Microsoft.Graph"
To install the Microsoft graph PowerShell SDK for the current user scope:
Install-Module Microsoft.Graph -Scope CurrentUser

This installs the Microsoft Graph and submodules (38 as of today). Wait for the installation to complete.
Update Microsoft Graph PowerShell Module
To update the existing module, use the following:
Update-Module Microsoft.Graph
Uninstall the Microsoft Graph PowerShell Module
Microsoft Graph has a main module and multiple submodules. To uninstall the Graph module, we have to uninstall the main module first:
Uninstall-Module Microsoft.Graph
Then, uninstall all sub-modules of Microsoft Graph. The Authentication module must be uninstalled at the last, as other modules depend on it.
#Uninstall all Sub-modules of Graph
Get-InstalledModule Microsoft.Graph.* | ForEach-Object { if($_.Name -ne "Microsoft.Graph.Authentication") {
    Uninstall-Module $_.Name }
}

#Uninstall the dependant module
Uninstall-Module Microsoft.Graph.Authentication
How to use PowerShell to Call Graph API?
With the Microsoft.Graph module installed, you can start using the Graph API to perform various tasks. It supports delegated access, where users can log in and consent, and app-only access for unattended scenarios. Use the Connect-MgGraph command to sign in with the required scopes. Once connected, you can call any available Graph API methods.
Method 1: Connect to Graph API with Delegated Access from PowerShell
You’ll be using delegated access to sign in as a user, grant consent to the required scopes to the SDK to act on your behalf and call the Microsoft Graph. Here is an example of fetching User Information using PowerShell:
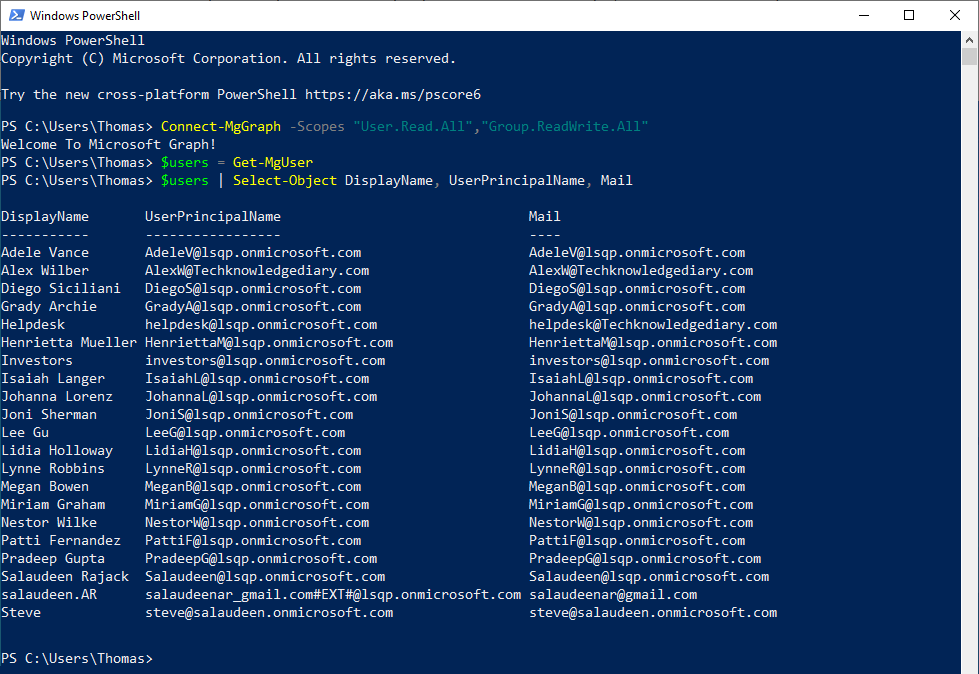
#Connect to Microsoft Graph
Connect-MgGraph -Scopes "User.Read.All"

#Get All users
$users = Get-MgUser
$users | Select-Object DisplayName, UserPrincipalName, Mail
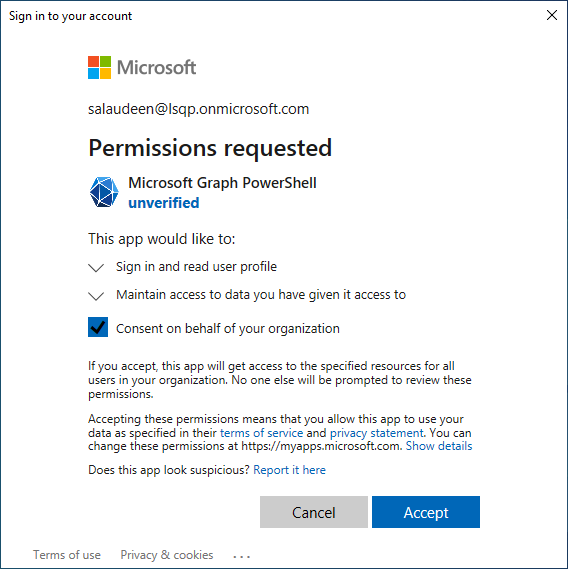
This will prompt for authentication, and you’ll need to sign in with an admin account to consent to the required scopes.
Once connected, the command indicates success with a Welcome To Microsoft Graph! message. And the Get-MgUser command outputs a listing of users in your Microsoft 365 organization.
If you want to connect to the Beta version of Graph API, use Select-MgProfile -Name "beta" cmdlet. Here is another example of getting the user’s last login date and time stamps:
#Connect to Microsoft Graph
Connect-MgGraph -Scopes "AuditLog.Read.All", "User.Read.All"

#Set the Graph Profile
Select-MgProfile -Name "beta"

#Properties to Retrieve
$Properties = @(
    'Id','DisplayName','UserPrincipalName','UserType', 'AccountEnabled', 'SignInActivity'
)

#Get All users along with the properties
$AllUsers = Get-MgUser -All -Property $Properties

$SigninLogs = @()
ForEach ($User in $AllUsers)
{
    $SigninLogs += [PSCustomObject][ordered]@{
            LoginName       = $User.UserPrincipalName
            DisplayName     = $User.DisplayName
            UserType        = $User.UserType
            AccountEnabled  = $User.AccountEnabled
            LastSignIn      = $User.SignInActivity.LastSignInDateTime
    }
}

$SigninLogs

#Disconnect MS Graph
Disconnect-MgGraph
Similarly, to connect to a SharePoint Online site with Microsoft Graph API, use this PowerShell:
#Parameters
$SiteID = "0defaa16-1fc5-4a55-bbec-a06d10de2a42"

#Connect to Microsoft Graph
Connect-MgGraph -Scopes "Sites.FullControl.All"

#Get a SharePoint Site collection
$Site = Get-MGSite -SiteId $SiteId

#Get All document libraries from the site
Get-MgSiteDrive -SiteId $SiteId
Examples of using the Microsoft Graph API with PowerShell
To give you an idea of what is possible with the Microsoft Graph API and PowerShell. You can perform bulk operations too. Here are a few examples:
- To get the context, use:
Get-MgContext - Retrieving a list of all users in Office 365:
Get-MgUser - Creating a new SharePoint site:
New-MgSite - Retrieving a list of all OneDrive files for a specific user:
Get-MgDriveItem -DriveId <drive ID> -DriveItemId <Drive item ID>
As you can see, the possibilities are endless with the Microsoft Graph API and PowerShell.
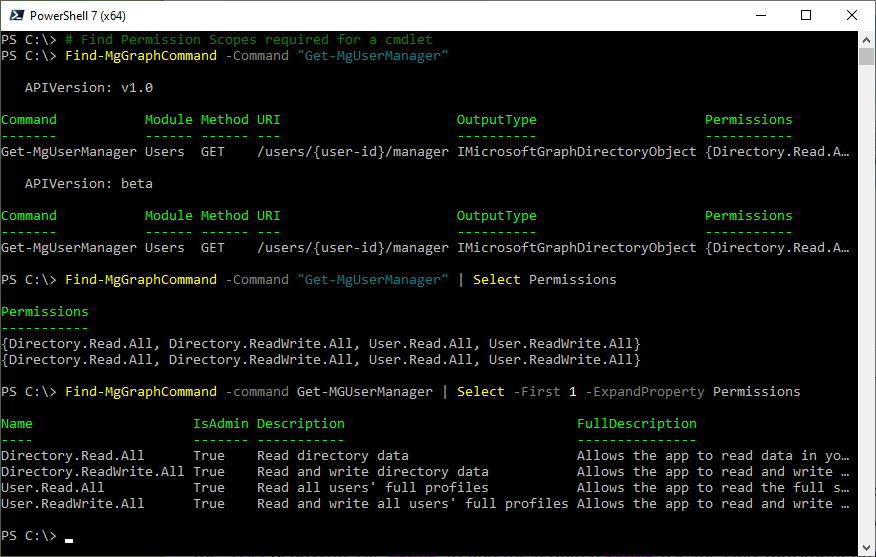
Find the Required permission scope for Graph Commands
The logged-in user or client ID connecting to Microsoft Graph must be permitted to access a specific scope. E.g., If you want to update a user profile using the Update-MgUser command, you can do it with the “User.ReadWrite.All” scope. To find the required scope, use the Find-MgGraphCommand cmdlet. E.g.,
Find-MgGraphCommand -command Update-MgUser | Select -First 1 -ExpandProperty Permissions
To get all available cmdlets in the Microsoft Graph PowerShell module, you can use the following:
Get-command -Module Microsoft.Graph*
There are, 9275 cmdlets available in the Microsoft Graph 1.25 version!
Method 2: Connecting to Graph API using App ID from PowerShell
Before we start, there are a few prerequisites that you need to fulfill:
- You need to register an application in Azure AD.
- You need to grant permission to the application to access the Graph API.
- Add a certificate or client secret to the App ID. The certificate can be self-signed or from an authority.
Register an Application in Azure AD
Before connecting to the Graph API with PowerShell, you must register an app in Azure AD to obtain the necessary permissions and credentials.
To register an application in Azure AD, follow these steps:
- Log in to the Azure AD Portal (https://aad.portal.azure.com/).
- Click on “Azure Active Directory” from the left-hand menu >> Click on “App registrations” >> Click on “New registration”.

- Enter a name for your application and select “Accounts in this organizational directory only” as the supported account type.

- Click on “Register”.


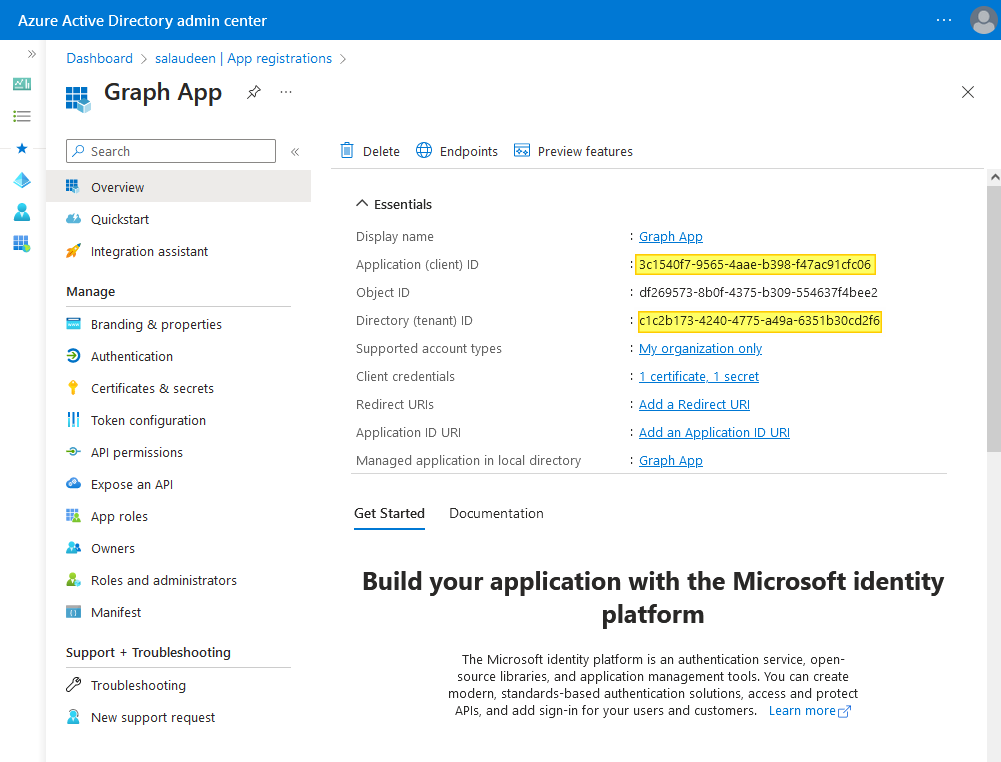
After registering the application, you will be redirected to the application’s dashboard. Take note of the “Application (client) ID” and the “Directory (tenant) ID”, as we will need them later.
Grant Permissions to the Application
To access the Graph API, your app must have the appropriate permissions. To grant permissions to the application, follow these steps:
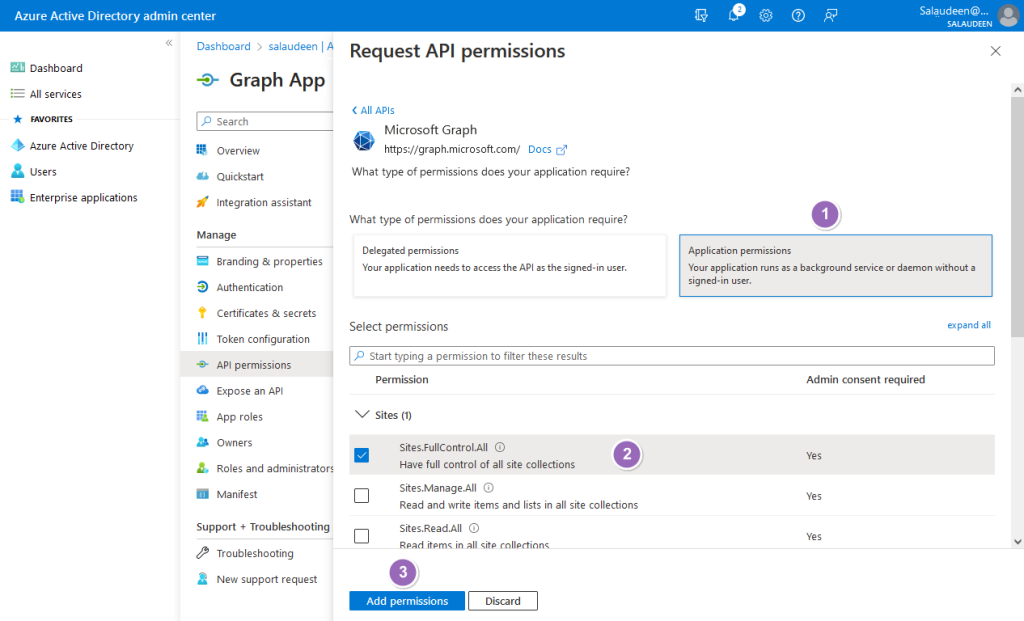
- Click on “API permissions” from the left-hand menu of the App you created >> Click on “Add a permission”.

- Select “Microsoft Graph” as the API.

- Search and select the required permissions (e.g., “Sites.FullControl.All” for gaining full control on all SharePoint Online sites).

- Click on “Add permissions”.
- Grant your consent to the added permissions by clicking on “Grant admin consent for <Your-Domain”. This step must be performed by Azure AD Global Administrator.


For a full breakdown of all the available permissions you can specify when connecting to Microsoft Graph, check out the permissions reference sheet from Microsoft: https://learn.microsoft.com/en-us/graph/permissions-reference
Add Certificate and/or Client Secret to the AppID
You have to add a client secret (Password) or a certificate (or both!) to the App to securely connect to the App. To add a certificate to the app, we need either a self-signed certificate or a standard SSL certificate from an authority.
Add Certificate to the App
Use this PowerShell script to generate a self-signed certificate in your “Documents” folder. This will be used for certificate based authentication.
#Parameters
$CertificateName = "Graph API Cert"
$CertificatePassword = "Password1"

#Get the "Documents" folder
$DocumentsFolder = [Environment]::GetFolderPath("MyDocuments")

#Generate a Self-signed Certificate
$Certificate = New-SelfSignedCertificate -Subject $CertificateName -CertStoreLocation "Cert:\CurrentUser\My" -KeyExportPolicy Exportable -KeySpec Signature -KeyLength 2048 -KeyAlgorithm RSA -HashAlgorithm SHA256

#Export the Certificate to "Documents" Folder in your computer
Export-Certificate -Cert $Certificate -FilePath $DocumentsFolder\$CertificateName.cer

#Export the PFX File
Export-PfxCertificate -Cert $Certificate -FilePath "$DocumentsFolder\$CertificateName.pfx" -Password (ConvertTo-SecureString -String $CertificatePassword -Force -AsPlainText)
This certificate must be installed in the “Trusted store” on the machine where you’ll run the script.
Upload the Certificate to the App
Once the certificate is ready, follow these steps to add a certificate to your app:
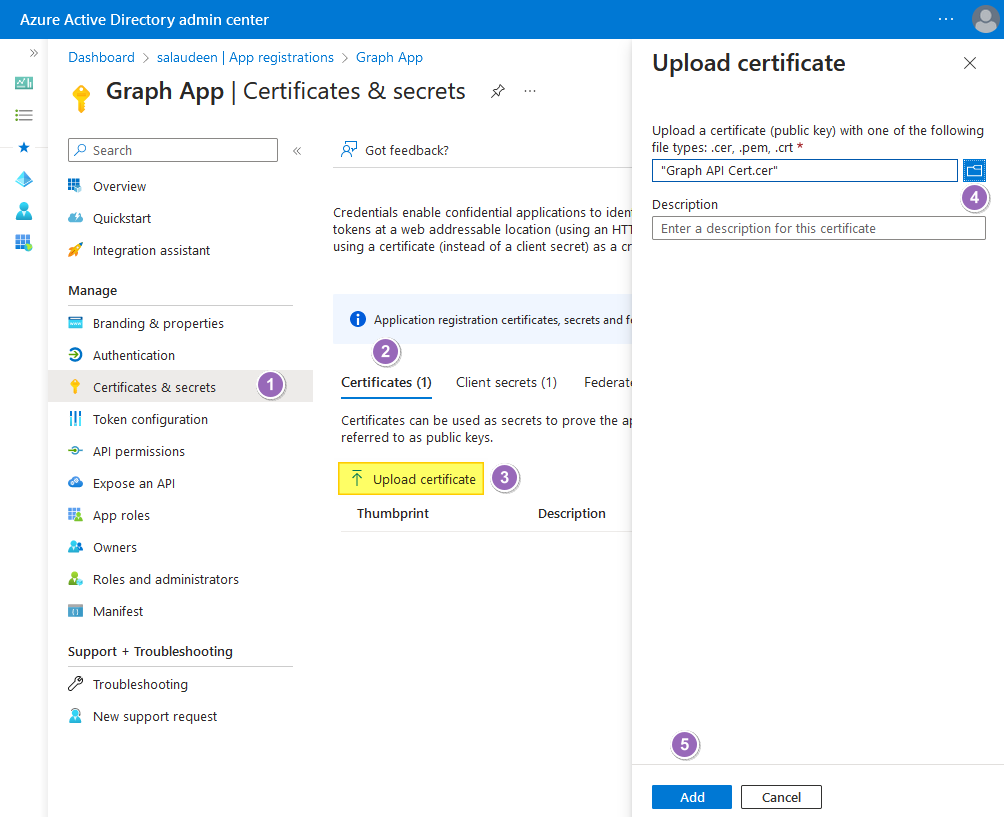
- Go to your Azure app >> Click on “Certificates & Secrets” >> Click on the “Certificates” tab.
- Click on “Upload certificate”.
- Browse to the CER file generated and click on the “Add” button.

- Make a note of the “Thumbprint”. That’s your secure key associated with the certificate to authenticate to the application.
Add Client Secret to the App
Similarly, to add a client secret to the app, do the following:
- Click on “Certificates & secrets” >> Click on the “Client Secrets” tab and then on “New client secret”.
- Set the “Description” and the “Expires” validity. When finished, click Add.

- Make a note of the client secret, which we’ll be using to connect to the Graph API.


Connect to Graph API with App ID from PowerShell using the Certificate
Now that we have registered an application and granted permissions, and added client secret and certificate to it. We are ready to connect to the Graph API from PowerShell. Here is how to connect to Microsoft Graph API using the certificate thumbprint:
#Parameters for Tenant ID and Client ID
$TenantID = "c1c2b173-4240-4775-a49a-6351b30cd2f6"
$ClientID = "3c1540f7-9565-4aae-b398-f47ac91cfc06" #App ID
$CertThumbPrint = "63FDD807AE01C1EB34CE5647D164E3C153C0FA7"

#Connect to Microsoft Graph using App
Connect-MgGraph -ClientID $ClientID -TenantId $TenantID -CertificateThumbprint $CertThumbPrint
Connect to Graph API using Client Secret
If you want to use the client secret, Here is the PowerShell script for you!
#App Registration details
$TenantID = "c1c2b173-4240-4775-a49a-6351b30cd2f6"
$ClientID = "3c1540f7-9565-4aae-b398-f47ac91cfc06"
$ClientSecret = "9Ad2Q~DA-yLotNvvaplkchnnf__6D5zdFJi1mb4l"

$Body =  @{
    Grant_Type    = "client_credentials"
    Scope         = "https://graph.microsoft.com/.default"
    Client_Id     = $ClientID
    Client_Secret = $ClientSecret
}

$Connection = Invoke-RestMethod `
    -Uri https://login.microsoftonline.com/$TenantID/oauth2/v2.0/token `
    -Method POST `
    -Body $body

#Get the Access Token
$Token = $Connection.access_token

#Connect to Microsoft Graph
Connect-MgGraph -AccessToken $Token
The Microsoft Graph cmdlets are wrappers of Rest API calls. You can also call the Invoke-Webrequests method to interact with any underlying REST API methods.
#App Registration details
$TenantID = "c1c2b173-4240-4775-a49a-6351b30cd2f6"
$ClientID = "3c1540f7-9565-4aae-b398-f47ac91cfc06"
$ClientSecret = "9dd8Q~DA-yLotavvabkchnnf__6c5VdFJi0mb1l"
$Domain = "Crescent"

$Body =  @{
    Grant_Type    = "client_credentials"
    Scope         = "https://graph.microsoft.com/.default"
    Client_Id     = $ClientID
    Client_Secret = $ClientSecret
}

$Connection = Invoke-RestMethod `
    -Uri https://login.microsoftonline.com/$TenantID/oauth2/v2.0/token `
    -Method POST `
    -Body $body

#Get the Access Token
$AuthHeader = @{
'Authorization'="Bearer $($Connection.access_token)"
}

#Get all sites
$URI = "https://graph.microsoft.com/v1.0/sites"
$WebRequest = Invoke-WebRequest -Headers $AuthHeader -Uri $URI
$Result = ($WebRequest.Content | ConvertFrom-Json).Value

#Get all site collections of the domain
$Result | Where {$_.siteCollection.Hostname -eq "$Domain.sharepoint.com"} | select name,webUrl,id
Graph Explorer
Finding the right API method for the task may be challenging for beginners. You can use Graph Explore or Rest API Reference as a starting point.

Common errors and troubleshooting tips
While using the Azure AD Graph API and Microsoft Graph API with PowerShell is generally straightforward, there are some common errors that you may encounter. One common error is “The remote server returned an error: (401) Unauthorized.” You may also get “Insufficient privileges to complete the operation”. This typically means that your credentials are incorrect or you do not have the appropriate permissions to access the Graph API. Double-check your credentials and permissions to ensure that they are correct.
Another common error is “The term ‘cmdlet name’ is not recognized as the name of a cmdlet.” This typically means that the appropriate PowerShell module is not installed or loaded. Make sure that you have installed and loaded the appropriate module for the cmdlet you are trying to use.
Conclusion
In this beginner’s guide, we covered the essentials of connecting to the Microsoft Graph API using PowerShell, from setting up your environment and authenticating to making API calls. We have also seen how to register an application in Azure AD, grant permissions, and add client secrets to the app. With the knowledge gained in this guide, you can begin automating tasks and managing your Microsoft 365 environment more efficiently.
The next steps for you could be to explore more of the cmdlets provided by the Microsoft Graph API PowerShell module, or to start building your own PowerShell scripts to automate common tasks. The possibilities are endless, so get started today!
The Microsoft Graph API is a unified RESTful API endpoint that enables developers to access and interact with data, intelligence, and services available in the Microsoft Cloud. It acts as a single point of entry to access a wide variety of resources, such as users, groups, emails, calendars, tasks, files, devices, and more, across multiple Microsoft services like Office 365, Azure Active Directory, Enterprise Mobility and Security, Windows, and more.
To install the Microsoft Graph PowerShell SDK, run the following command in your PowerShell session:Install-Module -Name Microsoft.Graph
This command installs Microsoft.Graph module provides cmdlets for interacting with the Microsoft Graph API in PowerShell.
It depends on the specific API endpoints and resources you want to access! In general, there are two types of permissions in Microsoft Graph:
1. Delegated permissions: To act on behalf of signed-in users.
2. Application permissions: These permissions are granted to applications that run without user interaction, such as background services.
You need to register an application in the Azure portal, assign permissions to the application, Grant admin consent, and then use the registered application’s credentials in your PowerShell script.
Because the AzureAD, MSOnline and AzureADPreview PowerShell modules are scheduled for deprecation. To be prepared, admins should get going with the new Microsoft Graph PowerShell SDK module.
Using code in your post `for connecting to Graph API using secret ID value method, how do i also include all site collection admins for each site?
Hi,
I’m struggling a bit right at the starting line:
Connect-MgGraph gives me this error:
Connect-MgGraph: InteractiveBrowserCredential authentication failed: Could not load type ‘Microsoft.Identity.Client.BaseAbstractApplicationBuilder`1’ from assembly ‘Microsoft.Identity.Client, Version=4.50.0.0, Culture=neutral, PublicKeyToken=0a613f4dd989e8ae’.
I have installed/imported the Microsoft.Identity.Client 4.50.0.0.
Can anyone point me in the direction to help resolve the error, please?
It looks like the Identity.Client is mising some assembly (?) but Im not skilled enough on this to troubleshoot/understand.
I have seen the same error (for same version) reported/discussed in a github issue, but that was resolved in an update. I have all the latest modules.
Any suggestions much appreciated, thank you.
Ish Rashad
use powershell core instead of windows powershell
Thank you for your always informative articles! I also have a question about the users of a SharePoint site. When I try to get all the guest users from a site (with Graph API), I get an authorization error, but my app does have “User.Read.All” permissions. What am I missing?
You can use either the Graph Explorer or the PowerShell command Find-MgGraphCommand to get the necessary permissions to run a Graph command in PowerShell!
Hi Salaudeen, Thanks for this blog. I have one question , How to we provide User consent permissions ? Is it from API permissions ?
Admin consent is for entire domain , but how do we grant delegated permissions to the users added into the user group (eg 2 users) ? especially AuditLog.Read.All / User.Read.All
Version 2 of MSGraph breaks the AccessToken, this solved it: Connect-MgGraph -AccessToken ($Token |ConvertTo-SecureString -AsPlainText -Force) -NoWelcome
Nice guide! Btw; [pscustomobject] is already ordered, so you don’t need [pscustomobject][ordered]
I followed Method 2 and I am able to connect to one of my tenants. However the get-mguser command gives me an error stating that I do not have sufficient privileges.
I searched internet for a couple of hours without any luck. Any Idea?
Ensure your ID has the “User.Read.All” rights consented!