SharePoint Online: How to Configure Information Rights Management (IRM) to Protect Documents?
Requirement: Configure IRM in SharePoint Online.
How to enable information rights management in SharePoint Online?
Information Rights Management (IRM) policies in SharePoint Online protect sensitive content from unauthorized users by preventing users from printing or saving copies of a file. Information Rights Management can be applied to Office documents such as Word, Excel, PowerPoint, PDF, and XPS files.
Step 1: Make sure Rights Management is Activated in the Microsoft 365 Admin Center
Unlike SharePoint On-premises, you don’t have to install anything to implement IRM, as Office 365 comes pre-installed. IRM settings are scoped at the list or library level. However, You must activate the Information Rights Management Service for the organization from the Office 365 admin center before IRM can be applied to the SharePoint library or list. To activate IRM in Office 365, follow these steps:
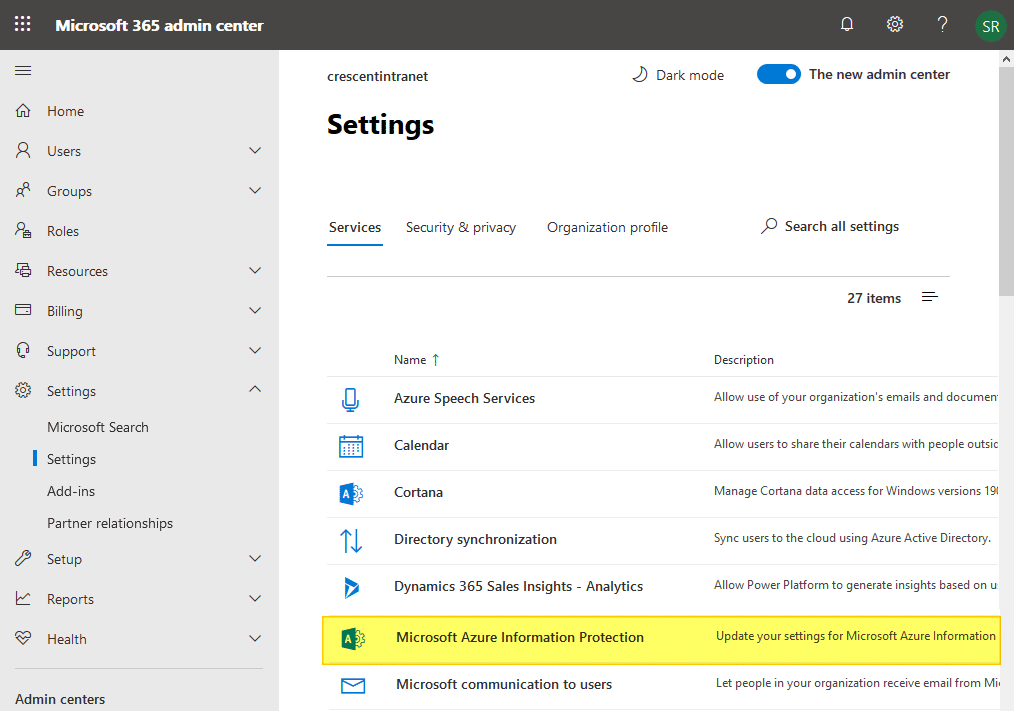
- Login to Microsoft Admin Center at https://admin.microsoft.com
- Expand Settings from left navigation >> Click on Settings >> Click on ”Microsoft Azure Information Protection”.

- Click “Manage Microsoft Azure Information Protection settings >> Make sure Rights management is activated.

Office 365 provides IRM service through Azure Active Directory Rights Management, included in E3 and E4 plans.
Step 2: Enable IRM in the SharePoint Online Admin Center
Once IRM is enabled at the Office 365 admin center, the next step is to activate IRM in SharePoint Online.
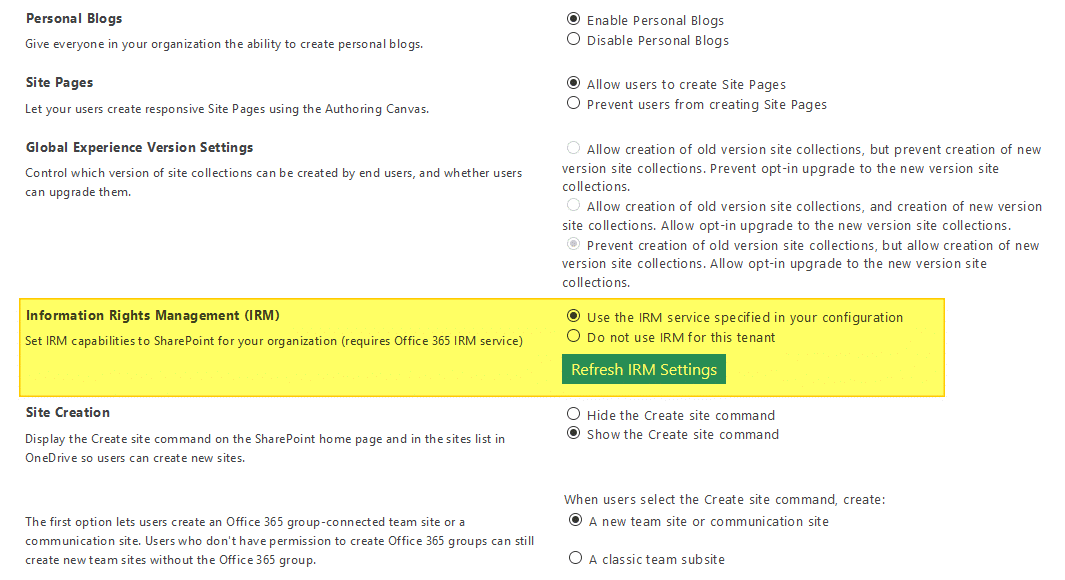
- Login to SharePoint Admin Center >> Click on Settings >> Click on the “Classic settings page” link.
- Scroll down and find “Information Rights Management (IRM)”, Set “Use the IRM service specified in your configuration,” and then click on the “Refresh IRM Settings” button.
- Click on the “OK” button at the bottom to commit your changes.
This will enable the IRM service to document libraries in the tenant. Wait for some time. It took me 30 min!
Step 3: Activate IRM on SharePoint Online List or Library
Once IRM settings are enabled at the tenant level, site owners can protect their documents with IRM. To apply IRM encryption to a document library, do the following:
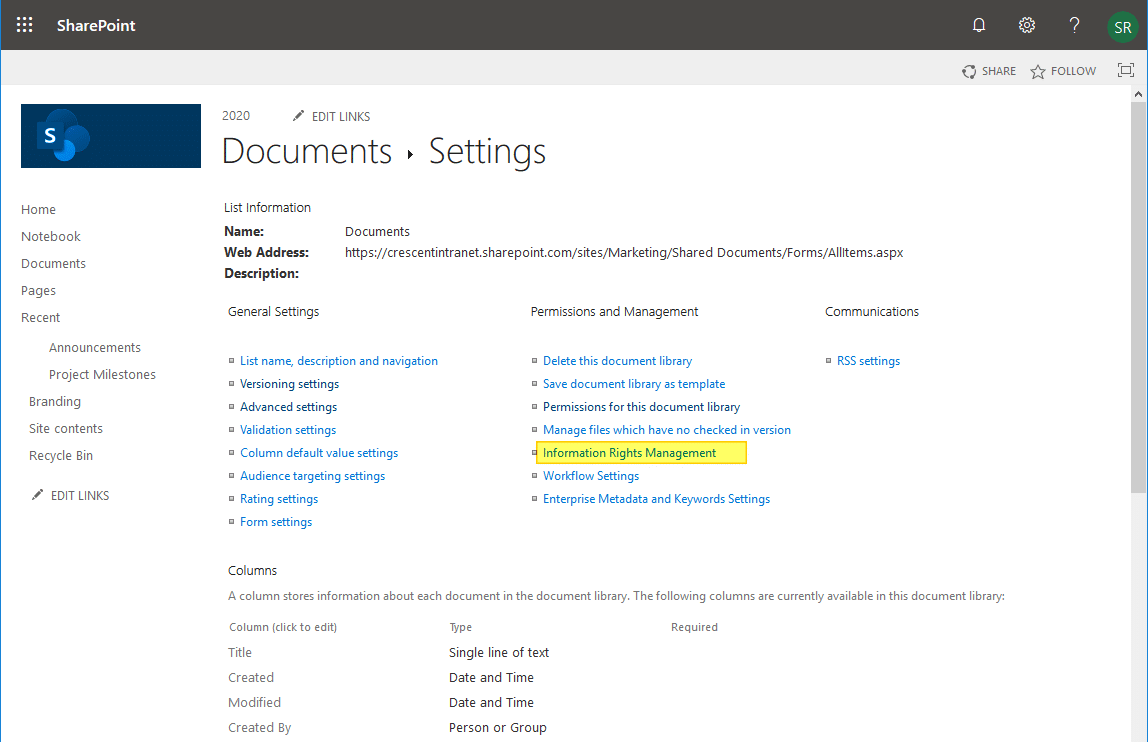
- Go to the list or library settings >> Click on the “Information Rights Management” link under the Permissions and Management section. If you don’t see this link – Information Rights Management (IRM) service may not have been enabled either in your Office 365 or in the SharePoint Online Tenant settings.
- On the Information Rights Management Settings page, select “Restrict permission” to documents in this library on the download checkbox for applying permission to documents. Enter a name for the policy in the Create a permission policy title input box, and provide a description in Add a permission policy description input box.

You can click on “Show Options” to expand IRM Library settings and select the restrictions that have to be applied for documents in the library, and click on the OK button.
Once the IRM is enabled for a list or library, any supported file in that library can be protected. Similarly, When you enable IRM for a list, rights management applies only to files attached to list items (But not to the list items!) IRM needs to be configured in every list and library you want to protect.
Every document you upload to SharePoint gets encrypted, and when you try to open any of those encrypted documents, it authorizes your credentials with Office 365 security servers. So, you can specify what each user should be able to do with this document to protect against any accidental leakage of your information. You’ll see a “Restricted Access” message when people download files in an IRM-enabled list or library.

Wrapping up
In summary, Configuring Information Rights Management (IRM) in SharePoint Online is an effective way to protect sensitive documents and ensure that they are only accessed by authorized users. By following the steps outlined in this guide, you should now be able to set up IRM for your SharePoint Online documents, including adding users and groups to the permissions list, creating a rights policy template, and applying the template to specific documents or libraries. IRM can help to prevent accidental or unauthorized sharing of sensitive information and give you greater control over your organization’s data. It’s important to note that, IRM is just one of the several security measures that an organization can use to protect their data, it should be used in combination with other security measures to provide a comprehensive security solution.