How to Run a PowerShell Script? A Comprehensive Guide!
As a system administrator, PowerShell is an essential tool that you need to have in your toolset. PowerShell is a powerful scripting language developed by Microsoft for task automation and configuration management. It provides a command-line shell and a scripting language that can be used to automate various administrative tasks on Windows systems, PowerShell comes pre-installed on all Windows machines, except for the older versions. This comprehensive, step-by-step guide on how to run a PowerShell script will walk you through the various methods of running PowerShell scripts. Whether you’re a beginner or an experienced user, this guide will cover everything you need to know to get started.
Table of contents
- Why use PowerShell scripts?
- Understanding the Execution Policy
- A step-by-step guide to running a PowerShell script
- Running Scripts as administrator
- Running PowerShell Scripts from the command prompt (CMD)
- Integrating PowerShell Scripts into Scheduled Tasks
- Running PowerShell script from a batch file
- Dot Sourcing: Run a Script from Another Script
- Running a PowerShell Script from the Windows File Explorer
- Create a Shortcut to Run PowerShell Script
- Executing PowerShell Scripts Remotely
- PowerShell modules for running scripts
- PowerShell Script Editor Tools
- Best practices for running PowerShell scripts
Why use PowerShell scripts?
PowerShell scripts can be used to automate repetitive tasks and save time for system administrators. With PowerShell, you can perform tasks such as creating user accounts, managing files and folders, and configuring network settings. PowerShell also provides a way to manage remote machines, which makes it an excellent tool for managing large-scale environments. PowerShell offers a powerful set of features that can be used for automating administrative tasks. One of the most significant benefits of using PowerShell is its ability to work with other Microsoft technologies such as Active Directory, Exchange Server, and SharePoint. In addition, the new PowerShell core offers cross-platform compatibility, like Linux or macOS operating systems.
PowerShell scripts can also be used to ensure consistency in the environment. By using scripts, you can ensure that all machines are configured in the same way, which can minimize errors and reduce downtime.
Understanding the Execution Policy

Before you can run any PowerShell scripts, it’s important to understand and configure the execution policy. The execution policy determines the level of security for running scripts on your system. By default, PowerShell has a restricted execution policy, which prevents the execution of any scripts.
Why running PowerShell scripts may be disabled on your system
Let’s understand why you might encounter the “Running scripts is disabled on this system” error message when you try to run scripts on your system. By default, PowerShell has a security feature called “Execution Policy” that controls the level of trust for running scripts. This policy is in place to protect your system from running potentially malicious scripts.
Enabling running PowerShell scripts on your system
To enable running PowerShell scripts on your system, you need to modify the Execution Policy. There are different levels of Execution Policy that you can choose from, depending on your security requirements. Use the “Get-ExecutionPolicy” cmdlet to check the current execution policy on the device, such as Windows Server or PC. Here’s a brief rundown of the execution policies available:
- Restricted – No scripts can be run. Only PowerShell commands can be executed interactively. This is the default option.
- AllSigned – All the scripts must be digitally signed by a trusted publisher. Unsigned scripts are blocked (runs only signed scripts).
- RemoteSigned – Locally created scripts can run, but downloaded scripts must be signed. This is a standard policy for clients.
- Unrestricted – All scripts can run. This exposes your system to the most risk.
To change the PowerShell Execution Policy, open PowerShell as an administrator and use the following command:
Set-ExecutionPolicy RemoteSigned
The above command sets the execution policy to “RemoteSigned,” which allows you to run scripts created on the local computer but requires a digital signature to run any script downloaded from the internet. You can choose other execution policies based on your security needs, such as “Unrestricted” or “AllSigned”. However, it’s important to note that changing the execution policy can pose security risks, so it’s best to choose a policy that balances security and convenience.
By-passing the execution policy by adding “-executionpolicy bypass” is also possible for a particular PowerShell file!
A step-by-step guide to running a PowerShell script
Now that you are familiar with the different ways to run a PowerShell script, let’s go through a step-by-step guide on how to run a ps1 file in PowerShell:
Step 1: Open PowerShell
To start PowerShell, search for “PowerShell” in the Start menu or use the Run dialog (Windows Key + R) and type “powershell”. This will start the PowerShell command-line shell to run your first PowerShell script.
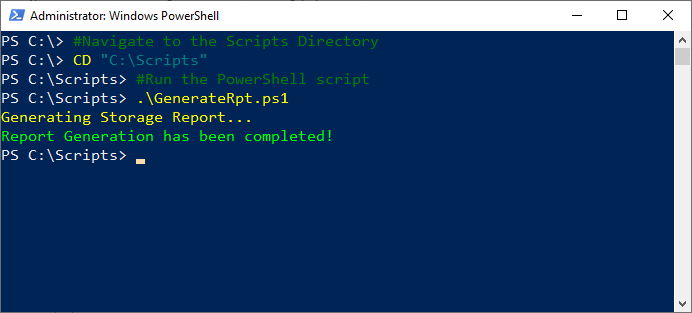
Step 2: Navigate to the Folder
The most common way to execute a PowerShell script is from the PowerShell console. To do this, you’ll need to open the PowerShell terminal and navigate to the directory where the script is located.
CD "C:\Scripts"
This will change the working directory to the “C:\Scripts” folder.
Step 3: Run the script from the PowerShell console
To run a PowerShell script file, use the following command (Type the name of your ps1 file) and hit enter:
.\GenerateRpt.ps1
Replace “GenerateRpt.ps1” with the actual name of your PowerShell script. This will execute the “GenerateRpt.ps1” file in the current directory.
If the script is in a different directory, you’ll need to provide the full path to the script file. You can also pass parameters to the script by adding them after the script name, separated by spaces.
If the script is located in a directory with a space in the name, you’ll need to enclose the path in double quotes:
.\"Path of the script with Spaces\FileName.ps1"
It’s worth noting that PowerShell requires you to explicitly specify the path to the script or use the dot-slash notation (.) for security reasons. This ensures that you’re running the intended script and not accidentally executing a malicious file with the same name.
You can also call a script in a specific path using the call operator “&”. For example, if your script is located in C:\Scripts\MyScript.ps1, you would run the below command:
&"C:\Scripts\MyScript.ps1"
Similarly, you can type and run commands directly in the PowerShell window (E.g., Get-Process).
Running Scripts as administrator
Sometimes, you may need to execute a PowerShell script with elevated privileges. This is particularly useful when the script requires administrative access to perform certain tasks. There are several methods for executing PowerShell scripts with elevated privileges, including starting Windows PowerShell as an administrator or using the Runas command or the Start-Process cmdlet to launch a script as an admin.
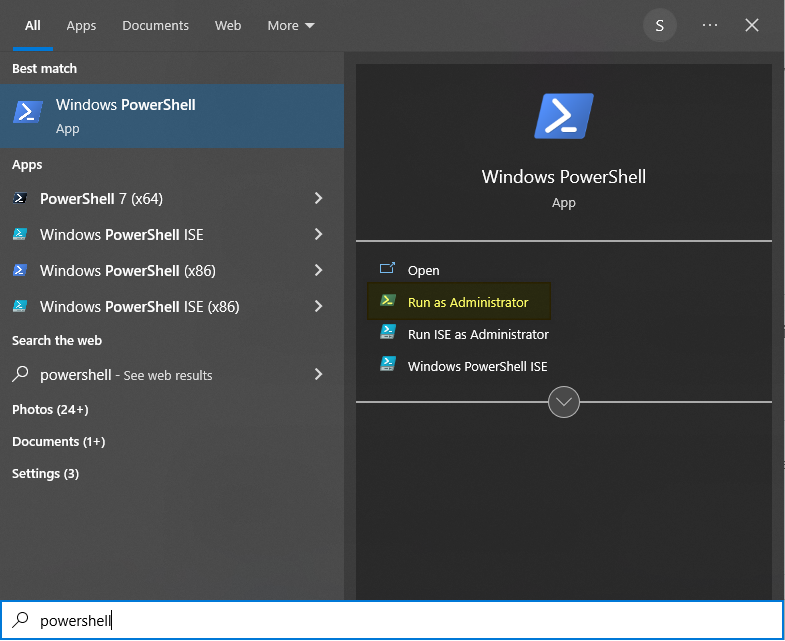
To run a script as an administrator, follow these steps:
- Type “PowerShell” or “PowerShell ISE” in the start menu Icon.
- Select “Run as administrator” from the context menu.
This will open Windows PowerShell with administrative privileges and execute the script. If UAC (User Account Control) is enabled on your system, you may be prompted to provide administrator credentials.
Running a script as an administrator gives it the necessary permissions to perform tasks that require elevated access, such as modifying system settings or accessing restricted files and folders. However, exercise caution when running scripts with administrative privileges to prevent unintended consequences or security risks.
Run PowerShell as an Administrator Automatically
To run a PowerShell script as an administrator automatically, you need to open PowerShell as an administrator and then run the script.
You can also run PowerShell scripts as an administrator from the command prompt by using the following command:
Start-Process powershell.exe -Verb runAs -ArgumentList "-File C:\Scripts\MyScript.ps1"
This starts a new PowerShell process with admin rights. Running scripts with elevated privileges allows you to perform advanced functions that may not be possible with standard user permissions.
Running PS1 files as a different user
If you need to run a script under a different user account, you can use the “Run as” feature. Here’s how you can do it:
- Open a Command Prompt window as an administrator.
- Type the following command and press Enter:
runas /user:username powershell.exe -File "C:\Temp\YourScript.ps1"
Replace “username” with the actual username of the user account you want to run the script under, and replace “C:\Temp\YourScript.ps1” with the actual path to your PowerShell script.
Running PowerShell Scripts from the command prompt (CMD)
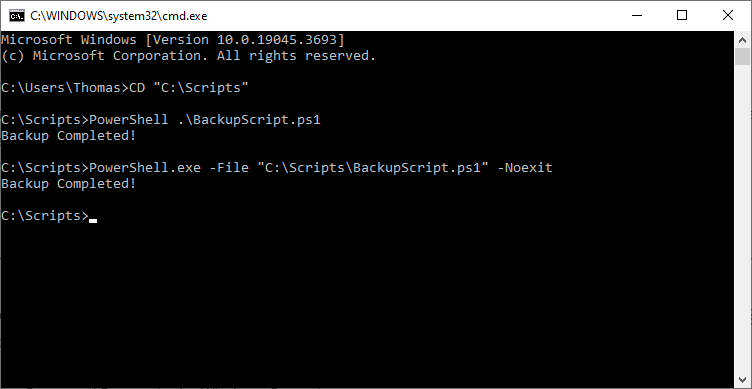
In addition to running PowerShell scripts from the PowerShell console, you can also run them from the command prompt. To run PowerShell scripts from the command prompt, you must use the PowerShell executable and pass the script as a parameter. To do so, simply open the Command Prompt and type “powershell” followed by the “-file” parameter and the path of your PowerShell script file. For example, if your script is named “BackupScript.ps1” and is located in your “Downloads “C:\Scripts” folder, you would type the following command:
- Open a Command Prompt in the Windows Operating system.
- Type the following PowerShell command and press Enter:
powershell.exe -File "C:\Scripts\BackupScript.ps1" -noexit
Replace “C:\Scripts\BackupScript.ps1” with the actual path to your PowerShell script.
Integrating PowerShell Scripts into Scheduled Tasks
To further streamline and automate your PowerShell tasks, you can integrate PowerShell scripts into scheduled tasks. Scheduled tasks are automated processes that can be programmed to run on a computer at predetermined times or intervals, allowing you to schedule the execution of your PowerShell scripts without manual intervention.
Setting up scheduled tasks can help save time and effort, as well as ensure that scripts are executed on a regular basis. By integrating your PowerShell scripts into scheduled tasks, you can further automate your processes and ensure that your scripts are executed efficiently and consistently.
To schedule a PowerShell script in the Windows Task Scheduler, you can follow these steps:
- Open Task Scheduler by typing “Task scheduler” in the window start menu.
- From the Actions menu, click on “Create a Basic Task”
- Give the task a name and description, and then click “Next”
- Choose the trigger for the task. This can be a specific time, a recurring schedule, or an event.
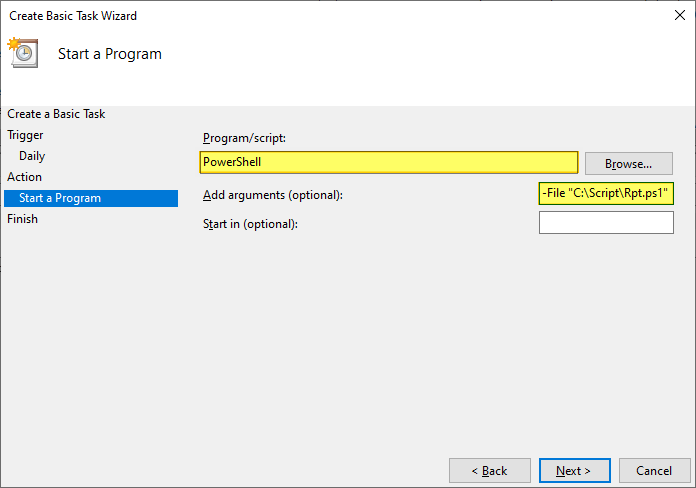
- Specify the action that the task should be performed. In this case, choose “Start a program”
- In the “Program/script” field, enter “PowerShell”
- In the “Add arguments (optional)” field, enter “-File [path to your PowerShell script]”

- Click “OK” to save the scheduled task.
Refer here for more info: How to Create a Scheduled Task to run a PowerShell script?
Running PowerShell script from a batch file
Batch files, also known as .bat files, are script files used to automate tasks in Windows. They can be used to execute PowerShell scripts, allowing for even more automation possibilities. Here’s how you can do it:
- Open Notepad or any text editor.
- Type the below command and save the file with a .bat or .cmd extension:
powershell.exe -File "C:\Scripts\script.ps1"
Replace “C:\Scripts\script.ps1” with the actual path to your PowerShell script. More on Running PowerShell commands from the Batch files or executing batch files from PowerShell scripts is here: How to Run a Batch File from PowerShell Script?
Dot Sourcing: Run a Script from Another Script
Dot sourcing is a technique that allows you to run PowerShell scripts from within another script. To utilize dot sourcing, simply use the dot (.) operator followed by the path to the script or function you wish to run. This method enables code defined in one script to be referenced in another script, making it easier to reuse and access functions and variables.
To dot source a script, use the following syntax:
. .\ScriptName.ps1
Dot sourcing is particularly useful when you have common functions or variables that you want to share across multiple scripts. If the script is located in a different folder, use:
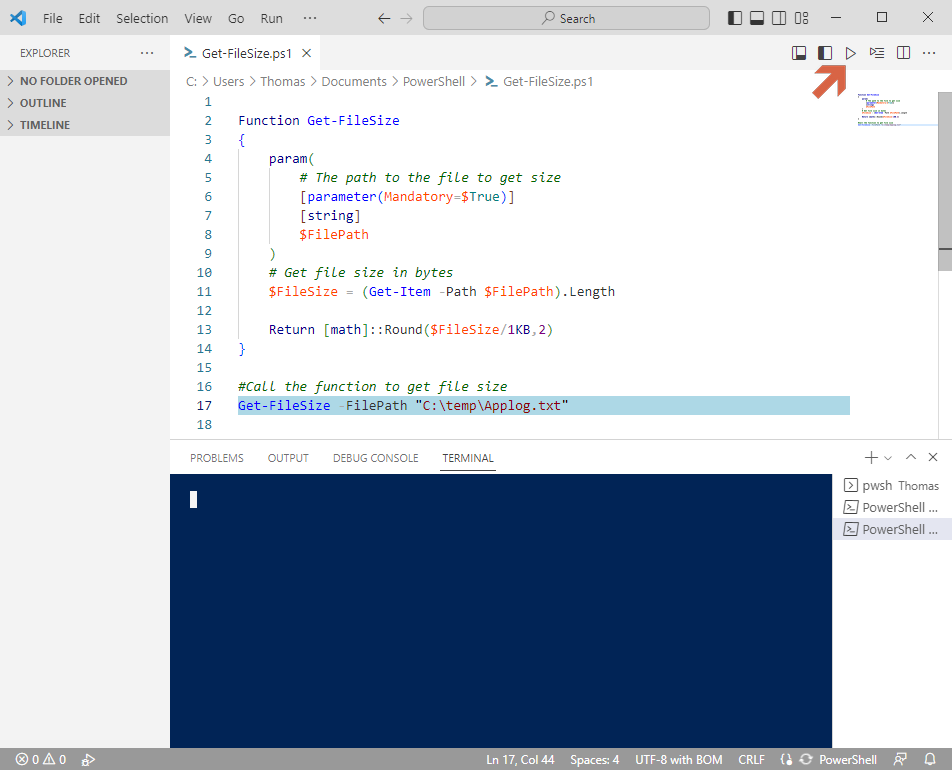
. "C:\Users\Thomas\Documents\PowerShell\Get-FileSize.ps1"

#Call the method defined in the another script file
Get-FileSize "C:\Logs\AppLogs.txt"
The above script lets you call a function from another script in the current PowerShell session using dot sourcing.
Running a PowerShell Script from the Windows File Explorer
In addition to running scripts from the command line, you can also run PowerShell scripts from the graphical user interface (GUI) or by creating shortcuts. This method is useful when you want to run scripts with a simple click without opening the PowerShell terminal.
To run a PowerShell script from the GUI, follow these steps:
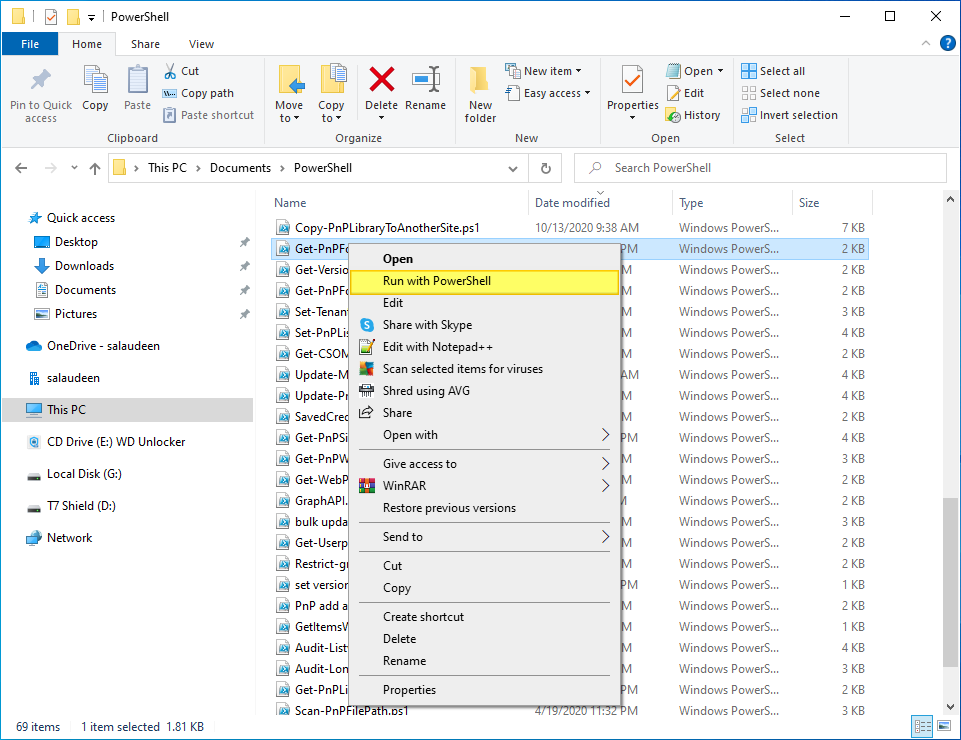
- Locate the script file in Windows Explorer.
- Right-click on the script file name and select “Run with PowerShell” from the context menu.
This will open a PowerShell window and execute the script.
Create a Shortcut to Run PowerShell Script
You can also create a shortcut to the script file and place it on your desktop or in any convenient location. Double-clicking the shortcut will run the script using PowerShell. Here is how to do that:
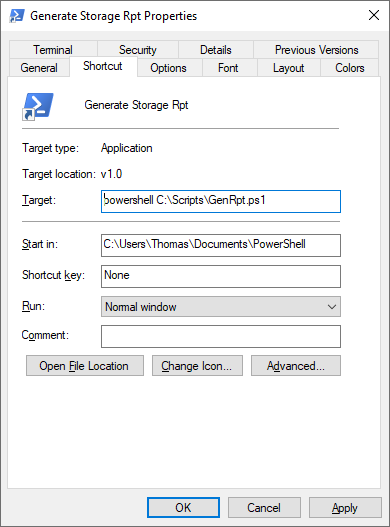
- Right-click on your script file in File Explorer >> Choose “Send to” > Select “Desktop (create shortcut)”
- Now, Right-click on the created shortcut on your desktop >> In the “Target” Field, add “PowerShell”. E.g., “PowerShell C:\Scripts\GenRpt.ps1”.
- Click on “OK” to save your changes.

Now, if you double-click on the shortcut, the script will be executed. If you want to leave the window open without closing it automatically, use:
powershell -NoExit -File "C:\Scripts\GenRpt.ps1"
Executing PowerShell Scripts Remotely
In many scenarios, you may need to execute PowerShell scripts on remote computers. This can be especially useful for managing multiple systems or performing administrative tasks across a network. In this section, we’ll discuss various techniques for running PowerShell scripts on remote computers, including configuring Windows Remote Management (WinRM), and using the Invoke-Command cmdlet.
Understanding these methods will enable you to efficiently and securely execute scripts on remote systems, further expanding the capabilities of PowerShell and allowing you to manage your IT environment with greater ease and precision.
Configuring WinRM for Remote Execution
WinRM, or Windows Remote Management, is a service that enables secure remote PowerShell script execution. Before you can run scripts on remote computers, you’ll need to enable and configure WinRM. To do this, open a PowerShell console with administrator privileges and run the Enable-PSRemoting command. This command will automatically enable the Windows Remote Management (HTTP-In) rules.
To examine the WinRM service state, use the Test-WSMan command. If the remote computer is in a workgroup and a Public network profile is applied to the LAN connection, you’ll need to explicitly enable incoming WinRM traffic in Windows Firewall.
Using Invoke-Command for Remote Script Execution
The Invoke-Command cmdlet lets you establish a remote connection and execute scripts on remote computers. To use Invoke-Command, you’ll need to specify the computer name or IP address of the remote computer. To execute a script on a remote computer, use the following format:
Invoke-Command -ComputerName <computer_name> -ScriptBlock <script_path> | <PowerShell cmdlets> -Credential Domain\UserName
For example, if you want to run a script called “Get-EventLog.ps1” on a computer named “FileServer” with a parameter of “143”, you would type:
Invoke-Command -ComputerName FileServer -FilePath C:\Scripts\Get-EventLog.ps1 -ArgumentList "143"
Using Invoke-Command to execute scripts on remote computers provides a powerful and efficient way to manage remote systems and automate tasks across your network. You can also use any available PowerShell commands on the remote server:
Invoke-Command -ComputerName FileServer -ScriptBlock { Get-Service }
This script runs the Get-Service cmdlet, which returns all of the services installed on the remote computer.
PowerShell modules for running scripts
PowerShell modules are collections of cmdlets, functions, and scripts that can be used to perform specific tasks. There are many PowerShell modules available for running scripts, including:
- Posh-SSH: A module for performing SSH and SFTP tasks
- ActiveDirectory: A module for managing Active Directory
- ExchangeOnlineManagement: A module for managing Exchange Online
- VMware.PowerCLI: A module for managing VMware environments
Make sure you install the necessary modules before running any cmdlets from the specific module. E.g., To install the PowerShell module to manage SharePoint Online, use:
Install-Module -Name Microsoft.Online.SharePoint.PowerShell -Force -AllowClobber
PowerShell Script Editor Tools
There are several PowerShell script editor tools available that can help you write, test, and debug PowerShell scripts. Here are some popular PowerShell script editor tools:
- PowerShell ISE: An integrated scripting environment for PowerShell that comes pre-installed with Windows
- Visual Studio Code: A code editor with extensions for PowerShell scripting.
- 3rd party commercial PowerShell editors with advanced features: Sapien PowerShell Studio, PowerShell Plus, Notepad++, etc., to edit PowerShell scripts. You can also create a PowerShell script or open the PowerShell script in Notepad and make changes to it (Not just Notepad, but you can use any text editors to create a PowerShell script!).
PowerShell ISE to Create and Run PowerShell script Files on Windows 10 or 11
The PowerShell Integrated Scripting Environment (ISE) is a powerful tool that offers a user-friendly interface for editing, reviewing, and executing scripts. This environment is ideal for those who prefer a more visual approach to writing scripts or need to make modifications while executing scripts. It comes pre-installed on Windows Operating systems, whether you use Windows 10 or the newer Windows 11.
To run a script in PowerShell ISE, open the Windows PowerShell ISE and use the File menu to open your script file. Once your script is displayed in the ISE, simply press the green run button to run a PowerShell script using the PowerShell ISE.

The PowerShell ISE offers a convenient way to execute scripts while providing a more accessible environment for reviewing and editing your code, making it an excellent choice for those new to PowerShell or those who prefer a more graphical interface.
Execute a PowerShell Using Visual Studio Code
When combined with the PowerShell extension, Visual Studio Code (VSCode) provides an excellent environment for writing and running PowerShell scripts.
To create and run a PowerShell script using Visual Studio Code, you can follow these steps:
- Install Visual Studio Code and the PowerShell extension
- Open Visual Studio Code and open the script file you want to run.
- To run the entire script, press “F5” or select “Run” from the “Debug” menu
- To run a specific section of the script, highlight the code and press “F8” or select “Run Selection/Line in PowerShell” from the context menu.
With these steps, you can easily run PowerShell scripts and commands in VS Code. More info: How to Run PowerShell Scripts with Visual Studio Code?
Best practices for running PowerShell scripts
To ensure that your PowerShell scripts are efficient, maintainable, and easy to understand, it’s important to follow some best practices when running them. Here are some best practices for running PowerShell scripts:
Understanding the script’s purpose and functionality
Before running a PowerShell script, take the time to understand its purpose and functionality. Review the script’s documentation or comments to ensure that it aligns with your requirements and doesn’t pose any security risks.
Testing the script before running it
Always test a PowerShell script in a controlled environment before running it in a production environment. This will help you identify any potential issues or unintended consequences.
Using error handling and logging
Implement error handling and logging mechanisms in your scripts to capture and gracefully handle errors. This will make troubleshooting and debugging much easier. Monitor script execution and log any errors or unexpected behavior for troubleshooting purposes.
Other Best Practices:
- Use descriptive variable names to make the code easier to understand.
- Use comments to explain the purpose of the script and each section of the code. Document the script so that others can understand and use it.
- Use functions to break up large scripts into smaller, more manageable pieces.
- Use consistent formatting to make the code easier to read.
- Use PowerShell modules to organize and reuse code.
- Use version control to track changes to the script over time.
- Document the script so that others can understand and use it.
- Continuously learn and improve your PowerShell skills by reading blogs, attending conferences, and participating in online communities.
Troubleshooting Common Errors in Running PowerShell Scripts
Even with the best practices in place, PowerShell scripts can still fail. When this happens, it’s essential to know how to troubleshoot the script to identify and resolve the issue. Here are some common errors that you might encounter when running PowerShell scripts and how to troubleshoot them:
- Syntax errors: Check the syntax of the script to ensure that there are no errors in the code.
- Execution policy errors: Check the execution policy to ensure it allows scripts to run.
- Permissions errors: Check the permissions of the user running the script to ensure they have the necessary permissions to perform the task.
- Module errors: Check that any modules used by the script are installed correctly.
Wrapping up
Running a PowerShell script doesn’t have to be a daunting task, even for beginners. Throughout this comprehensive guide, we’ve explored the various techniques and methods to run PowerShell scripts, both locally and remotely. From launching PowerShell scripts using File Explorer, Windows PowerShell, and PowerShell ISE to managing execution policies and running scripts with elevated privileges as an administrator, you now have the knowledge and confidence to effectively harness the power of PowerShell. By understanding the execution policy, using the command line or GUI, dot sourcing, and running from CMD or batch files, you can execute PowerShell scripts with ease. With the steps outlined in this article, you can confidently run PowerShell scripts and automate various administrative tasks on your Windows system.
Remember to always exercise caution and understand the scripts you are running to ensure a secure and efficient experience. Be sure to adhere to best practices for writing and running PowerShell scripts, and use descriptive variable names, comments, and error handling to make your scripts more maintainable and easier to understand. With these skills and resources, you can become a master of PowerShell and streamline your administrative tasks.
To run a PowerShell script line by line, you can use the PowerShell Integrated Scripting Environment (ISE). Open the script in the ISE, select the lines you want to run, and then use the “Run Selection” button to execute the script one line at a time. You can execute individual lines by selecting them and pressing F8 as well.
PowerShell scripts can be run in Azure using various methods such as Azure Cloud Shell, Azure PowerShell module, Azure Automation, Azure Functions, and Azure Virtual Machines. The choice of method depends on your specific requirements and the resources you are working with Azure.
To run a PowerShell script in Visual Studio 2019, you must install the PowerShell Tools for Visual Studio extension first, then Open Visual Studio 2019 and create a new PowerShell project by clicking File > New > Project and selecting the PowerShell Script project. Once the script is ready, You can execute it by clicking the green “Play” button on the toolbar, which will execute the PowerShell script.
To run a PowerShell script remotely as an administrator, you’ll need to ensure PowerShell remoting is enabled First. Once done, you can use the Invoke-Command cmdlet with the -ComputerName parameter to specify the remote computer. Use the -Credential parameter to provide administrator credentials for the remote computer.
There are several ways to run a PowerShell script on startup, including using Task Scheduler, Group Policy, the PowerShell profile, or a Batch file in the “Startup” folder (C:\Users\UserName\AppData\Roaming\Microsoft\Windows\Start Menu\Programs\Startup). To run a PowerShell script on startup with Windows Task Scheduler, create a new task in Task Scheduler, set the trigger to “At system startup”, and set the action to run PowerShell with the script as an argument.
There are several ways to run a PowerShell script from another script, including the call operator, the dot sourcing method, the Invoke-Expression cmdlet, or the Start-Process cmdlet. Here is how to use the Call Operator method: For example, if you have two scripts named “script1.ps1” and “script2.ps1” in the same directory, you can call “script2.ps1” from “script1.ps1” using the command: “& .\script2.ps1”
To create a batch file to run a PowerShell script, follow these steps: Prepare Your PowerShell Script, save it, and note its path, for example, “C:\Scripts\MyScript.ps1”. Create a new Batch file by right-clicking in your desired directory, selecting “New” and then “Text Document”. Open the text document and enter the following line: powershell.exe -ExecutionPolicy Bypass -NoLogo -NoProfile -File “C:\Scripts\MyScript.ps1”. Finally, Save the text file with a .bat extension, for example, “RunScript.bat”.
To run a PowerShell script with parameters, you can follow these steps: Define the parameters in the PowerShell script by adding a param block at the beginning of the script. For example, “param([string]$Param1, [int]$Param2)”. To run the script with parameters, pass the values for parameters as: PowerShell.exe -File “C:\Scripts\script.ps1” -Param1 “Value1” -Param2.
Hi Rajack, great to see the PowerShell knowledge sharing through your blog. Can you suggest some PowerShell tutorial videos? thank you!
Hello Salaudeen,
I tried to run my script as follows: pwsh E:\Folder\Script.ps1 (from CMD, because I want to run this as a scheduled task)
It works until the point that I want to connect to SharePoint using Connect-PnPOnline. Nothing happens and the script exits without any error or other hints. When I execute this script inside PowerShell, everything works fine!
I already compared the output of environment variables and also loaded modules. Everything the same. But I cannot get this script running via cmd call or scheduled task.
Do you have any idea or help here? I can share the code if this helps.
Thank you and regards.
Daniel.
Just a quick addition: I want to run this on Azure VM (Windows Server 2019).
Testing the same on my notebook (Windows 11), everything is fine.
Is there some limitation when using it on Windows Server?
Salaudeen! You and your blog are prolific! I love how thorough and well thought out each of your posts are. You not only show a clean model of how to solve an individual problem, but also explain several other ways to solve it as well, with explanations as to when to use each approach. I am impressed almost daily by your output!
Above you have a small blurb about “Using error handling and logging” and I’m wondering if you have a baseline script that you start with that has areas stubbed out for handling common problems such as M365 Throttling? If you would share that with us, the world would be a better place. 🙂
Thank you again for all you do!