Office 365: How to Disable Delve in SharePoint Online?
Requirement: Disable Delve in Office 365 / SharePoint Online.
How to Disable Delve for All Users in Office 365?
Delve is an Office 365 App used to view and organize all related documents in one location. Microsoft Delve uses artificial intelligence and machine learning to display relevant information based on what you work on and who you work with from different applications within Microsoft 365, such as SharePoint, OneDrive, and Teams. E.g., To find out what documents someone is working on, you can simply click on the person’s name and see which documents they are working on. Although documents shown in Delve are security trimmed (Users will only see a document if they have access to it), some companies fear their privacy and want to disable delve for all users.
To disable delve for all users in Office 365, follow these steps:
- Login to your SharePoint Admin Center.
- Click on “Settings” from left navigation >> Click on “classic settings page” at the bottom>> Under Delve, Select “Disable Delve”

- Click on the “OK” button at the bottom of the page to commit your changes.
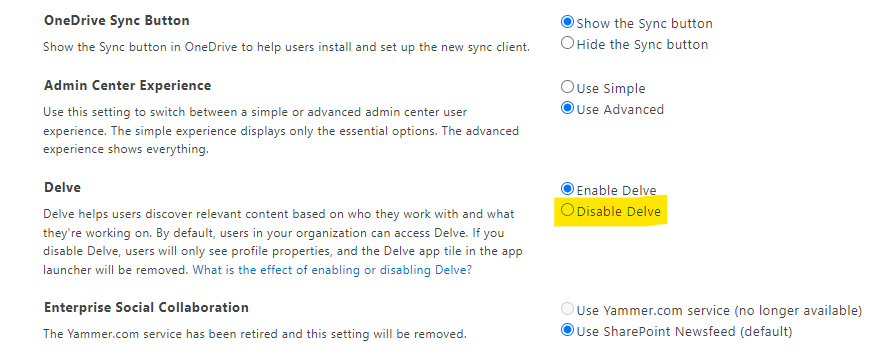
This disables delve in SharePoint Online for all users for the entire tenant. (Please note that this does not disable the Delve feature altogether, but it does not show any documents in Delve!)
How to Disable the Delve User Profile Redirect?
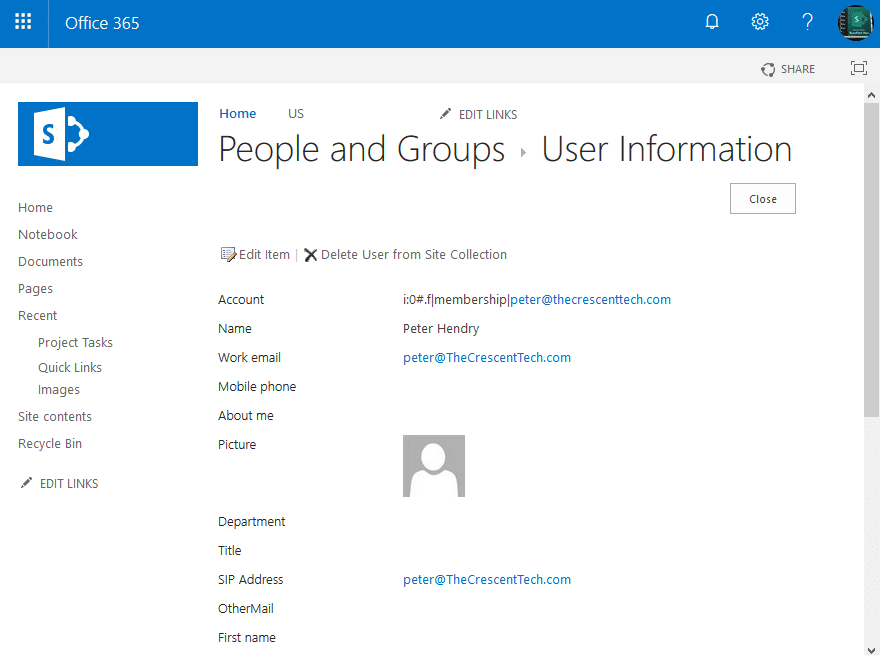
When you click on any user account in SharePoint Online, it takes you to the Delve page of the user (or My Site in SharePoint On-premises). You can stop that redirect by appending the “Force=True” parameter to the URL: https://yourdomain.sharepoint.com/_layouts/15/userdisp.aspx?ID=USERID&Force=True
E.g., https://yourdomain.sharepoint.com/_layouts/userdisp.aspx?ID=12&Force=True
This takes you to the simple user information page:
Disable Delve per User in SharePoint Online
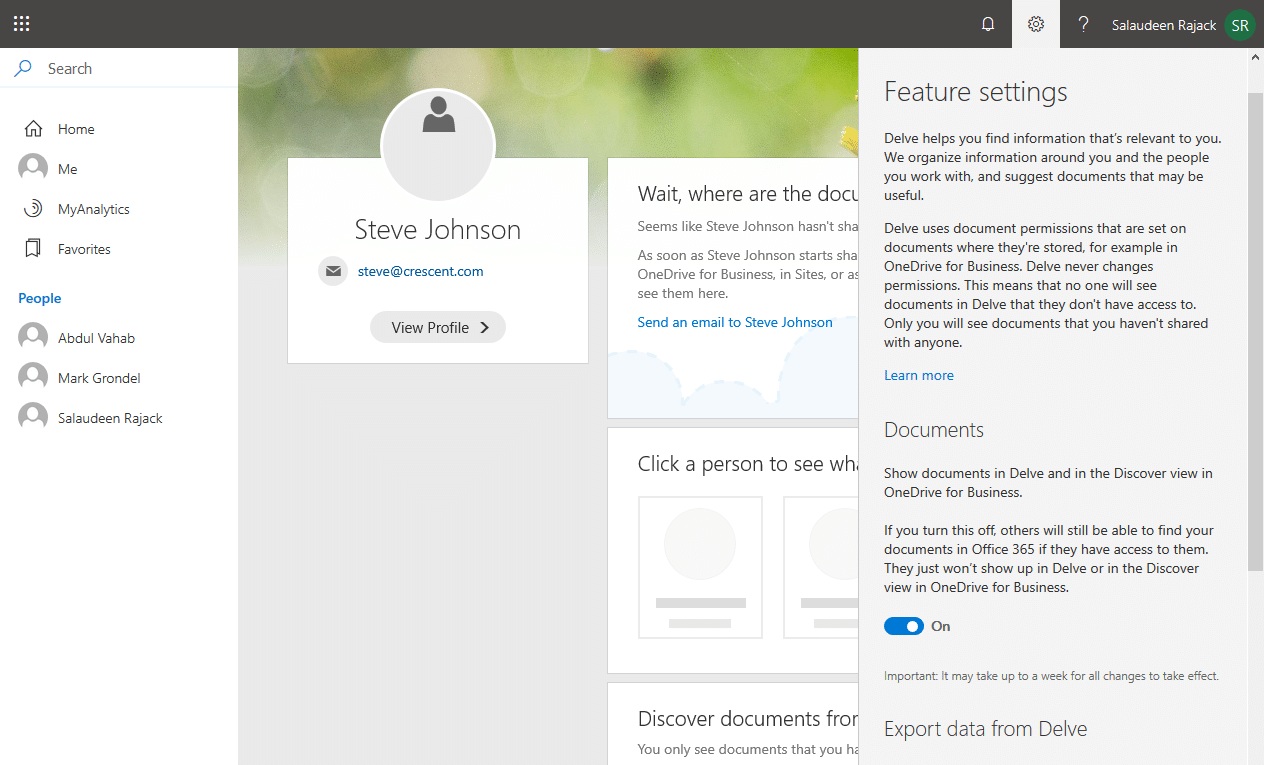
We can also disable delve for one user! Users can individually opt out of sharing their documents with Delve and the Office Graph by login into Delve from the Waffle inside Office 365 or by going directly to the URL https://delve.office.com and clicking on Settings gear >> Click on “Feature settings” and choose “Off” under documents.
To disable delve for some users, just set the highlighted properties in their user profile to null.
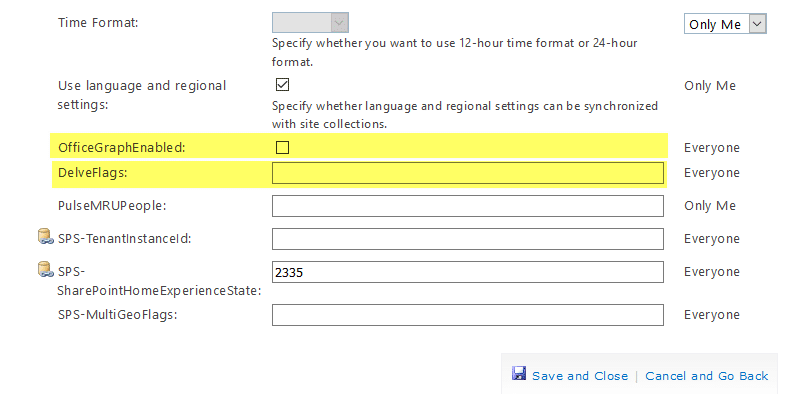
You can also use PowerShell to set these user profile properties and disable delve for all users: Just set “DelveFlags” and “OfficeGraphEnabled” values to $null. How to Set User Profile Property in SharePoint Online using PowerShell?
Setting “msExchHideFromAddressLists” attribute in AD, then synched to SharePoint user profile property “SPS-HideFromAddressLists” – But it would hide the user from both Delve and Search results.
Disable Delve for Documents in SharePoint Online:
Delve absolutely adheres to all permissions set in SharePoint and OneDrive for Business. No one will ever see anything they don’t already have access to. However, suppose you want to disable Delve for a particular document(s) on a site. In that case, you can create a site column called “HideFromDelve” of Boolean type (“Yes/No”) and add this column to each library, and then set this flag to “Yes” for each document that you don’t want to show in Delve. Here is the step-by-step instruction:
Step 1: Create “HideFromDelve” Site Column
- Navigate to the SharePoint Online site that has documents you want to hide from Delve.
- Click on the settings gear in the top-right corner and go to Site Settings
- In the site settings page, Under Web Designer Galleries, click on “Site columns” >> Click on “Create”
- Enter the column name as “HideFromDelve” (EXACT the same name), and set the column type as “Yes/No” Checkbox field.
- Set the default value to “No” (Otherwise, every document you create within the library will not show up in Delve!)
The next step is to add the site column libraries wherever required.
Step 2: Add the “HideFromDelve” Site Column to the document library
- Navigate to the library that has documents you want to hide
- Go to Library Settings >> Under the list of columns, click the link Add from existing site columns
- Scrolls down in the Available site columns list and select the newly created HideFromDelve column, and click the add button to move it across.
Then click Ok.
After the column is added to your library, the next step is to set that metadata for documents you want to hide from delve
Step 3: Mark the Documents you want to hide from Delve
- Navigate back to your library, and you can begin marking documents to be hidden from Delve.
- Edit document properties and set the “HideFromDelve” column value to “Yes”. The quickest way to do this is through the Quick
Edit view.
After the documents have been re-indexed by the SharePoint search, they should no longer be visible in Delve (but still searchable through SharePoint
search).
Disable delve for a SharePoint Document Library or Site
You can also remove either a document library or site from Delve and SharePoint Online search results. Navigate to the document library >> Advanced Settings, and set “Search” to “No”. Similarly, In site settings >> Search >> Search and Offline Availability >> Set “Allow this site to appear in search results” to “No”.
My users accidentally discovered Delve today. They asked me to turn it off, quickly! Thank you for this article.
With apologies, I found the setting. I was using the wrong admin account. Very sorry. Your article was very helpful!!!
There is no “classic settings page” any more that I can find. New admin center
Here is the url: https://yourdomain-admin.sharepoint.com/_layouts/15/online/TenantSettings.aspx
Making OfficeGraphEnabled and DelveFlags NULL does not disable Delve for users in our tenant, FYI.