How to Copy Files with PowerShell Copy-Item cmdlet?

Copying files is a common task that system administrators need to perform regularly. While you can use Windows Explorer for basic operations, PowerShell offers more flexibility and control when it comes to copying files. In this article, we will go over the different ways you can copy files and folders using PowerShell. We will cover basic copy commands like Copy-Item and more advanced techniques like using wildcards and copying recursively.
You will learn how to:
- Copy a single file to another location
- Use wildcards to copy multiple files
- Copy all files from one folder to another
- Copy and rename files
- Handle errors and skip overwrite, etc.
Whether you need to back up configuration files, deploy scripts to multiple servers, or sync changes to a directory, PowerShell has the copy commands you need.
Table of contents
- Introduction to Copy-Item cmdlet in PowerShell
- Copy File without Overwriting Existing in PowerShell
- PowerShell to Copy and Rename a File
- Ensure the Destination Folder Before Copying the Files
- Copy Multiple Files in PowerShell
- Copy All Files and Folders Recursively
- Copy files from multiple folders to one Folder
- PowerShell to Include or Exclude Files to Copy
- Filter and Copy Files
- Copy Contents between Folders with the Progress Bar
- Copying Files to and from Remote Servers with PowerShell
- How do you copy a file if it is newer?
- Wrapping up
Introduction to Copy-Item cmdlet in PowerShell
In PowerShell, you can copy a file from one location to another using the Copy-Item cmdlet. At its core, the Copy-Item cmdlet is designed to copy files from one location to another within the same namespace. It can handle file system operations, such as copying files, directories, registry keys from registry drive, and entries. The Copy-Item cmdlet can copy files between folders, drives, and remote machines.
PowerShell Copy-Item Syntax
The basic syntax for the cmdlet is as follows:
Copy-Item
-Path <string[]>
-Destination <string[]>
[-Container]
[-Credential <pscredential>]
[-Exclude <string[]>]
[-Filter <string>]
[-Include <string[]>]
[-Force]
[-PassThru]
[-Recurse]
[-FromSession <PSSession[]>]
[-ToSession <PSSession>]
[-WhatIf]
[-Confirm]
[<CommonParameters>]
The important parameters list:
| Parameter | Description |
|---|---|
-Path | Specifies the path to the item to copy. |
-Destination | The destination parameter specifies the path to the location where the items are copied. |
-Container | Indicates that this cmdlet preserves the container when it copies the items. Default is $True. |
-Exclude | Specifies, as a string array, an item or items that this cmdlet excludes from the operation. |
-Filter | Specifies a filter to qualify the Path parameter. |
-Include | Specifies, as a string array, an item or items that this cmdlet includes in the operation. |
-Force | Forces the cmdlet to copy items that cannot otherwise be changed, such as read-only files or hidden items. |
-Recurse | Copies items in subdirectories, not the subdirectories themselves. Use this parameter with the Container parameter. |
-PassThru | When you use the PassThru parameter, it returns an object representing the copied item |
PowerShell Copy File Example
Here’s a simple example of how to use the Copy-Item cmdlet:
Copy-Item -Path <source> -Destination <destination>
This cmdlet takes two parameters: the file’s source location and the destination location. The -Path specifies the path of the file you want to copy. This can be a local or a remote file path, and the -Destination specifies the location where you want to copy the file to. This can also be a local or a remote path. You can also use its aliases: Copy, CP, or CPI.
Examples:
Let’s take a look at some examples to understand better the basic syntax and parameters for copying files with PowerShell:
| Example | Example |
|---|---|
Copy-Item -Path "C:\file.txt" -Destination "D:\newfile.txt" | Copies the file “file.txt” from the C: drive to the D: drive, renaming it as “newfile.txt” in the destination folder. |
Copy-Item -Path "C:\folder" -Destination "D:\" -Recurse | Copies the entire contents of a folder from the C: drive to the D: drive, preserving the directory structure. |
Copy-Item -Path "C:\file.txt" -Destination "\\Server\Share\" | Copies the file “file.txt” from the local machine to a remote server specified by the UNC path “\\Server\Share\”. |
By mastering the basic syntax and parameters of the Copy-Item command, you’ll have the foundation to efficiently copy files with PowerShell and streamline your file management tasks.
For example, if you want to copy a specific file named “AppLog.txt” from the “C:\Source” folder to the “C:\Destination” folder, you would use the following command:
Copy-Item -Path "C:\Source\AppLog.txt" -Destination "C:\Destination"
If you want to copy the entire folder structure, including all the files and subfolders, use:
Copy-Item -Path "C:\Source\*" -Destination "C:\Destination" -Recurse
Copy File without Overwriting Existing in PowerShell
Please note, the Copy-Item cmdlet overwrites the destination file by default if it exists! However, if you want to preserve the original file and avoid overwriting, you can use the following method:
#Parameters
$SourceFile = "C:\Temp\AppLog.txt"
$DestinationFile = "C:\Temp\Archive\AppLog.txt"

#Check if the Target file exists
If (-not (Test-Path -Path $DestinationFile)) {
    Copy-Item -Path $sourceFile -Destination $DestinationFile
}
Else {
    Write-Host -f Yellow "The Destination File Already Exists!"
}
PowerShell to Copy and Rename a File
You can copy a file to the same path or a different folder to rename it. E.g.,
Copy-Item -Path "C:\Source\example.txt" -Destination "C:\Destination\NewExample.log"
Also works: Copy-Item -Path “C:\Source\example.txt” -Destination “C:\Source\example-v2.txt”
Ensure the Destination Folder Before Copying the Files
If the destination folder does not exist, the cmdlet will throw an error “Copy-Item : Could not find a part of the path <Path>”. To avoid this, you have to use the combination of Test-Item, New-Item, and Copy-Item cmdlet, to create the entire destination folder tree if it does not exist.
#Function to copy a File to given path
Function Copy-File {
    [CmdletBinding()]
    Param
    (
        # The path to the Source File location
        [Parameter(Mandatory=$true,ValueFromPipelineByPropertyName=$true,Position=0)]
        [string] $SourceFilePath,

        # The destionaion Folder where the file to be copied
        [Parameter(Mandatory=$true, ValueFromPipelineByPropertyName=$true, Position=1)]
        [string] $DestinationFolderPath
    )

    #Check if the Destination Folder exists
    If (-not (Test-Path $DestinationFolderPath)) {
        New-Item -ItemType Directory -Path $DestinationFolderPath | Out-Null
        Write-Host "Ensured the $DestinationFolderPath!" -f Yellow
    }
    #Copy the File to Destination Folder
    Copy-Item -Path $SourceFilePath -Destination $DestinationFolderPath
    Write-Host "File $SourceFilePath Has been Copied to $DestinationFolderPath!" -f Green
}

#Call the function
Copy-File -SourceFilePath "C:\Temp\AppLog.zip" -DestinationFolderPath "C:\Temp2\Logs"

The above script preserves the directory structure between the source directory and the destination.
Copy Multiple Files in PowerShell
You can also use wildcard characters to copy multiple files at once. For example, the following command will copy all the txt files from the “C:\Source” folder to the “C:\Destination” folder.
Copy-Item -Path "C:\Source\*.txt" -Destination "C:\Destination"
Similarly, to copy all files (without any subfolders and their files) from the source to the destination folder, use the following:
Copy-Item -Path "C:\Source\*.*" -Destination "C:\Destination"
Copy All Files and Folders Recursively
The Copy-Item cmdlet can also be used to copy an entire directory with its contents. To do this, you would use the -Recurse parameter, which tells PowerShell to copy the contents of the directory along with its files and subdirectories.
Copy-Item -Path "C:\Source" -Destination "C:\Destination" -Recurse -Force
Please note, that you have to use the -Force switch merge with the destination folder if it exists already! The above cmdlet will merge the source with destination folders, and overwrite any files with the same name. Otherwise, You’ll get “Copy-Item : An item with the specified name C:\Temp2\Logs already exists.” error.
What if you want to copy the contents of a folder without the Root folder? Use:
Copy-Item -Path "C:\Temp\Logs\*" -Recurse -Force -Destination "C:\Logs"
Copy files from multiple folders to one Folder
Here’s a PowerShell script that you can use to copy multiple files from a source folder to a destination folder:
Copy-Item -Path C:\Logs\Log-1.txt,C:\temp\log-2.txt -Destination C:\LogsV2
Similarly, you can copy all files from multiple folders and merge them with PowerShell, as:
Copy-Item -Path "C:\Temp\Logs V2\*","C:\Temp\Logs V3\*" -Destination "C:\Logs"-Recurse -force
PowerShell to Include or Exclude Files to Copy
You can also use the -Include or -Exclude switch, along with wildcard characters, to filter the files you want to copy. For example, you can use -Include to copy only the files with specific extensions:
Copy-Item -Path "C:\Temp\*" -Destination "C:\Logs" -Include "*.log"
This script will copy only the files with the extension log. You can also use -Exclude to exclude certain files or folders from the copy process:
Copy-Item -Path "C:\Temp\*" -Destination "C:\Logs" -Exclude "*.bak","*.tmp"
This script will copy all files and folders except the ones with the .bak extension and the folder named ‘temp’.
Filter and Copy Files
You can also use filters to select specific files based on their properties. For example, you can copy all files modified in the last 7 days using the following command:
Get-ChildItem "C:\Source" -File | Where { $_.LastWriteTime -gt (Get-Date).AddDays(-7)} | ForEach-Object { Copy-Item -Path $_.FullName -Destination "C:\Destination"}
This command will copy all files modified in the last seven days to the destination folder. It uses the pipeline input from the Get-ChildItem cmdlet.
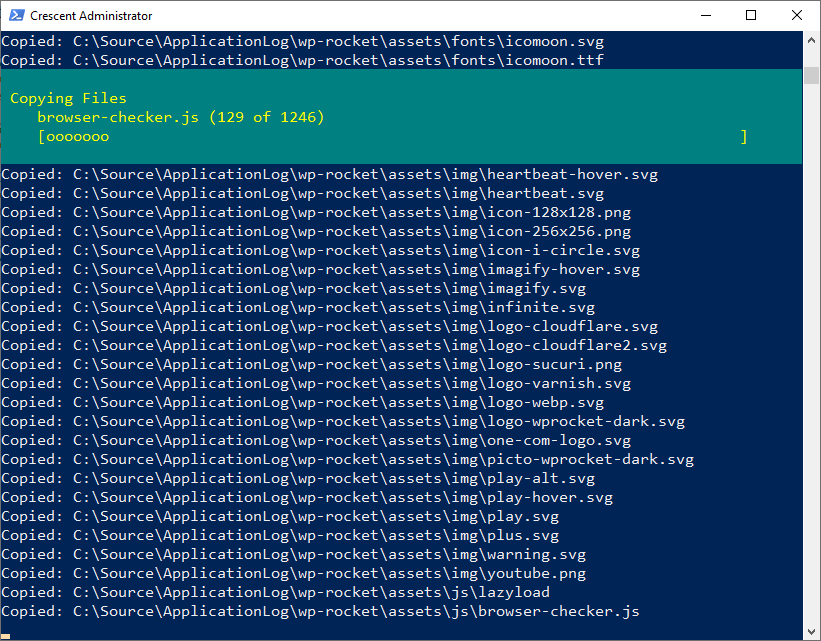
Copy Contents between Folders with the Progress Bar
This script will display a progress bar in the PowerShell console, updating as each file is copied from the source to the destination folder.
# Set the source and destination folder paths
$SourcePath = "C:\Source"
$DestinationPath = "C:\Destination"

# Get all files and Folders in the source folder
$SourceItems = Get-ChildItem -Path $SourcePath -Recurse

# Initialize progress bar variables
$TotalItems = $SourceItems.Count
$CurrentIndex = 0

# Copy files with progress bar
ForEach ($Item in $SourceItems) {
    $currentIndex++
    $ProgressPercent = ($CurrentIndex / $TotalItems) * 100

    # Update the progress bar
    Write-Progress -Activity "Copying Files" -Status "$Item ($currentIndex of $TotalItems)" -PercentComplete $ProgressPercent

    $SourceItemPath = $Item.FullName
    $DestinationItemPath = $SourceItemPath.Replace($SourcePath, $DestinationPath)

    # Ensure destination directory exists
    $DestinationDir = [System.IO.Path]::GetDirectoryName($DestinationItemPath)
    if (!(Test-Path -Path $DestinationDir)) {
        New-Item -ItemType Directory -Path $DestinationDir
    }

    # Copy the file
    Copy-Item -Path $SourceItemPath -Destination $DestinationItemPath -Force
    Write-host "Copied:"$Item.FullName

    # Optional: Pause between files for demonstration
    # Start-Sleep -Milliseconds 100
}

# Complete the progress bar
Write-Progress -Activity "Copying Files" -Completed
Copying Files to and from Remote Servers with PowerShell
PowerShell’s copy-item cmdlet can copy files across different machines. To copy files from one server to another, you can create a PowerShell session to the remote server using the New-PSSession cmdlet. This establishes a connection that enables file copying between the local and remote servers. Once the session is established, you can use the Copy-Item command to copy files from the source path to the destination path on the remote server. The Copy-Item command supports various parameters, such as -Force to overwrite existing files and -Recurse to copy directories and their contents recursively.
Here is the PowerShell script demonstrating how to copy files between different computers:
#Establish a session with remote computer
$Session = New-PSSession -ComputerName "FileServer" -Credential (Get-Credential)

# Copy All files from local computer to remote computer
Copy-Item -Path C:\Backup\* -Destination C:\BackupArchive\ -ToSession $Session -Recurse

#Copy Files from Remote Computer to Local Computer
Copy-Item -Path C:\Updates\* -Destination C:\temp\ -FromSession $Session -Recurse
In the above example, the $Session is a session variable storing the remote session information.
Similarly, if you want to copy files from a remote machine to your local machine, you can use UNC paths to specify the source and destination paths. UNC paths start with two backslashes, followed by the server name and the path to the file or directory. By using the Copy-Item command with the appropriate UNC paths, you can easily transfer files from the remote server to your local machine.
Copy-Item "\\Server01\Share\Updates.zip" -Destination "\\Server12\Temp\Updates.zip"
How do you copy a file if it is newer?
To copy a file in PowerShell only if it is newer than the version in the destination directory, you can compare the LastWriteTime property of the source and destination files. Here’s how to do it:
# Define source and destination paths
$SourcePath = "C:\Source"
$DestinationPath = "C:\Destination"

# Function to copy items if newer
function Copy-IfNewer {
    param (
        [string]$sourceItem,
        [string]$destinationItem
    )
    if (Test-Path -Path $destinationItem) {
        $sourceLastWrite = (Get-Item -Path $sourceItem).LastWriteTime
        $destinationLastWrite = (Get-Item -Path $destinationItem).LastWriteTime

        if ($sourceLastWrite -gt $destinationLastWrite) {
            Copy-Item -Path $sourceItem -Destination $destinationItem -Force
            Write-Output "Source is newer, File copied: $SourceItem"
        }
    } else {
        Copy-Item -Path $sourceItem -Destination $destinationItem -Force
        Write-Output "No existing file in destination, File copied: $SourceItem"
    }
}

# Enumerate all files and folders in the source directory
Get-ChildItem -Path $SourcePath -Recurse | ForEach-Object {
    $SourceItemPath = $_.FullName
    $DestinationItemPath = $SourceItemPath.Replace($SourcePath, $DestinationPath)

    # Ensure destination directory exists
    $DestinationDir = [System.IO.Path]::GetDirectoryName($DestinationItemPath)
    if (!(Test-Path -Path $DestinationDir)) {
        New-Item -ItemType Directory -Path $DestinationDir
    }

    # Copy the item if it is newer
    Copy-IfNewer -sourceItem $SourceItemPath -destinationItem $DestinationItemPath
}
Handle Errors and Logging
When performing file copying operations with PowerShell, it’s important to handle errors gracefully and implement robust logging mechanisms. This will help you identify any issues and troubleshoot them effectively.
You can use PowerShell’s Try-Catch blocks to handle errors and log relevant information. Here’s an example:
try {
    Copy-Item -Path 'C:\Source\file.txt' -Destination 'D:\Destination'
} catch {
    Write-Host "An error occurred: $_"
    # Additional error handling or logging code here
}
In this example, any errors that occur during the file copying process will be caught and logged, allowing for further analysis and troubleshooting.
Wrapping up
In summary, the Copy-Item cmdlet is a powerful tool for copying files in PowerShell. With the use of just a few simple commands, users can quickly and easily transfer files between folders or locations. Throughout this guide, we have explored the basic syntax of copying files with PowerShell and learned how to leverage advanced options for more complex file-copying operations. Whether you need to copy a single file or multiple files, PowerShell provides flexible options to meet your file copy needs. By understanding the basic syntax and options available, you can easily copy files from one location to another. This makes PowerShell an invaluable tool for administrators who need to quickly and easily copy files with minimal effort.
To copy files using PowerShell, you can use the Copy-Item command with the -Path and -Destination parameters. The basic syntax is “Copy-Item -Path -Destination [destination path]”. Here’s an example of copying a single file:Copy-Item -Path "C:\source\file.txt" -Destination "C:\destination\file.txt"
Yes, you can rename files during the copy process by using the Copy-Item command with the -Destination parameter followed by the new file name.Copy-Item -Path "C:\Source\file.txt" -Destination "C:\Destination\newfile.txt"
You can copy files to a remote server by creating a PowerShell session to the server and using the Copy-Item command with the appropriate source and destination paths. E.g.
#Define the source file or directory and the destination path on the remote server$SourcePath = "C:\local\Source"
$DestinationPath = "C:\remote\destination"
#Specify the remote server's name or IP address
$RemoteServer = "remote-server-name-or-ip"
#Establish a session with the remote server
$session = New-PSSession -ComputerName $remoteServer -Credential (Get-Credential)
#Copy the file or folder to the remote server
Copy-Item -Path $sourcePath -Destination $destinationPath -ToSession $session
This allows you to copy files over a network securely.
Yes, you can copy multiple files and folders by using wildcards, filters, and the -Recurse parameter with the Copy-Item command. This allows you to select specific files or copy entire directories and their contents.Copy-Item -Path "C:\Source\file1.txt", "C:\Source\file2.txt" -Destination "C:\Destination\"
To copy today’s files in PowerShell, use Get-ChildItem -Recurse -File to list files from the directory and its subdirectories, filter them by LastWriteTime with Where-Object against today’s date from Get-Date, and then use Copy-Item to copy these files to the desired location. Here is the PowerShell script to copy only files modified today:$SourceDirectory = "C:\Source"
$DestinationDirectory = "C:\Destination"
Get-ChildItem -Path $SourceDirectory -Recurse -File | Where-Object { $_.LastWriteTime.Date -eq (Get-Date).Date } | ForEach-Object {
$DestinationPath = Join-Path $DestinationDirectory $_.FullName.Substring($SourceDirectory.Length + 1)
Copy-Item $_.FullName -Destination $DestinationPath
}
To copy a file into a folder in PowerShell, you can use the Copy-Item cmdlet. Here’s an example of how to achieve this:Copy-Item -Path "C:\Source\file.txt" -Destination "C:\Destination\"
Yes, you can use xcopy in PowerShell. PowerShell provides a way to run external commands and utilities so that you can use xcopy within a PowerShell script or directly on the PowerShell command line.xcopy "C:\Source" "C:\Destination"/E /I
Yes, but you need to specify the full network path, including the server name and share. Example: Copy-Item -Path \\server\share\myfile.txt -Destination C:\newfolder