How to Delete a Folder in PowerShell?
Requirement: Remove a Directory in PowerShell.
PowerShell to Delete a Folder
Have you ever faced a situation where you needed to delete a bunch of folders all at once? Or perhaps a complex scenario, where you had to eliminate a series of directories based on a specific pattern or condition? If you’ve ever tried to do these tasks manually, you’ll appreciate the efficiency and power that Windows PowerShell brings to the table. In this article, we’ll delve into the fascinating world of PowerShell, specifically focusing on how to delete folders effectively and efficiently.
Deleting a folder using PowerShell is simple and can be completed using several methods. Let’s look at how to do it step by step.
Table of contents
- PowerShell to Delete a Folder
- How to Delete a Folder Using PowerShell?
- How to force delete a folder in PowerShell?
- PowerShell Delete Folder If Exists
- Delete a Folder in the Current Directory with PowerShell
- PowerShell to delete a folder and subfolders
- Delete all Files and Sub-Folders from a Folder using PowerShell
- Delete Specific contents of a folder
- Deleting Folders Based on a Condition
- Precautions to take before deleting folders with PowerShell
How to Delete a Folder Using PowerShell?
As a system administrator or a regular user, there are times when you need to delete folders on your computer. While deleting a folder manually is a straightforward process, it can be time-consuming if you have multiple folders to delete. However, with PowerShell, you can automate the process and save time.
To begin, open the Windows Start menu, type “PowerShell” into the search bar, and open it as administrator (Otherwise, You may run into the “access to the path is denied” error!). To delete a folder in PowerShell, you can use the Remove-Item cmdlet with the -Recurse parameter. This cmdlet will need to specify the path of the folder you want to delete using the -Path parameter.
The Syntax for Remove-item:
Remove-Item
      [-Path] <String[]> | -LiteralPath <String[]>
      [-Filter <String>]
      [-Include <String[]>]
      [-Exclude <String[]>]
      [-Recurse]
      [-Force]
      [-Credential <PSCredential>]
      [-WhatIf] [-Confirm]
      [-Stream <String[]>]
      [<CommonParameters>]
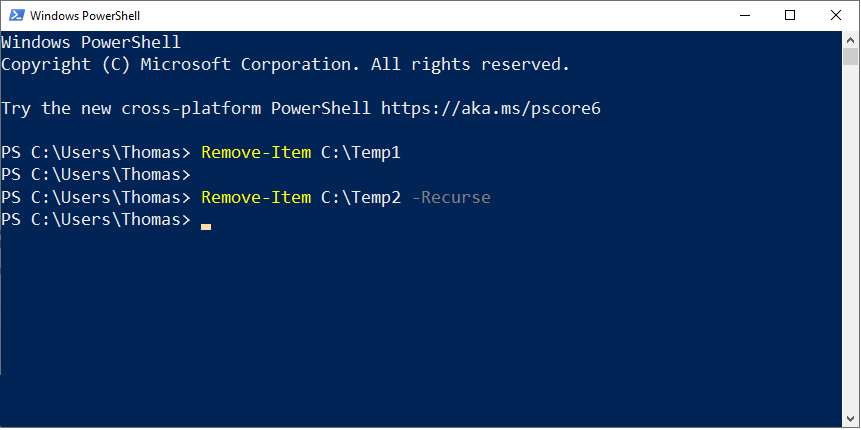
Here’s an example of how to remove a directory using the Remove-Item cmdlet:
# powershell to remove a directory C:\path\folder
Remove-Item -Path C:\path\folder -Recurse
This will delete the folder and all of its contents, including subfolders and files. You can also use its alias, Del, Rmdir, or RM commands. Use the -LiteralPath parameter to delete the given path exactly without any wildcard inclusions.
You can verify that everything was deleted by going to your original folder location using Windows File Explorer and making sure that everything has been removed completely. Please note that the Remove-Item cmdlet can also be used to delete many other items, including files, folders, registry keys, variables, aliases, and functions.
Deleting Multiple Folders using PowerShell script
PowerShell’s strength lies in its ability to handle multiple items at once. If you need to delete multiple folders simultaneously, provide their paths separated by a comma:
Remove-Item -Path C:\Temp\MyFolder1, C:\Temp\MyFolder2 -Recurse
This command will delete both MyFolder1 and MyFolder2, along with their contents. Similarly, to delete multiple folders and contents without confirmation, use:
#Parameter
$Directories = "C:\Temp\Logs", "C:\Temp\Backups", "C:\Temp\AppLogs"

#Delete files in each directory
ForEach ($Dir in $Directories) {
    Remove-Item -Path $Dir -Recurse -Force
}
How to force delete a folder in PowerShell?
Sometimes, you may encounter an error when trying to delete a folder with PowerShell. This can happen if the folder contains read-only files or if another program is using it.
You can use the -Force parameter to delete the folder and its contents without prompting for confirmation. For example:
Remove-Item -Force -Recurse -Path "C:\Users\Thomas\Desktop\Unused"
The above command will delete the folder and its contents without prompting for confirmation.
PowerShell Delete Folder If Exists
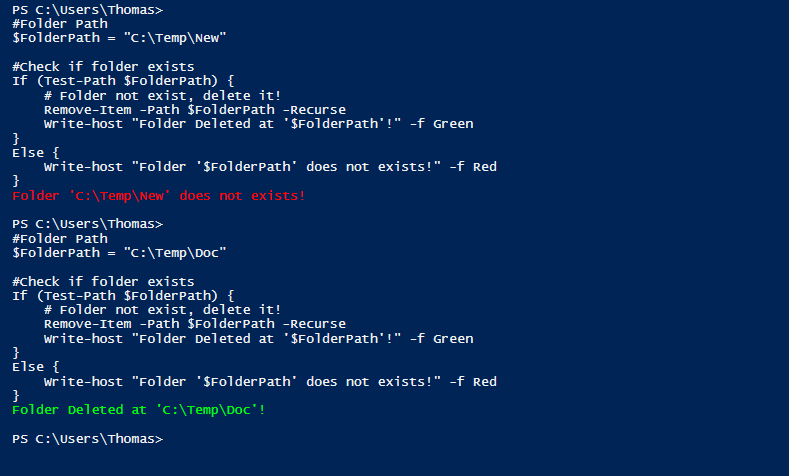
Here is an example of how to delete a folder in PowerShell if it exists:
#Folder Path
$FolderPath = "C:\Temp\New"

#Check if folder exists
If (Test-Path $FolderPath) {
    # Folder not exist, delete it!
    Remove-Item -Path $FolderPath -Recurse
    Write-host "Folder Deleted at '$FolderPath'!" -f Green
}
Else {
    Write-host "Folder '$FolderPath' does not exists!" -f Red
}
Here is the PowerShell script in action:
Delete a Folder in the Current Directory with PowerShell
Once you have opened PowerShell, use the cd command to change directories to where the folder you want to delete is located. For example, if your folder is called “NewFolder” and it is located in “C:\Users\YourUserName\Documents”, then use the following command: cd C:\Users\YourUserName\Documents.
You can also use the rd or rmdir command as you do in the command prompt, which is an alias for Remove-Item, to delete a folder and its contents. For example, to delete a Folder “New” in the current directory with all its contents without prompting for confirmation, use:
rd .\[Your Folder Name] -Recurse -Force
Similarly, You can use the alias: Del command to delete a folder in PowerShell.
del C:\Temp\Logs -recurse -force
PowerShell to delete a folder and subfolders
If you want to delete a folder and its subfolders, you can use the Remove-Item command with the -Recurse parameter. For example, to delete the folder “C:\Folder1” and all its subfolders, you can run the following command:
Remove-Item -Path "C:\Folder1" -Recurse
The Remove-ItemRecurse command is used to delete a folder and all its contents recursively from specified locations. This means that it will delete all the subfolders and files in the folder.
Delete all Files and Sub-Folders from a Folder using PowerShell
How to delete all files and sub-folders from a Folder without deleting the given folder using PowerShell? To delete all files and folders from a specific folder using PowerShell, you can use the Remove-Item cmdlet with the -Recurse and -Force parameters.
Here’s an example of how to use this cmdlet to delete all files and folders from a folder called “C:\Temp”:
Remove-Item C:\Temp\* -Recurse -Force
The * wildcard tells PowerShell to delete all files and folders in the “C:\Temp” folder. The -Recurse parameter tells PowerShell to delete the contents of the folder, including any subfolders and files. The -Force parameter tells PowerShell to delete the files and folders without prompting for confirmation.
Delete Specific contents of a folder
If you want to delete the contents of a folder without deleting the folder itself, you can use the Remove-Item command with the -Exclude parameter. This parameter allows you to specify the files or folders that you want to exclude from the delete operation. For example, to delete all the files in the folder “C:\Folder1” except for the file “file1.txt”, you can run the following command:
Remove-Item -Path "C:\Folder1\*" -Exclude "file1.txt" -Recurse
Similarly, You can use the “-Include” switch to include only specific files or file types for deletion. Similarly, you can filter specific file types and delete file (E.g., Txt files) with wildcard characters.
# Delete only .txt files in a directory
Remove-Item -Path "C:\Temp\*" -Filter "*.txt"
In this example, -Filter “*.txt” tells Remove-Item to only delete items that match the filter, which in this case is all .txt files. To include multiple files in deletion, use:
# Delete only .txt and .docx files in a directory and its subdirectories
Remove-Item -Path "C:\Temp\Logs\*" -Include "*.txt","*.docx" -Recurse
In the above script, -Include “.txt”,”.docx” tells Remove-Item to only delete items that match the include patterns, which in this case are all .txt and .docx files. The -Recurse parameter tells it to look in all subdirectories of the specified path for child items.
Deleting Folders Based on a Condition
PowerShell can also delete folders based on specific conditions. For example, you might want to delete all folders that haven’t been modified in the last seven days. Here’s how you could do this:
Get-ChildItem -Path C:\Temp -Recurse -Directory | Where-Object { $_.LastWriteTime -lt (Get-Date).AddDays(-7) } | Remove-Item -Recurse -WhatIf
This command retrieves all directories in C:\Temp using Get-ChildItem (Aliases: Dir, GCI, or LS), which were last modified more than seven days ago, and pipe them to the Remove-Item cmdlet to delete them. The -Whatif parameter is added to preview the operation without actually doing the delete operation.
Please note that we have not used the ForEach-Object loop, as the Remove-Item can take the input from the pipeline.
Precautions to take before deleting folders with PowerShell
Before you start deleting folders with PowerShell, it is important to take some precautions to avoid accidentally deleting important files or folders. Here are some precautions that you should take:
- Double-check the folder path to ensure that you are deleting the correct folder.
- Back up important files and folders before deleting them.
- Test the delete operation on a test folder to ensure that it works as expected. Use -whatif switch to preview the results.
Wrapping up
Deleting a folder using PowerShell is a simple process that can be completed using several methods. PowerShell is a mighty tool that can significantly simplify your life when dealing with file system tasks. By harnessing the power of cmdlets like Remove-Item, you can easily handle complex scenarios. PowerShell offers an efficient and reliable solution, whether you’re dealing with a single folder, multiple directories, or complex conditions.
This article showed you how to delete a folder using PowerShell. Please note that all these methods completely remove the Folder without sending it to the recycle bin.
Use the Get-ChildItem cmdlet in combination with Remove-Item to recursively delete all empty directories within a specified directory:Get-ChildItem -Path "C:\Temp\Logs" -Recurse -Directory | Where-Object { (Get-ChildItem -Path $_.FullName -Recurse -File -EA SilentlyContinue | Measure-Object).Count -eq 0 } | Remove-Item -Recurse -Force
To delete a folder with subfolders and files in CMD (Command Prompt), you can use the rmdir (or equivalently rd) command. Here’s an example:rmdir /S /Q "C:\path\to\your\directory"
Here, /S removes the specified directory and all of its subdirectories, including all files. /Q runs in quiet mode, which means you won’t be asked to confirm the deletion.
Use the Remove-Item cmdlet to delete all files and folders recursively in PowerShell. Here’s an example:Remove-Item -Path "C:\Temp\Logs\*" -Recurse -Force
You can delete a file in PowerShell using the Remove-Item cmdlet. Remove-Item -Path "C:\Temp\LogFile.txt" -Force
The -Force parameter helps to delete read-only files and suppress any confirmation prompts.
Yes, use the -Force parameter to reveal and delete hidden folders. Remove-Item -Path "C:\Temp\backup" -Force
Use the -Recurse parameter with Remove-Item so all contents, including sub-folders get removed:Remove-Item -Path "C:\Temp\john" -recurse
Pipe the folder objects into Where-Object to filter by LastWriteTime, then remove:Get-ChildItem "C:\Temp" -Directory | Where-Object {$_.LastWriteTime -lt (Get-Date).AddDays(-30)} | Remove-Item -Recurse
This deletes folders recursively if they are over 30 days old based on LastWriteTime timestamp.
to remove directories you can also do this…
type in del and press enter and it should say this:
cmdlet Remove-Item at command pipeline position 1
Supply values for the following parameters:
Path[0]:
type directory (C:\exampleDirectory) and press enter, and it will let you add more directories (Path[1]: )
when you’re satisfied with the added directories, just press enter twice to run the command.
del basically just runs the Remove-Item cmdlet but makes the use a little more simple than having to write out the whole command.
Just thought I’d share