How to Bulk Add Members to Distribution List in Office 365?
Distribution lists in Office 365 allow you to send emails to a group of recipients with a single email address. This feature can simplify email communication within an organization by enabling users to send emails to specific groups or individuals with a single click. Adding members to a distribution list is an essential task that every administrator must know how to do. This article will show you how to add contacts to an Office 365 distribution list.
How to add email to the distribution list in Office 365?
Adding members to a distribution list in Office 365 is a simple process that can be completed in just a few steps. Here’s how to do it:
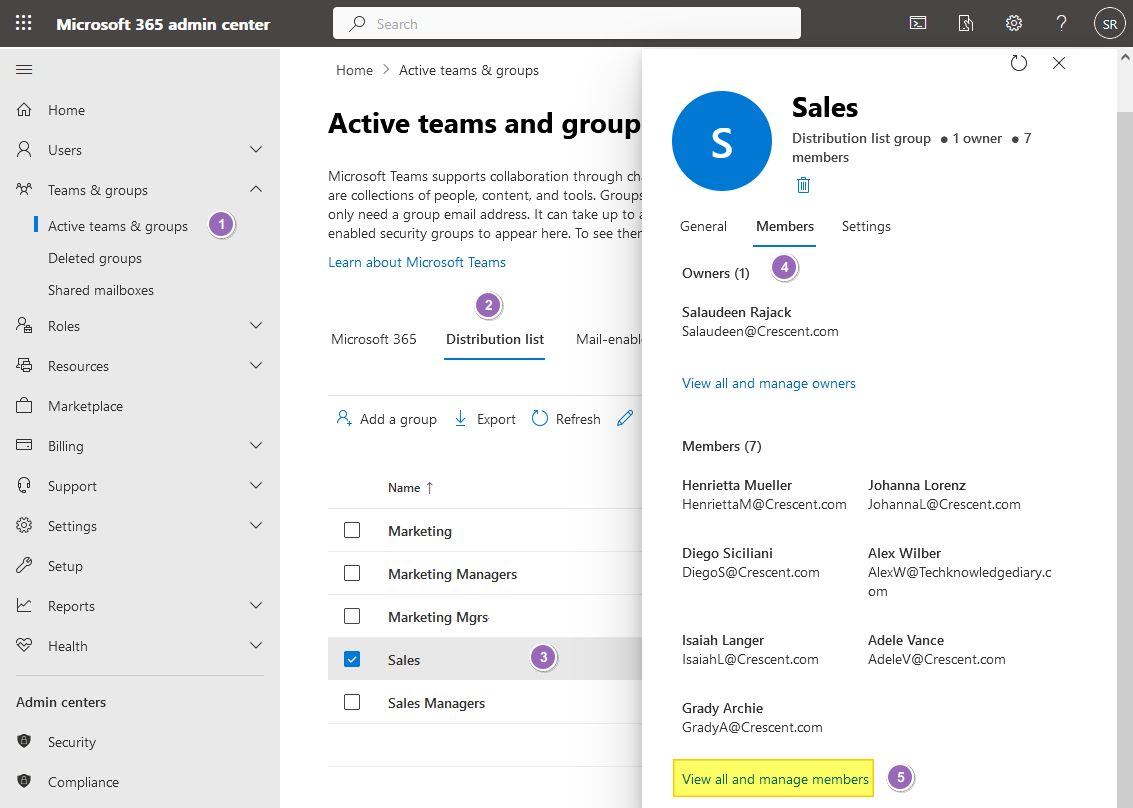
- Access the Office 365 Admin Center with your admin credentials.
- Navigate to “Teams & Groups” > “Active teams & groups” from the left navigation.
- Click on the “Distribution Lists” tab on the Active teams and groups page.
- Find the distribution list to which you want to add members and click on it to open its properties.
- Click on the “Members” tab >> Click on “View all and manage members” to add a member to the group.

- Click the “Add Members” button to open the Members window.

- In the “Add Members” window, you can search for users or groups you want to add to the distribution list. You can search for a specific user by typing their name in the search box.
- Once you have found the user or group you want to add to the distribution list, select them by clicking the checkbox next to their name.

- Click the “Add” button at the bottom to add the selected members to the distribution list.
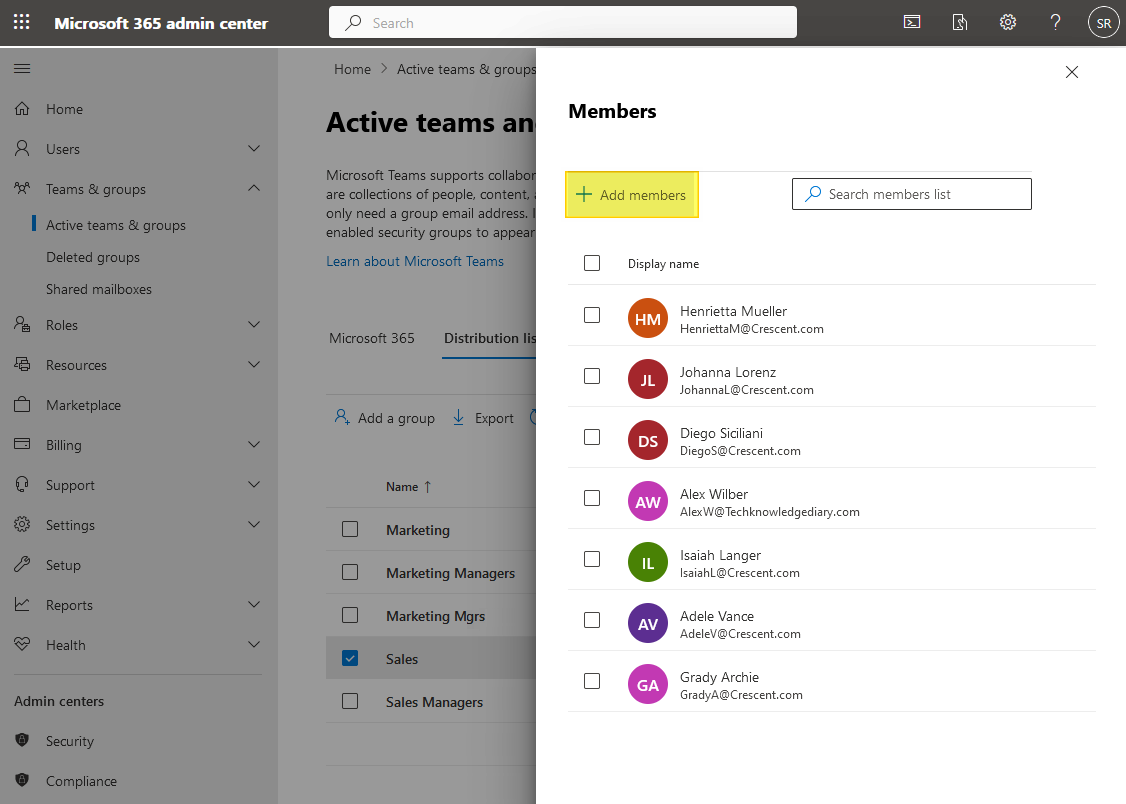

The added members will now receive emails sent to the distribution list.
PowerShell to Add a user to the Distribution Group
Office 365 administrators can automate various administrative tasks using PowerShell, including adding members to distribution lists. To add a member to a distribution list using PowerShell script, use the Add-DistributionGroupMember cmdlet:
#Connect to Exchange Online
Connect-ExchangeOnline -ShowBanner:$False

#Add User to the Distribution Group
Add-DistributionGroupMember –Identity "Sales@Crescent.com" -Member "Steve@Crescent.com"
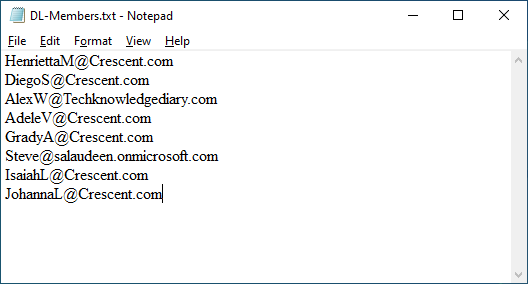
PowerShell to Bulk Import Members to a Distribution list
How about adding users in bulk to a Distribution group? Let’s import multiple users to a distribution list from a text file.
$GroupEmailID = "Sales@Crescent.com"
$CSVFile = "C:\Temp\DL-Members.txt"

#Connect to Exchange Online
Connect-ExchangeOnline -ShowBanner:$False

#Get Existing Members of the Distribution List
$DLMembers =  Get-DistributionGroupMember -Identity $GroupEmailID -ResultSize Unlimited | Select -Expand PrimarySmtpAddress

#Import Distribution List Members from CSV
Import-CSV $CSVFile -Header "UPN" | ForEach {
    #Check if the Distribution List contains the particular user
    If ($DLMembers -contains $_.UPN)
    {
        Write-host -f Yellow "User is already member of the Distribution List:"$_.UPN
    }
    Else
    {
        Add-DistributionGroupMember –Identity $GroupEmailID -Member $_.UPN
        Write-host -f Green "Added User to Distribution List:"$_.UPN
    }
}
Here is what my text file looks like – One Email in each line:
Bulk Add Users to Distribution lists using PowerShell
Bulk-adding users to distribution lists in Office 365 can be time-consuming if done manually. However, PowerShell can be used to automate this process and make it more efficient. Here’s how to bulk add users to distribution lists using PowerShell in Office 365:
$CSVFile = "C:\Temp\DL-Group-Members.csv"

Try {
    #Connect to Exchange Online
    Connect-ExchangeOnline -ShowBanner:$False

    #Get date from CSV File
    $CSVData = Import-Csv -Path $CSVFile

    #Iterate through each row in the CSV
    ForEach($Row in $CSVData)
    {
        #Get the Distribution Group
        $Group = Get-DistributionGroup -Identity $Row.GroupEmail

        If($Group -ne $Null)
        {
            #Get Exisiting Members of the Group
            $GroupMembers = Get-DistributionGroupMember -Identity $Row.GroupEmail -ResultSize Unlimited | Select -Expand PrimarySmtpAddress

            #Get Users to Add to the Group
            $UsersToAdd =  $Row.Users -split ","

            #Add Each user to the Security group
            ForEach ($User in $UsersToAdd)
            {
                #Check if the group has the member already
                If($GroupMembers -contains $User)
                {
                    Write-host "'$($User)' is already a Member of the Group '$($Group.DisplayName)'" -f Yellow
                }
                Else
                {
                    Add-DistributionGroupMember –Identity $Row.GroupEmail -Member $User
                    Write-host -f Green "Added Member '$User' to the Group '$($Group.DisplayName)'"
                }
            }
        }
        Else
        {
            Write-host "Could not Find Group:"$Row.GroupName
        }
    }
}
Catch {
    write-host -f Red "Error:" $_.Exception.Message
}
Prepare a CSV file containing the email addresses of the users you want to add to the distribution list. The CSV file should have a header row with the following column names: GroupEmail, and Users. Here is my CSV template:

Conclusion
Adding members to a distribution list in Office 365 is a straightforward process that can be done using either the Office 365 Admin Center or PowerShell. Following the steps outlined in this article, you can quickly and easily add members to a distribution list and improve communication and collaboration within your organization. This PowerShell method is more efficient than adding users manually, especially when dealing with a large number of users.
Salaudeen, I’ve lifted a couple of your scripts for my own use. Thank you. Saved me from my own clunky thinking.
This was exactly what I was looking for. I’m a PowerShell newbie and the code for bulk-adding users worked flawlessly.
Thank you!!!
Hi
Re PowerShell to Bulk Import Members to a Distribution list
Being new to powershell…. I’ve changed the csv file name and location to suit my needs, Dl has been created.
if I past the script it adds >> in front of every line and doesn’t execute.
Please can you explain how I use it?
Thanks
Please use PowerShell ISE or Visual studio code.
When I ran the script I got the following errors:
At C:\Temp\bulkadd.ps1:46 char:30
+ write-host -f Red “Error:” $_.Exception.Message
+ ~~~~~~~~~~~~~~~~~~~~~~
The string is missing the terminator: “.
At C:\Temp\bulkadd.ps1:33 char:17
+ {
+ ~
Missing closing ‘}’ in statement block or type definition.
At C:\Temp\bulkadd.ps1:26 char:13
+ {
+ ~
Missing closing ‘}’ in statement block or type definition.
At C:\Temp\bulkadd.ps1:17 char:9
+ {
+ ~
Missing closing ‘}’ in statement block or type definition.
At C:\Temp\bulkadd.ps1:12 char:5
+ {
+ ~
Missing closing ‘}’ in statement block or type definition.
At C:\Temp\bulkadd.ps1:3 char:5
+ Try {
+ ~
Missing closing ‘}’ in statement block or type definition.
At C:\Temp\bulkadd.ps1:50 char:129
+ … bers-to-distribution-list-in-office-365-powershell.html#ixzz8Ix8cr8ED
+ ~
The Try statement is missing its Catch or Finally block.
+ CategoryInfo : ParserError: (:) [], ParseException
+ FullyQualifiedErrorId : TerminatorExpectedAtEndOfString
However ChatGPT fixed was able to rectify the script, see below:
$CSVFile = “C:\Temp\DL-Group-Members.csv”
Try {
# Connect to Exchange Online
Connect-ExchangeOnline -ShowBanner:$False
# Get data from CSV File
$CSVData = Import-Csv -Path $CSVFile
# Iterate through each row in the CSV
ForEach ($Row in $CSVData) {
# Get the Distribution Group
$Group = Get-DistributionGroup -Identity $Row.GroupEmail
If ($Group -ne $Null) {
# Get Existing Members of the Group
$GroupMembers = Get-DistributionGroupMember -Identity $Row.GroupEmail -ResultSize Unlimited | Select -Expand PrimarySmtpAddress
# Get Users to Add to the Group
$UsersToAdd = $Row.Users -split “,”
# Add Each user to the Security group
ForEach ($User in $UsersToAdd) {
# Check if the group has the member already
If ($GroupMembers -contains $User) {
Write-Host “‘$($User)’ is already a Member of the Group ‘$($Group.DisplayName)'” -ForegroundColor Yellow
} else {
Add-DistributionGroupMember -Identity $Row.GroupEmail -Member $User
Write-Host -ForegroundColor Green “Added Member ‘$User’ to the Group ‘$($Group.DisplayName)'”
}
}
} else {
Write-Host “Could not Find Group: $($Row.GroupEmail)” -ForegroundColor Red
}
}
}
Catch {
Write-Host -ForegroundColor Red “Error: $($_.Exception.Message)”
}
Microsoft products are not very handy to use, mainly due to the lack of proper interface design and usability. E.g. adding a copied list of emails is not possible into a Outlook Groups nor Teams Groups etc. THIS SHOULD BE A MANDATORY POSSIBILITY!