How to Empty the Recycle Bin using PowerShell?
The Recycle bin in Windows stores deleted files temporarily before permanently deleting them. It allows you to restore accidentally deleted files if needed. However, the recycle bin can quickly fill up and take up disk space. Knowing how to empty the recycle bin using PowerShell can help free up space when needed.
In this beginner’s guide, we will go over various ways to empty the recycle bin using PowerShell scripts and the command line.
Why emptying the recycle bin is important for system performance?
On Windows, the recycle bin acts as a temporary storage space for deleted files. When you delete a file, it is not immediately removed from your system. Instead, it is moved to the recycle bin, allowing you to restore it if needed. This provides an added layer of protection against accidental deletions.
While the recycle bin serves as a safety net, it can also consume a significant amount of disk space over time. As files accumulate in the recycle bin, they continue to occupy space on your hard drive, potentially slowing down your system and affecting its overall performance. Regularly emptying the recycle bin is crucial to free up disk space and maintain optimal system performance.
With its extensive capabilities and vast library of commands, PowerShell offers a seamless way to manage and automate various tasks in Windows operating systems. One such task is emptying the recycle bin, which is essential for maintaining system performance and reclaiming valuable disk space.
How to empty the recycle bin manually?
Before diving into PowerShell’s world, let’s explore the manual method to empty the recycle bin. The most straightforward way to empty the recycle bin is:
Alternatively, you can open the recycle bin and click the “Empty Recycle Bin” button in the toolbar. These methods are simple and effective for emptying the recycle bin, but they lack the automation and customization capabilities that PowerShell offers.
Empty the Recycle bin using the Command Line
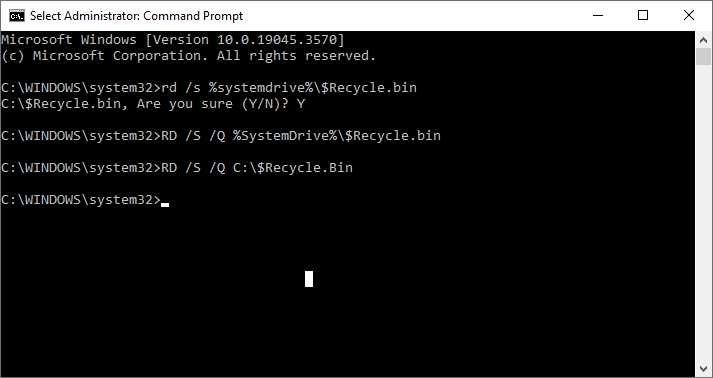
The easiest way to empty the recycle bin for the currently logged-in user is as follows:
RD /S /Q %SystemDrive%\$Recycle.bin

This will clear the recycle bin for the user running the command. Any deleted files in the bin will be permanently removed.
To empty all users’ recycle bins:
RD /S /Q C:\$Recycle.Bin
How to empty the recycle bin using the PowerShell?
Now that we have a basic understanding of the recycle bin and its significance. Let’s explore the PowerShell commands that enable us to manage the recycle bin efficiently. PowerShell provides a set of cmdlets (pronounced command-lets) specifically designed for managing the recycle bin. These cmdlets allow you to perform various actions, such as listing the items in the recycle bin, restoring deleted files, and, of course, emptying the recycle bin.
While manually emptying the Recycle Bin through the graphical interface is straightforward, there are situations where automating or scripting this task becomes essential. Here is how to empty the recycle bin using PowerShell:
- Open PowerShell by searching for it in the Start menu or by pressing the Windows key + X
- Select “Windows PowerShell (Admin)” from the Power User menu. Or Right-Click on the Windows PowerShell and select “Run as Administrator”.
- Once PowerShell is open, type the following command:
Clear-RecycleBin -Force
This command will empty the recycle bin, permanently deleting all the files inside it. The -Force parameter ensures that the operation is performed without any prompts for confirmation. If you want to clear the recycle bin for a specific drive on your computer, type in the following command and then the corresponding letter for the drive:
Clear-RecycleBin -DriveLetter C:
It’s important to note that this command only affects the current user’s recycle bin. If you want to empty the recycle bin for all users on the system, we will explore that in the next section.
Emptying the recycle bin for all users using PowerShell
Emptying the recycle bin for all users on a system requires administrative privileges. To achieve this, open an elevated PowerShell session by right-clicking on the PowerShell icon and selecting “Run as administrator.” Once the elevated PowerShell session is open, you can use the following command to empty the recycle bin for all users:
Get-ChildItem -Path 'C:\$Recycle.Bin' -Force | Remove-Item -Recurse -Force
This command retrieves all the items in the $Recycle.Bin directory, which is where the recycle bin is located, and permanently deletes them using the Remove-Item cmdlet with the -Recurse parameter. The force parameter ensures that no confirmation prompts are displayed during the deletion process.
Automate recycle bin management with PowerShell
PowerShell offers advanced techniques to automate and customize recycle bin management further. For example, you can schedule a PowerShell script to run at specific intervals using the Windows Task Scheduler, ensuring that the recycle bin is regularly emptied without any manual intervention. Additionally, you can leverage PowerShell’s scripting capabilities to selectively delete files based on specific criteria, such as file size, file type, or date of deletion.
If you find yourself frequently needing to empty the recycle bin using PowerShell, you can create a PowerShell script to automate the process. This allows you to execute the script whenever needed, saving you time and effort. Here’s an example of a simple PowerShell script that clears the recycle bin:
$RecycleBinPath = 'C:\$Recycle.Bin'
Get-ChildItem -Path $recycleBinPath -Force | Remove-Item -Recurse -Force
Save the script with a .ps1 extension (e.g., Clear-RecycleBin.ps1), and then you can run it by opening PowerShell and executing the script file using the following command:
.\Clear-RecycleBin.ps1
Tips and best practices for using PowerShell to empty the recycle bin
When working with PowerShell to empty the recycle bin, it’s important to remember a few tips and best practices. First, always exercise caution when permanently deleting files, as there is no way to recover them once they are gone. Double-check the paths and files you will delete to avoid unintended consequences. Second, consider creating a backup of important files before running any scripts or commands that empty the recycle bin. This provides an added layer of protection in case of accidental deletions.
Conclusion and final thoughts
Cleaning out the recycle bin on Windows using PowerShell is straightforward once you know the right commands. This allows you to free up space and remove content when needed. I hope this beginner’s guide has helped you learn how to manage the recycle bin using PowerShell effectively. You now have several options to empty the recycle bin, both for individual users and the whole system. PowerShell provides an efficient and customizable way to empty the recycle bin, freeing up valuable disk space and optimizing system performance.
Whether you prefer manual methods or advanced scripting techniques, PowerShell empowers you to take control of your system’s recycle bin and keep it clean and clutter-free. Remember, regularly emptying the recycle bin is essential for maintaining optimal system performance. So, you can consider having a scheduled job to empty the recycle bin.

