Using PowerShell Write-Host Cmdlet: A Quick Guide
One of the most commonly used commands in PowerShell is the Write-Host command, which is used to print messages and information to the console. Although it may seem like a simple command, there’s more to Write-Host than meets the eye. The write-Host cmdlet is used to output text, variables, and formatted data to your console window, providing valuable feedback during script execution. Understanding the fundamentals of Write-Host is essential for effective script creation and debugging. In this comprehensive guide, we will explore the different aspects of the Write-Host command and show you how you can make the most of this powerful command.
Table of contents
- Understanding the Write-Host Command and its Purpose
- What’s the difference between Write-Output and Write-Host in PowerShell?
- Formatting output with PowerShell Write-Host Cmdlet
- Display variables with the Write-Host Command
- Using Formatting Operator with PowerShell Write-Host
- Use the Write-Host cmdlet to Display Data with Format-Table
- Customizing the appearance of Write-Host output to Table in PowerShell
- Redirecting Write-Host output to a file in Windows PowerShell
- Using arrays with the Write-Host Command in PowerShell
- Examples of Using Write-Host for Different Scenarios
- Tips and Tricks for Using Write-Host Effectively
Understanding the Write-Host Command and its Purpose
To begin our journey into mastering PowerShell Write-Host, it is important to grasp the basics. The Write-Host command in PowerShell is used to display output directly to the console. It is particularly useful when we want to provide information or feedback to the user during script execution. Unlike other cmdlets like Write-Output, Write-Host is specifically designed for visual output and does not send data down the pipeline, making it ideal for displaying information in a human-readable format.
Use this cmdlet to display messages directly to the console (host).
Write-Host "Hello, World!"
Write-Host Parameters
To fully harness the power of PowerShell Write-Host, it is essential to master the various parameters that it offers. By understanding and utilizing these parameters effectively, you can enhance your scripting capabilities and create output that meets your specific requirements. The syntax for write-host cmdlet is as follows:
Write-Host
[[-Object] <Object>]
[-NoNewline]
[-Separator <Object>]
[-ForegroundColor <ConsoleColor>]
[-BackgroundColor <ConsoleColor>]
[<CommonParameters>]
Some key parameters to consider include:
| Parameter | Description |
|---|---|
| -ForegroundColor and -BackgroundColor: | The backgroundcolor and foregroundcolor parameters allow you to change the text color and specifies the background color of the text, respectively, providing visual clues and highlighting important information. |
| -NoNewLine | This parameter ensures that the output is displayed on the same line, allowing you to create concise and compact output. |
| -Separator | By specifying a separator string, you can insert a separator between multiple Write-Host statements, improving readability and organization. |
| -Object | This parameter allows you to pass complex objects to Write-Host, enabling you to display detailed information or specific properties of the object. |
By experimenting with these parameters and exploring their capabilities, you can unlock the full potential of PowerShell Write-Host and create output that perfectly suits your scripting needs. Write-Host can also be used as a wrapper for Write-Information since PowerShell 5.0. However, the $InformationPreference preference variable and InformationAction common parameter do not affect the Write-Host output.
What’s the difference between Write-Output and Write-Host in PowerShell?
While both cmdlets serve the purpose of displaying information, they have distinct behaviors that make them suitable for different scenarios. The main difference between the two commands is that Write-Host doesn’t produce output for subsequent commands to use. On the other hand, Write-Output sends the output to the pipeline, which lets you capture and manipulate it further.
It is important to understand when to use Write-Host and when to use Write-Output in order to leverage the power of PowerShell effectively. In short:
- Write-Host: Outputs information directly to the PowerShell console. It does not return any objects. It’s primarily used for displaying messages to the user during script execution.
- Write-Output: Sends output to the pipeline. If it’s the last cmdlet in the pipeline, PowerShell displays the output.
Formatting output with PowerShell Write-Host Cmdlet
One of the key advantages of PowerShell Write-Host is the ability to customize the appearance of your console output. We can use different formatting options, such as changing the foreground and background colors, adding new lines, and customizing the appearance of the output to create visually appealing and informative output that enhances readability.
Foreground and Background Colors
For example, to change the foreground color of the output to red, we can use the following command with -foregroundcolor parameter:
Write-Host -ForegroundColor Red "This text will be displayed in red."
This can be particularly useful when you want to highlight important information or differentiate between different types of output. Additionally, you can also format the background color of your output using the -BackgroundColor parameter. This allows you to create visually appealing and easily distinguishable console output.
Write-Host "Warning Message" -Foregroundcolor darkgreen -backgroundcolor white
Here is the list of available colors:
- Black
- DarkBlue
- DarkGreen
- DarkCyan
- DarkRed
- DarkMagenta
- DarkYellow
- Gray
- DarkGray
- Blue
- Green
- Cyan
- Red
- Magenta
- Yellow
- White
Write-Host for New Line and Same Line
By default, The write-host cmdlet writes each cmdlet output in a new line. To create a new line, you simply have to invoke the write-host cmdlet multiple times.
Write-Host "This is a message."
Write-Host "This is another message."
Or You can use the newline escape sequence `n (Newline character).
Write-Host "This is the first line."`n"This is the second line."
Use the -NoNewLine parameter to display the output on the same line.
Write-Host "This is the first line. " -NoNewLine
Write-Host "This is a continuation of the first line."
Output:

Display variables with the Write-Host Command
Variables are an integral part of any scripting language, and PowerShell is no exception. When working with Write-Host, you can leverage variables to display dynamic content and provide valuable information during script execution.
To incorporate variables in your Write-Host statements, you can use PowerShell’s string interpolation feature. By encasing the variable name within double quotes and preceding it with the $ symbol, you can dynamically insert the variable’s value into the output.
Use the following syntax to display the value of a variable using the Write-Host command:
$variable = "Hello, World!"
Write-Host "The value of the variable is: $variable"
This script displays the output “The value of the variable is: Hello, World!” on the console. This is particularly useful when we want to debug our scripts or monitor the values of variables during script execution.
Using Formatting Operator with PowerShell Write-Host
The formatting operator in PowerShell -f is helpful when you want to embed variable values within a string.
$fruit = "apple"
$quantity = 5
Write-Host ("I have {0} {1}s." -f $quantity, $fruit)

#Output: I have 5 apples.
The string before the -f operator contains placeholders {0}, {1}, {2}, etc., which indicate where the subsequent values should be inserted. The values after the -f operator fill in the placeholders. The values are comma-separated.
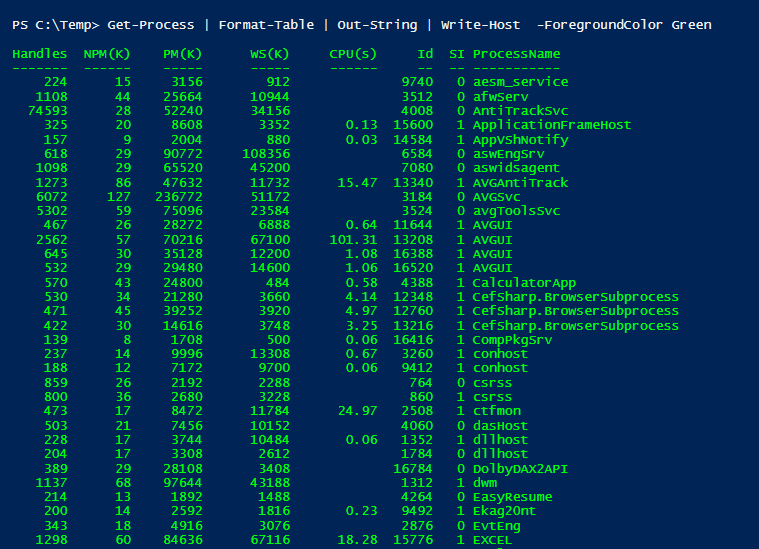
Use the Write-Host cmdlet to Display Data with Format-Table
People often use Write-Host to display simple text or variables, but they can also use it to present data in more complex formats, such as tables or lists. This allows you to organize and present information in a structured manner, making it easier for users to consume.
To display data in a table format, you can use the Format-Table cmdlet along with Write-Host. By piping the output of your script to Format-Table and then using Write-Host, you can present the data in a tabular format that aligns the columns neatly. For example:
Get-Process | Format-Table | Out-String | Write-Host -ForegroundColor darkgreen
This will display the running processes in a table format.
Besides tables, you can also use Write-Host to display data in other formats, such as lists or bullet points. By leveraging the appropriate formatting options and utilizing line breaks, you can present data in a visually appealing and organized manner.
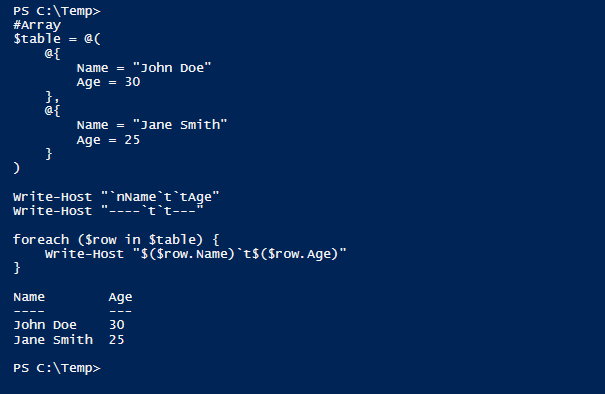
Customizing the appearance of Write-Host output to Table in PowerShell
You can customize the appearance of the Write-Host output using various formatting options. We can change the foreground and background colors, add new lines, format tables, and even display emojis.
For example, to display a table using the Write-Host command, we can use the following command:
#Array
$table = @(
    @{
        Name = "John Doe"
        Age = 30
    },
    @{
        Name = "Jane Smith"
        Age = 25
    }
)

Write-Host "`nName`t`tAge"
Write-Host "----`t`t---"

foreach ($row in $table) {
    Write-Host "$($row.Name)`t$($row.Age)"
}
This script will display a table with two columns (“Name” and “Age”) and two rows of data.
Redirecting Write-Host output to a file in Windows PowerShell
While Write-Host is primarily used to display output on the console, there may be situations where you need to redirect the output to a file for logging or further analysis. The Write-Host command does not directly support writing output to a file. However, we can still send the output to a file by redirecting the entire output of our PowerShell script with the Write-output cmdlet.
Write-Output "Script Execution Sarted at $(Get-Date)." | Out-File "C:\Logs\AppLog.txt" -Append
By using the redirection operator >, along with the desired file path, you can redirect the output of Write-Host to a file. For example,
Write-Host "Hello, World!" > output.txt
This will write the text “Hello, World!” to the file named output.txt.
This can be particularly useful when you want to capture and store the output of your scripts for future reference or analysis. Please note, when you redirect Write-Host output to a file, you only capture the text content. The file will not preserve any formatting options, such as colors or formatting.
Alternatively, you can use Start-Transcript to capture all console output.
Using arrays with the Write-Host Command in PowerShell
Arrays are a fundamental data structure in PowerShell, and we can use the Write-Host command to display the elements of an array on the console.
To display the elements of an array using the Write-Host command, we can use a loop to iterate through the array and display each element individually.
$Fruits = @("Apple", "Banana", "Orange")
foreach ($fruit in $fruits) {
    Write-Host $Fruit
}
This will display each element of the $fruits array on a separate line. Here’s another example:
$array = 1..5
$array | ForEach-Object { Write-Host $_ }
Here is another example of how to use the “-Separator” parameter with arrays:
#Project stages
$ProjectStages = @("Initiation", "Planning", "Execution", "Closure")

#Separate the array with different separators
Write-host ($ProjectStages) -Separator " => "

Examples of Using Write-Host for Different Scenarios
To truly master PowerShell Write-Host, it is important to explore its usage in various scenarios. Let’s take a look at some practical examples that demonstrate the power and versatility of Write-Host.
- Displaying Progress: When running long-running scripts or tasks, it is often helpful to provide progress updates to users. Write-Host can be used to display progress indicators, such as percentages or progress bars, allowing users to track the script’s execution.
- Error Handling: When encountering errors during script execution, it is crucial to provide meaningful error messages to aid in troubleshooting. Write-Host can be used to display error messages in a clear and concise manner, ensuring that users are aware of any issues that may arise.
- Debugging: During the development and testing phase of your scripts, Write-Host can be an invaluable tool for debugging. By strategically placing Write-Host statements at key points in your script, you can output variable values, intermediate results, or other relevant information to identify and resolve issues.
These are just a few examples of how Write-Host can be utilized in different scenarios. As you gain more experience with PowerShell, you will discover countless other creative ways to leverage the power of Write-Host.
Example 1: Displaying a progress bar during script execution
Let’s display a progress indicator using the write-host cmdlet:
$progress = 0
$target = 100

Write-Host "Progress:"

while ($progress -lt $target) {
    $progress += 10
    Write-Host -NoNewline "."; Start-Sleep -Milliseconds 500
}

Write-Host "Complete!"
This script will display a progress bar on the console, indicating the progress of a task.
Example 2: Displaying progress Message with Write-Host
When running a long script, it’s helpful to print status updates.
$items = Get-Content -Path "C:\list.txt"
foreach ($item in $items) {
    Write-Host "Processing $item" -ForegroundColor Yellow
    # Logic here
}
Example 3: Displaying error messages
This can be particularly useful when you want to highlight important information or differentiate between different types of output.
$errorMessage = "An error occurred. Please try again later."

Write-Host -ForegroundColor DarkRed $errorMessage
This script will display an error message in red on the console.
Tips and Tricks for Using Write-Host Effectively
As with any tool or cmdlet, there are certain tips and tricks that can help you use PowerShell Write-Host more effectively. By keeping these considerations in mind, you can maximize the impact of your console output and streamline your scripting process.
- Avoid Excessive Use: While Write-Host is a powerful tool, it is important to use it judiciously. Excessive use of Write-Host can clutter the console and make it difficult to focus on essential information. Reserve Write-Host for important updates, error messages, or critical output.
- Consider Alternative Output Methods: In some cases, outputting to the console may not be the most appropriate method. Consider other options, such as writing to a log file or sending output via email, depending on the context and requirements of your script.
- Utilize Formatting Options: Take advantage of the various formatting options available in Write-Host to enhance the appearance and readability of your output. Experiment with different colors, formatting styles, and separators to find a combination that works best for your needs.
- Test and Debug: When using Write-Host, it is crucial to test and debug your scripts thoroughly. Ensure that the output is displayed correctly, and the formatting is as intended. Use Write-Host strategically for debugging purposes to identify and resolve any issues in your script.
By following these tips and incorporating them into your scripting workflow, you can use PowerShell Write-Host more effectively and create output that is informative, visually appealing, and error-free.
Wrapping up
In this comprehensive guide, we have explored the different aspects of the Write-Host command in PowerShell. We have learned how to use it to display output on the console, format the output, redirect it to a file, manipulate variables, and customize the appearance of the output. With this knowledge, you can now leverage the power of the Write-Host command to create more interactive and visually appealing PowerShell scripts.