How to Change the Display Name of a User in Office 365?
In the world of Microsoft 365, the user display name plays a vital role in identifying individuals and facilitating effective communication. As an administrator of Office 365, there might be a need to change the display name for a user. Having a consistent display name allows your team members and customers easy access to messaging with each other, as well as tracking essential information such as messages or documents. Whether you are an administrator or an end-user, knowing how to change the display name is essential. This step-by-step guide will walk you through the process of changing the display name in the Microsoft 365 Admin Center, ensuring that you can easily update and personalize the user information.
Table of contents
- Understanding the importance of a user display name in Microsoft 365
- Step-by-step guide on changing display name in Microsoft 365 Admin Center
- Alternative methods to change the display name in Office 365
- Bulk Update Display name for Multiple users using PowerShell
- How to change your display name as an End User?
- Tips and best practices for changing display name in Office 365
Understanding the importance of a user display name in Microsoft 365
Let’s understand why it matters in the Microsoft 365 ecosystem. The display name is the name that appears when users send emails, chat in Microsoft Teams, or collaborate on documents. It helps in establishing professional relationships and ensuring clear communication within your organization. A user’s display name should accurately reflect their identity and be easily recognizable to colleagues. By customizing the display name, you can ensure that it aligns with your organization’s branding and enhances the overall user experience.
Step-by-step guide on changing display name in Microsoft 365 Admin Center
Changing the display name in the Microsoft 365 Admin Center is a straightforward process. Follow these steps to update the display name of a user:
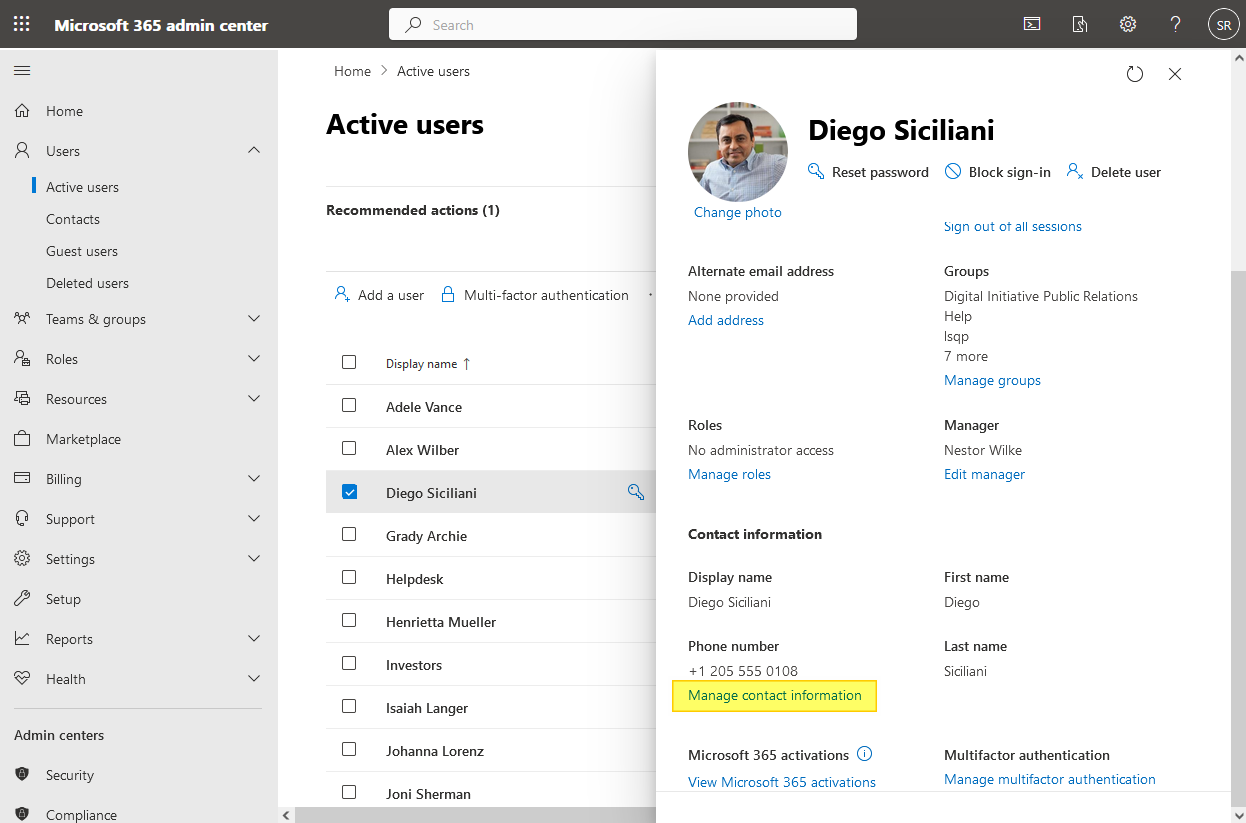
- Access the Microsoft 365 Admin Center: Log in to the Microsoft 365 Admin Center using your administrator credentials.
- Navigate to the Users section: Once logged in, go to “Users” and the “Active Users” page.
- Select the user whose display name you want to change: Locate the user from the list and click on their name to view their profile.
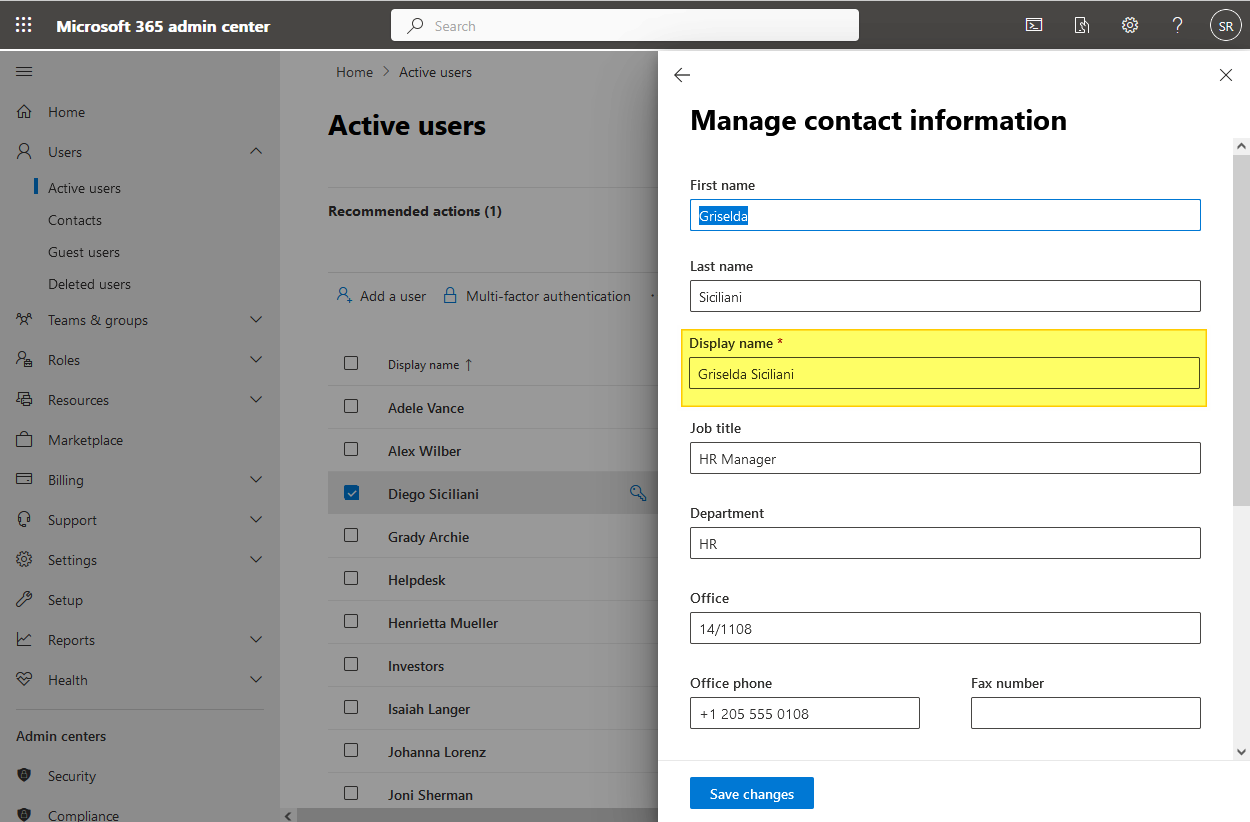
- Edit the display name: In the user’s profile, click on the “Manage contact information” link.

- Save the changes: After updating the display name, click on the “Save Changes” button to save the changes.

By following these simple steps, you can easily change the display name of a user in the Microsoft 365 Admin Center.
It’s important to remember that changing your display name in Microsoft 365 may not immediately update everywhere. It may take some time for the changes to propagate across all Microsoft 365 services.
Alternative methods to change the display name in Office 365
While the Microsoft 365 Admin Center provides a convenient interface to change display names, there are alternative methods available for more advanced users. These methods allow you to change display names in Office 365 using PowerShell, giving you more flexibility and control over the process.
Changing display name in Office 365 using PowerShell
PowerShell is a powerful command-line tool that allows administrators to automate tasks and perform advanced configurations in Office 365. Make sure you have the Azure AD PowerShell module already installed on your machine. To change a display name using PowerShell, use the below PowerShell script:
#Connect to Azure AD
Connect-AzureAD

#Change the Display Name
Set-AzureADUser -ObjectId "AlexW@Crescent.onmicrosoft.com" -DisplayName "Alex Sherman"
Confirm that the display name has been successfully updated by checking the user’s profile. Using PowerShell to change display names in Office 365 provides administrators with a more efficient and scalable method, especially when dealing with a large number of users.
Bulk Update Display name for Multiple users using PowerShell
How about updating the display name for multiple users in Microsoft 365 with the help of the PowerShell and CSV?
Try {
    # Login to Azure AD
    Connect-AzureAD

    # Import the CSV file
    $CSVData = Import-Csv -Path "C:\Temp\UserData.csv"

    # Loop through each row in the CSV
    ForEach ($Row in $CSVData) {
        # Get the user from Azure AD
        $User = Get-AzureADUser -ObjectId $Row.UserPrincipalName -ErrorAction SilentlyContinue

        If($User -ne $Null)
        {
            # Update the user's display name
            Set-AzureADUser -ObjectId $User.ObjectId -DisplayName $Row.DisplayName
            Write-host -f Green "Updated the Display Name for User:"$Row.UserPrincipalName
        }
        Else
        {
            Write-host -f Yellow "Could not find User:"$Row.UserPrincipalName
        }
    }

    # Disconnect the Azure AD session
    Disconnect-AzureAD

}
Catch {
    write-host -f Red "Error" $_.Exception.Message
}
Here is my CSV file:
How about updating External user’s display name? Sure! Here is the PowerShell script to update the Guest user’s display name.
Try {
    # Login to Azure AD
    Connect-AzureAD

    # Import the CSV file
    $CSVData = Import-Csv -Path "C:\Temp\UserData.csv"

    #Get All Guest Users
    $GuestUsers = Get-AzureADUser -Filter "userType eq 'Guest'" -All:$true

    # Loop through each row in the CSV
    ForEach ($Row in $CSVData) {
        # Get the user to update
        $User = $GuestUsers | Where-Object {$_.mail -eq $Row.UserPrincipalName}

        If($User -ne $Null)
        {
            # Update the user's display name
            Set-AzureADUser -ObjectId $User.ObjectId -DisplayName $Row.DisplayName
            Write-host -f Green "Updated the Display Name for User:"$Row.UserPrincipalName
        }
        Else
        {
            Write-host -f Yellow "Could not find User:"$Row.UserPrincipalName
        }
    }

    # Disconnect the Azure AD session
    Disconnect-AzureAD

}
Catch {
    write-host -f Red "Error" $_.Exception.Message
}
Update Display Name of the User with Azure Active Directory
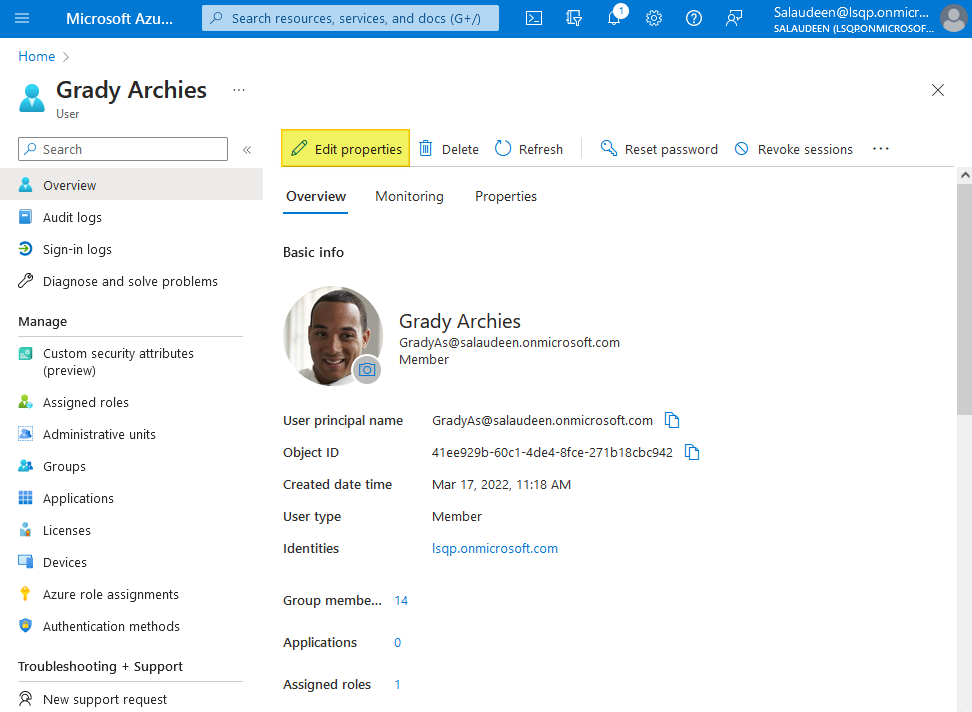
Changing your display name in Microsoft 365 can be done through the Azure Active Directory as well:
- Go to the Azure portal.
- On the left sidebar, select Azure Active Directory.
- Under Manage, click on Users.
- Search and select the user whose display name you want to change.
- Click on the Edit Properties button on the user properties page.

- Change the display name and then click Save.


How to change the email display name in Office 365 from Exchange Admin Center?
In addition to changing the display name that appears in various Microsoft 365 applications, you may also want to update the email display name from Exchange Online Admin Center. The email display name is the name that recipients see when they receive an email from you.
To change the email display name in Office 365, follow these steps:
- Access the Exchange Admin Center: Log in to the Exchange Admin Center using your administrator credentials.
- Navigate to the recipients section: Once logged in, go to the “Recipients” tab in the Admin Center.
- Select the user whose email display name you want to change: Locate the user from the list and click on their name to view their profile.
- Edit the email display name: In the user’s profile, find the field for the email display name and make the necessary changes.

- Save the changes: After updating the email display name, click on the “Save” or “Apply” button to save the changes.

Updating the email display name ensures that your recipients see the desired name when they receive emails from you, promoting consistency and professionalism.
How to change your display name as an End User?
To change your display name in Microsoft 365 without admin access, you can follow the below steps:
- Sign in to Microsoft 365.
- Visit this URL: http://outlook.office.com/ecp/PersonalSettings/Editaccount.aspx
- Select the General tab.
- Change your display name and then click Save.


Please note that these steps may not be available to all users, as it depends on the settings and permissions set by your organization. If you do not have the option to change your display name, you may need to reach out to your global admin or IT department for assistance.
Tips and best practices for changing display name in Office 365
When changing display names in Office 365, it is important to consider some tips and best practices to ensure a smooth and effective transition:
- Communicate the change: Inform your users about any upcoming display name changes to avoid confusion and ensure a seamless transition.
- Choose a consistent naming convention: Establish a naming convention that aligns with your organization’s branding and naming policies to maintain uniformity across users.
- Consider legal and privacy implications: Ensure that the display names comply with legal requirements and do not violate any privacy regulations.
- Test the changes: Before making widespread changes, test the display name modifications on a smaller scale to identify any potential issues.
- Check user permissions: Ensure that the user performing the display name change has the necessary administrative permissions in the Microsoft 365 Admin Center or Exchange Admin Center.
- Verify synchronization: If you are using hybrid deployment with on-premises Active Directory, ensure that the display name changes are synchronizing correctly.
- Restart applications: If the updated display name is not reflecting in specific Microsoft applications, such as Outlook or Teams, try restarting the applications to trigger a refresh.
Conclusion and final thoughts
The display name in Microsoft 365 plays a crucial role in establishing effective communication and maintaining a professional identity within your organization. Changing the display name of a user in Office 365 is a simple process that can be done in just a few steps. By following the step-by-step guide provided in this article, you can easily change the display name in the Microsoft 365 Admin Center. Additionally, you have learned about alternative methods using PowerShell and how to change the email display name through Exchange Online Admin Center, edit display names for specific users with Azure AD, and change the display name as end-user as well. I hope this step-by-step guide has been helpful and informative in changing the display name of a user in Office 365.
We have 3600+ guest users and want to bulk update and write additional informations such as city, county, phone number. Is it possible to bulk edit?
Hi Burcak,
Here are the steps to update Guest user details:
1. Create a CSV file and place all the updates you want, with columns: LoginName, Country, Department, or any other field.
2. Populate the CSV with details: E.g. salaudeen_gmail.com#EXT#@crescent.com, Norway, IT
3. Connect to Azure AD with Connect-AzureAD PowerShell cmdlet
4. Read the CSV file: $UserDetails = Import-CSV c:\scripts\Guest_users.csv
5. Update user details:
$UserDetails | ForEach { Set-AzureADUser -ObjectId $upn -CompanyName “Crescent Inc” -Department “IT” -Country “Norway” }
Hi again,
Thanks a lot from Istanbul, Turkiye. My teammates used this code and we can easily update our database, more than 4500+ users information today. As a search and rescue association member, thanks again.