Connect to SharePoint Online using Azure AD App ID from PowerShell
Requirement: Connect to SharePoint Online with Azure Active Directory Application from PowerShell.
Connecting to SharePoint Online programmatically is essential for automating administrative tasks and processes. PowerShell provides a powerful way to access SharePoint Online, manage data and settings, and integrate with other Microsoft cloud services. To connect through PowerShell, an Azure Active Directory (AD) application ID is required for authentication.
In this blog post, I will walk through the complete process of registering an Azure AD app, granting permissions, and using the credentials to connect to SharePoint Online with PowerShell. Whether you need to access SharePoint to copy files, manage list items, update properties, or do any other tasks with the API, this guide will show you how to get set up with the proper authentication.
Table of contents
How to Connect to SharePoint Online using Azure Application ID from PowerShell?
Using Azure Application ID to connect to SharePoint Online is a great way to manage your SharePoint Online environment from unattended PowerShell scripts. In this post, we’ll go over the necessary steps to connect to SharePoint Online using the Azure Application ID from PowerShell.
Step 1: Setup Azure AD Application ID
To connect with SharePoint Online using Azure Application ID, the following steps are necessary:
- Register an Azure AD Application
- Grant Permission to the App
- Create a certificate and upload it to Azure App secret
Register an Azure App
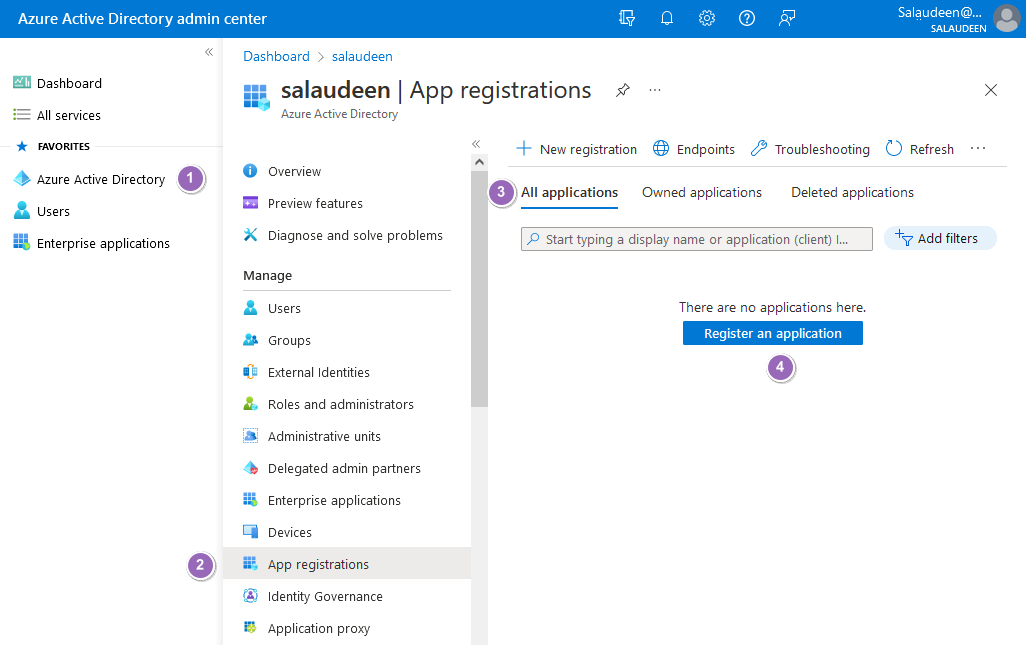
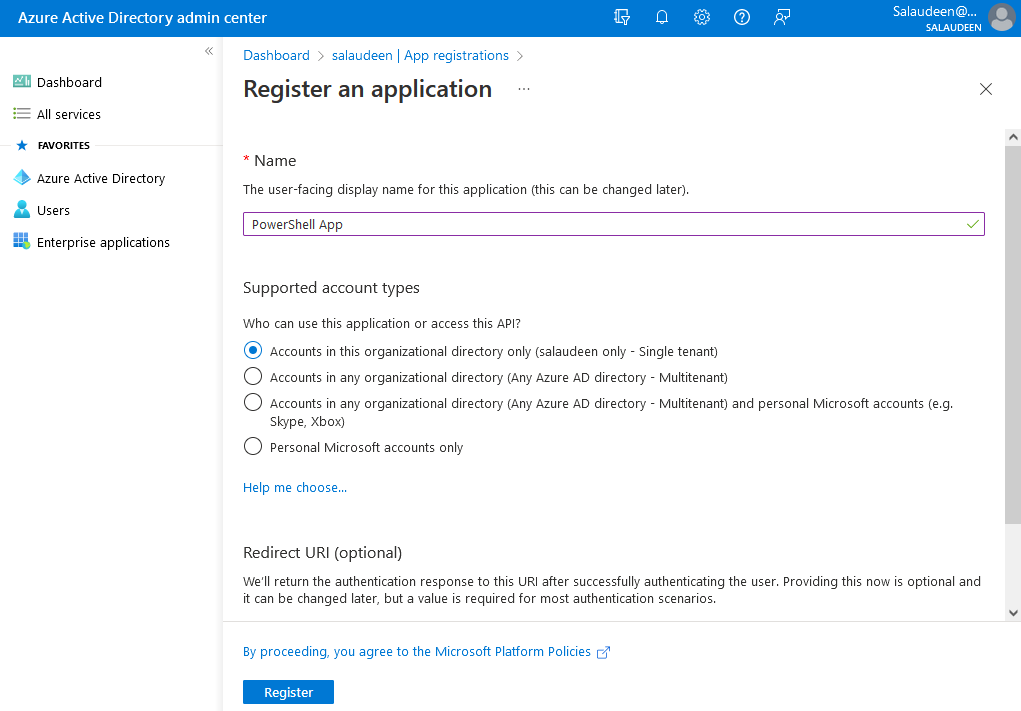
The first step is creating a new app in the Azure App registrations.
- Log in to the Azure portal as Global Admin at https://aad.portal.azure.com
- Click on “Azure Active Directory” and then “App registrations”.
- Click on “Register an application” or the “New registration” button.

- Enter the name of your app and let the default options, and then click on “Register”.

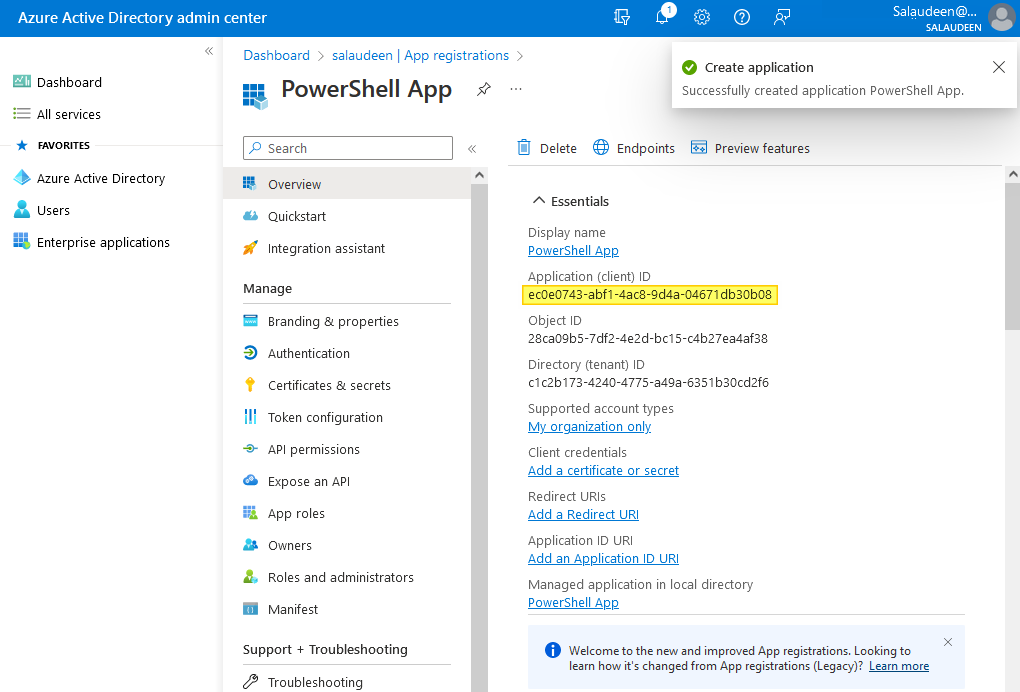
- You’ll be taken into the app summary. Make a note of the Application ID.

Grant Permissions to the Azure Application
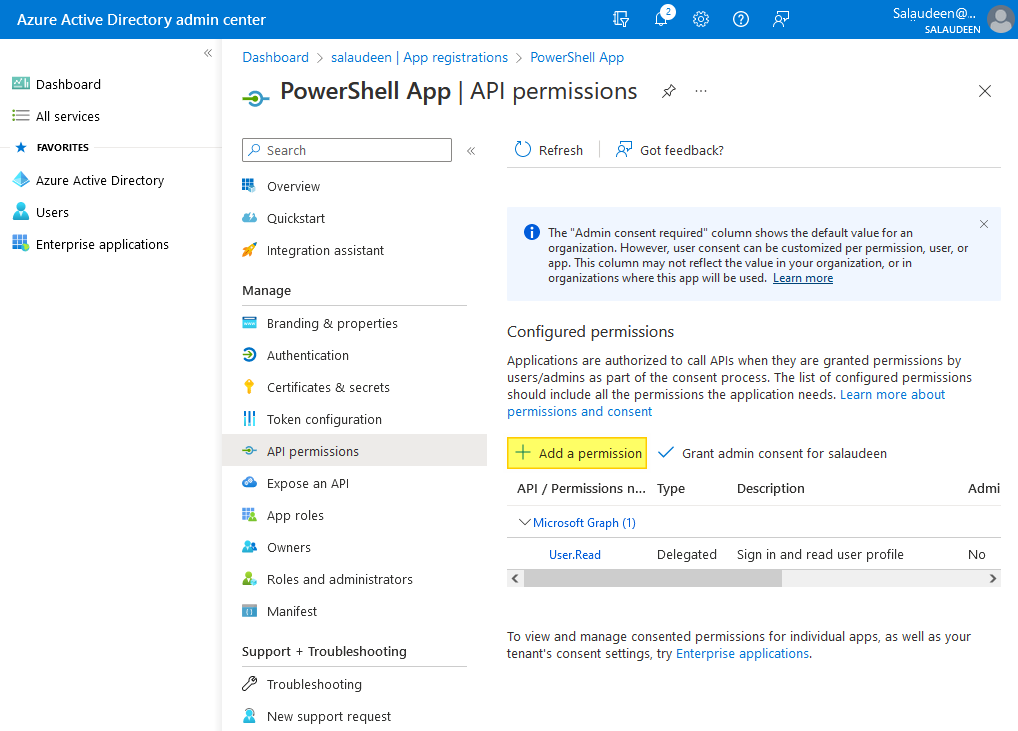
Once the app is created, we have to grant necessary access to the app. In our case, We are planning to use this App ID in our PowerShell scripts for SharePoint Online. So, We have to grant SharePoint Application permission: Full Control.
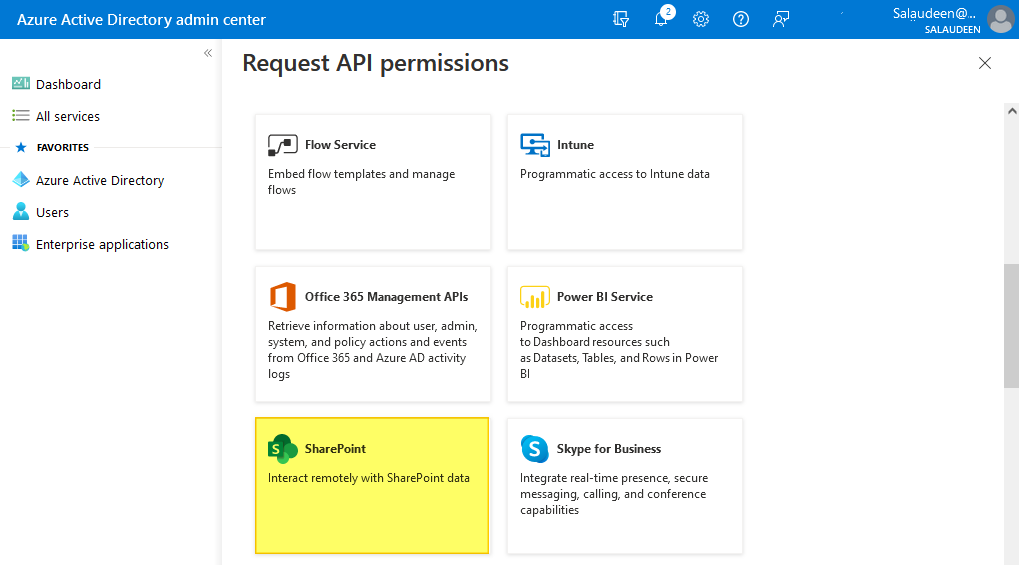
- From the created app summary page, click on “API permissions” in the left navigation link and then click on “Add a permission”.

- In the “Request API permissions” page, Select “SharePoint”.

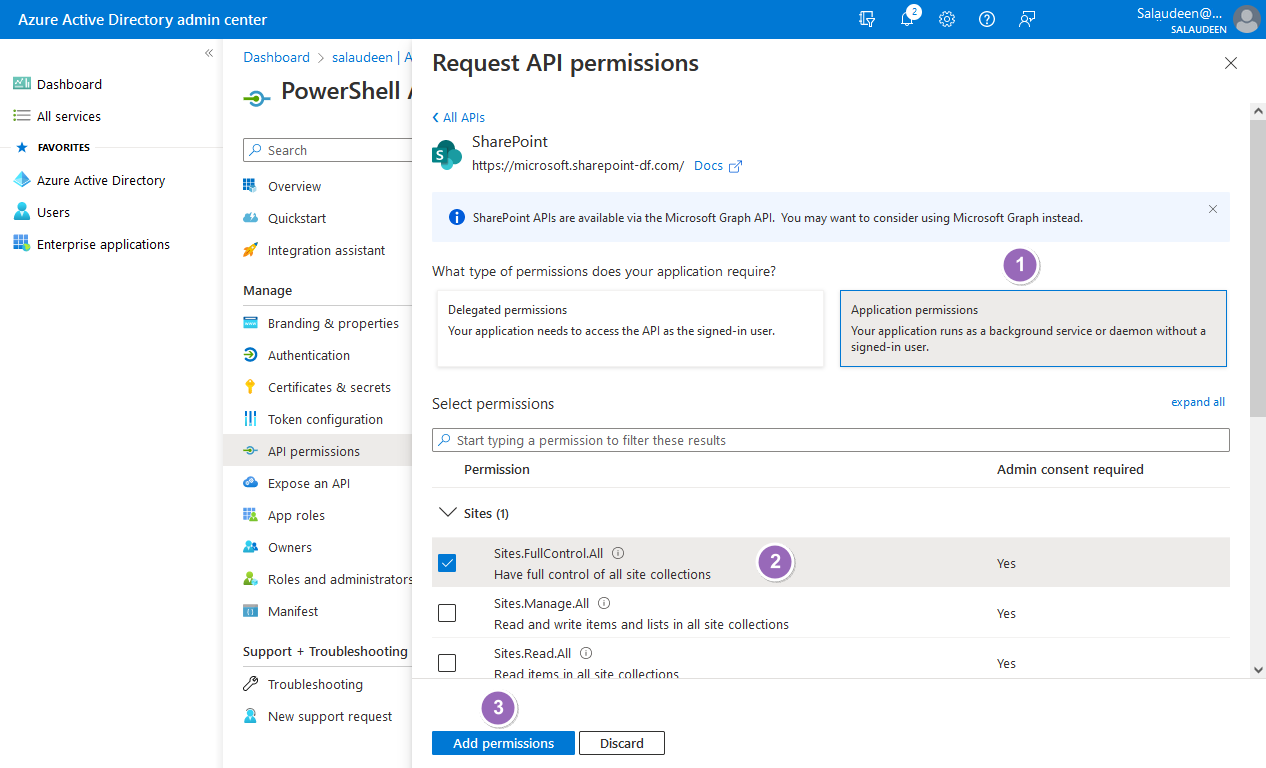
- Select Application permissions >> Select “Sites.FullControl.All” and click on “Add permissions”.

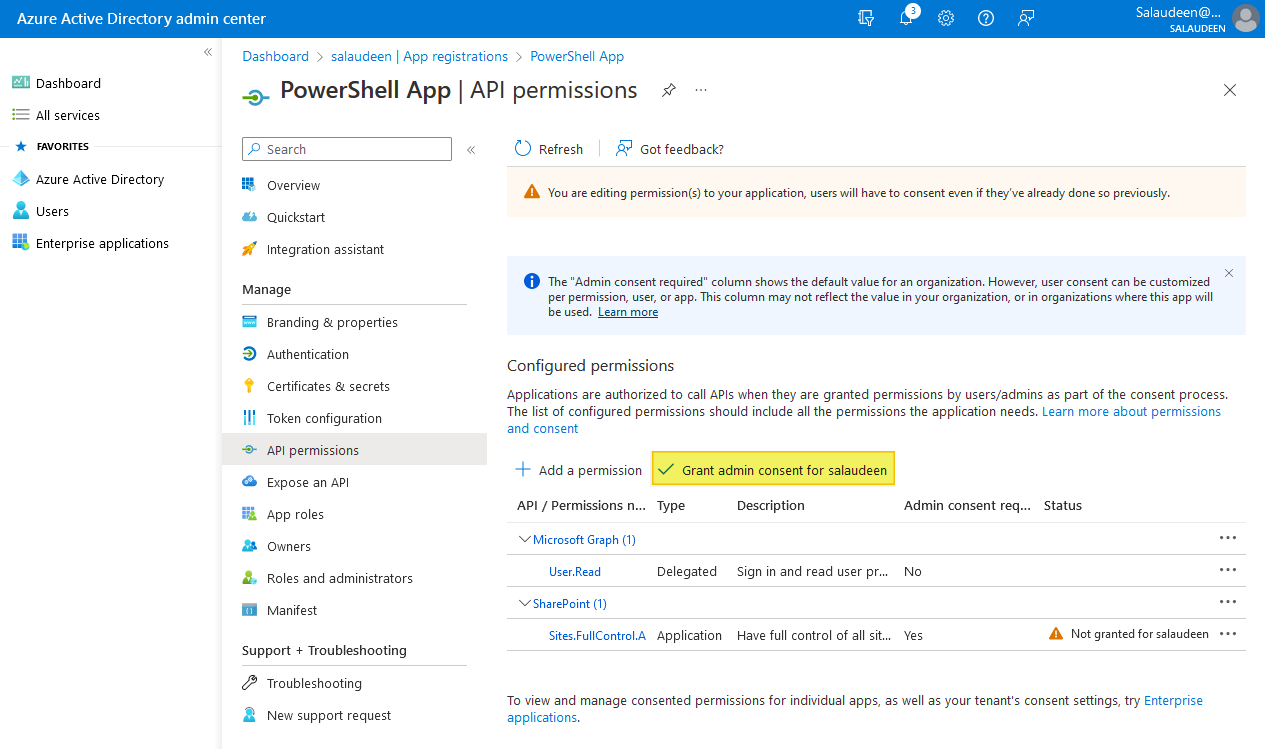
- Click on “Grant admin consent” to consent to the permissions.

Create a Certificate and Upload it to the App Secret
The next step is creating a secret to the App. Although passwords work, they are less preferable compared with certificates. So, we need a Self-signed certificate to upload to the application.
$CertificateName = "SharePoint Online Certificate"
$CertificatePassword = "Password1"

#Get the "Documents" folder
$DocumentsFolder = [Environment]::GetFolderPath("MyDocuments")

#Generate a Self-signed Certificate
$Certificate = New-SelfSignedCertificate -Subject $CertificateName -CertStoreLocation "Cert:\CurrentUser\My" -KeyExportPolicy Exportable -KeySpec Signature -KeyLength 2048 -KeyAlgorithm RSA -HashAlgorithm SHA256

#Export the Certificate to "Documents" Folder in your computer
Export-Certificate -Cert $Certificate -FilePath $DocumentsFolder\$CertificateName.cer

#Export the PFX File
Export-PfxCertificate -Cert $Certificate -FilePath "$DocumentsFolder\$CertificateName.pfx" -Password (ConvertTo-SecureString -String $CertificatePassword -Force -AsPlainText)
More on creating a self-signed certificate is here: https://learn.microsoft.com/en-us/azure/active-directory/develop/howto-create-self-signed-certificate
Once the certificate is generated, the next step is to upload the certificate to the application secret.
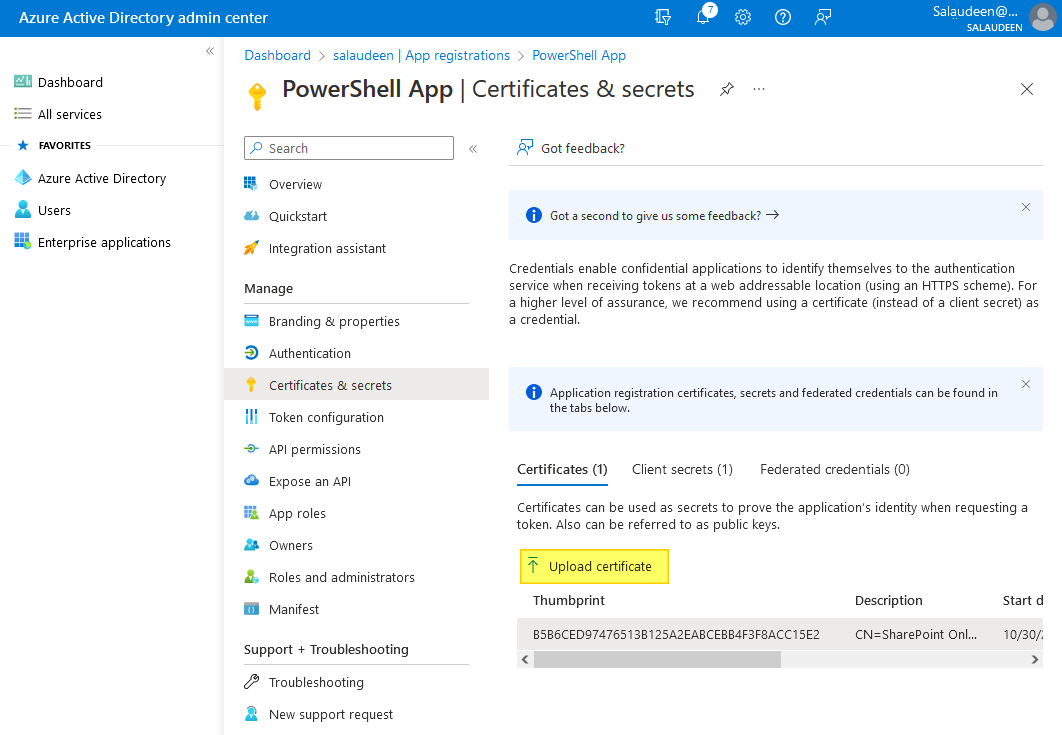
- Go to your Azure app >> Click on “Certificates & secrets”.
- Click on “Upload certificate”.

- Browse to the CER file generated and click on the “Add” button.
- Make a note of the “Thumbprint”. That’s your secure key associated with the certificate to authenticate to the application.

That’s all! Once you have completed all of these steps, you will be able to connect to SharePoint Online using the Azure Application ID from PowerShell!
Alternate Approach: PowerShell to Register App, Grant Permissions, and Client Secret
The above steps can be automated using a PowerShell script without going through the web user interface. Open the PowerShell console as Administrator and run this script:
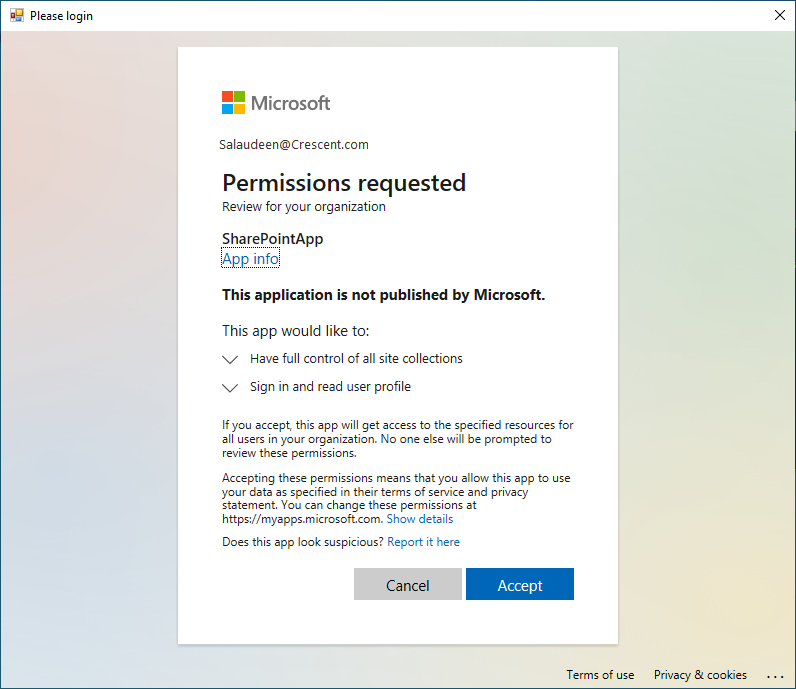
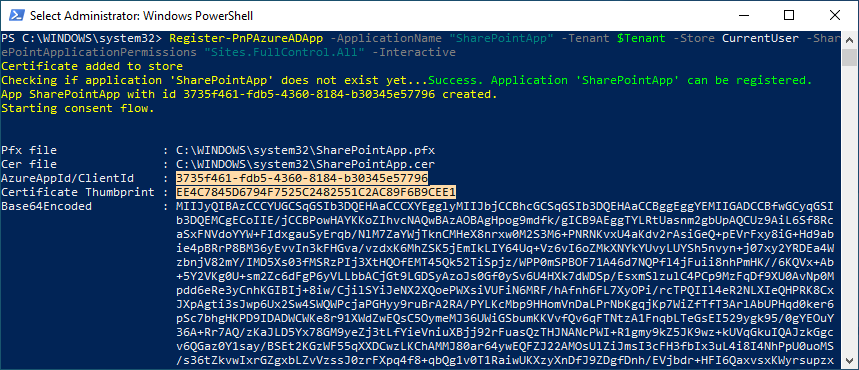
Register-PnPAzureADApp -ApplicationName "SharePointApp" -Tenant "Crescent.com" -Store CurrentUser -SharePointApplicationPermissions "Sites.FullControl.All" -Interactive
This script registers a new Azure AD Application, creates a new self-signed certificate, and adds it to the local certificate store. It will also upload the certificate to the Azure app registration.
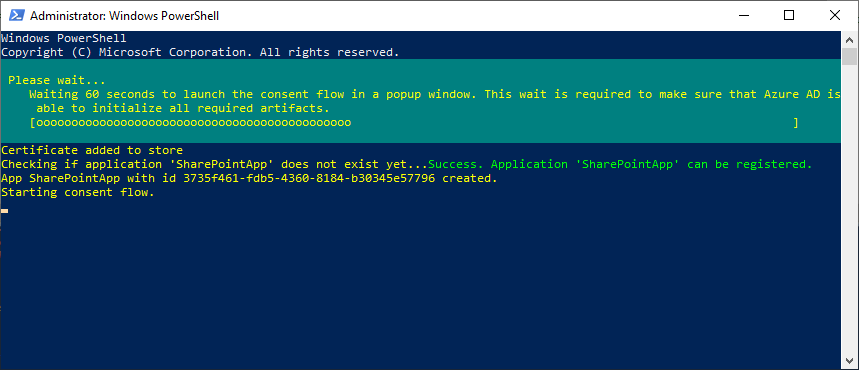
You’ll get a prompt to consent to the following permissions: “Sites.FullControl.All”. Login and accept the permission request.
Make a note of Application ID/ClientID and Thumbprint.
Now, we are good to proceed with connecting to SharePoint Online with PnP PowerShell.
Step 2: Connect to SharePoint Online using App ID and Certificate
Once the Azure AD application is ready, you can connect to SharePoint Online from PnP PowerShell as:
#Parameters
$SiteURL = "https://Crescent.sharepoint.com/sites/retail"
$ClientID = "3735f461-fdb5-4360-8184-b30345e57796"
$ThumbPrint = "EE4C7845D6794F7525C2482551C2AC89F6B9CEE1"
$Tenant = "Crescent.com"

#Connect to SharePoint Online using Certificate
Connect-PnPOnline -Url $SiteURL -ClientId $ClientID -Thumbprint $ThumbPrint -Tenant $Tenant

#Get the Site
Get-PnPSite
Anyone who needs to connect to SharePoint Online with the App must install the certificate in their local machine first, and then use the Client ID and the certificate thumbprint to authenticate.
Wrapping up
In this post, we walked through the complete process of connecting to SharePoint Online from PowerShell, with an application ID instead of a user account. By registering an Azure AD application, granting the required permissions, and using the application ID and secret in PowerShell, we can access SPO programmatically for automation tasks. Following the steps outlined in this article, you should now be able to integrate PowerShell workflows for SharePoint Online into larger projects and scripts. The application ID and secret provide a way to connect in an unattended manner without needing interactive user logins.
There are many possibilities when accessing SharePoint Online from PowerShell using an Azure AD identity. Whether you need to migrate data, manage properties and metadata, automate workflows, monitor usage, or develop custom applications, the techniques covered here should provide you with the authentication foundation. Here is my other post on Connect to SharePoint Online using ClientID and Client Secret with PnP PowerShell
Hi I am facing issue while executing below command :
PS C:\Windows\system32> Get-PnPSite
Get-PnPSite : The remote server returned an error: (401) Unauthorized.
At line:1 char:1
+ Get-PnPSite
+ ~~~~~~~~~~~
+ CategoryInfo : WriteError: (:) [Get-PnPSite], WebException
+ FullyQualifiedErrorId : EXCEPTION,PnP.PowerShell.Commands.Site.GetSite
My App has API Permission: SItes.FullControl.All
But in roles it has cloud administrator role. Do I required Sharepoint Admin role as i have manage permissions of all sharepoit sites using the app
Hello Sal,
You have a created a really nice blog.
I am having issues trying to execute the script to create a self-signed certificate. Getting errors like:
New-SelfSignedCertificate : A parameter cannot be found that matches parameter name ‘Subject’.
At \ShO_CreateSelfSignedCertificate.ps1:30 char:42
+ $Certificate = New-SelfSignedCertificate -Subject $CertificateName -CertStoreLoc …
+ ~~~~~~~~
+ CategoryInfo : InvalidArgument: (:) [New-SelfSignedCertificate], ParameterBindingException
+ FullyQualifiedErrorId : NamedParameterNotFound,Microsoft.CertificateServices.Commands.NewSelfSignedCertificateCommand
Export-Certificate : Cannot bind argument to parameter ‘Cert’ because it is null.
At C:\Users\rivere.EDC-NT\ShO_CreateSelfSignedCertificate.ps1:33 char:26
+ Export-Certificate -Cert $Certificate -FilePath $DocumentsFolder\$CertificateNam …
+ ~~~~~~~~~~~~
+ CategoryInfo : InvalidData: (:) [Export-Certificate], ParameterBindingValidationException
+ FullyQualifiedErrorId : ParameterArgumentValidationErrorNullNotAllowed,Microsoft.CertificateServices.Commands.ExportCertificateCommand
Export-PfxCertificate : Cannot bind argument to parameter ‘Cert’ because it is null.
At C:\Users\rivere.EDC-NT\ShO_CreateSelfSignedCertificate.ps1:38 char:29
+ Export-PfxCertificate -Cert $Certificate -FilePath…….
Make sure you are running the PowerShell console as administrator. Try specifying some other path like:
Export-Certificate -Cert $Certificate -FilePath”C:\Temp\$CertificateName.cer”
Hello
can I use this approach to Connect-SPOService?
Thank you
Connect-SPOService doesn’t support App ID yet.
Can I use this for CSOM powershell ?
Also, for pnp , I have followed the steps and getting the below error
Connect-PnPOnline: Cannot find certificate with this thumbprint in the certificate store.
How to upload the .pfx file ?
You have to generate and upload the certificate as per the instruction under “Create a Certificate and Upload it to the App Secret”. I believe CSOM doesn’t work here!
I am trying to run the script on a different server using the same app credentials , I manually copy pasted the .cer and .pfx files on the system and added the thumbprint to the certifcate manager store. I am still getting the same error as below:
Connect-PnPOnline: Cannot find certificate with this thumbprint in the certificate store.
Hi, great blog post. Is it needed to run the command “Grant-PnPAzureADAppSitePermission” if I use the API permission “Sites.selected” ?
No! Not necessary.
Thanks for your posts. These are very helpful.
In this sample , the registered app gives permission to all sites in tenant. But If we wanted to limit the scope to a specific site with Sites.Select, can you share the approach and necessary commands/scripts for that.?
Hello, is it works with Connect-MsolService ?
What version of the module microsoft.sharepoint.online.powershell are you using? Im on the latest and it has no clue about parameters clientid, tenant or thumbprint.
These parameters apply to PnP PowerShell!
Hi, Thanks for all your tutorials.
since 25/01/2023, can’t use pnp cmdlet after using connect-pnponline.
the connexion work succesfully, i can use get-pnpcontext, but get an exeption has been thrown when i try get-pnplist or something else.
Double check the App ID, Check if you have the certificate installed on your computer. Verify the permissions granted to App ID.
This is very well explained and working approach in 2023. It solved my painful trial-error journey for finding a convenient way to connect to sharepoint without the need to use the interactive login prompt for uploading local files to sharepoint through powershell by unattended automated scripts. My goal was to download files from sharepoint (easy part), manipulate them in local machine with macros and upload back to sharepoint (the hardest part in terms of working solution in 2023 since the internet is full of outdated and not working examples). Thank you very much!!!
That makes perfect sense – thank you for taking your time to reply 🙂
Best regards
Leif
Hi – and thanks for many great articles.
A couple of questions regarding this one:
1) Does this approach not have a built in problem in relation to the certificates having and end-date? I think I see so many problems which have to do with missing certificate renewals. How can you overcome this situation, where you two years down the road suddenly face functionality that no longer works?
2) Having the client secret in source code – is this good practice, or can it be compared to having a password in clear-text in the code?
Of course, the Certificates must be renewed before their expiry. The Self-service SSL certificate generated has a validity of 10 years. Users can’t authenticate just by knowing the Thumbprint of the certificate, But they must have the certificate installed in their local machine – which makes it more secure compared with password-based client secrets.