Configure My Sites in SharePoint 2016: Step-by-Step Guide
SharePoint 2016 brought new social networking capabilities to the SharePoint collaboration space. With My Sites, users can store documents, keep their profile information in the news feed, contribute to the organization via blogs, and follow activities on sites, people, tags, documents, etc.! In short: My Site is the personal space for individual users in an organization. In this comprehensive guide, we’ll dive deep into the process of configuring My Sites in SharePoint, focusing on SharePoint Server 2016 and SharePoint 2013.
Table of contents
- Understanding My Sites in SharePoint
- How to Configure My Sites in SharePoint 2016?
- Prerequisites:
- Step 1: Create a New web application for My Sites
- Step 2: Add a new managed path to the My Site Web Application
- Step 3: Enable self-service site creation for the web application
- Step 4: Add Permission Level Policy & User Permission to My Site Web Application (Optional):
- Step 5: Configure My Site URL in the User Profile Service Application
- Optional: Set up intervals for the activity feed timer job
- Create My Sites in SharePoint 2016
- Conclusion
Understanding My Sites in SharePoint
My Sites provide a personalized and central location for users to store, manage, and share their documents, updates, and expertise. Whether you’re new to SharePoint or an experienced administrator, configuring My Sites is a crucial step in leveraging the full potential of your SharePoint environment.
Each user in SharePoint gets their own My Site, which consists of the following key components:
- Personal Site: A private site where users can store and manage their personal documents and information.
- Newsfeed: A social feed that displays updates, activities, and conversations relevant to the user.
- Profile Page: A page that displays the user’s profile information, skills, and expertise.
The primary advantage of SharePoint My sites in a real-world scenario would be:
- People Search – My Sites lets your users update their contact details on their personal sites. This leads to locating and getting someone’s profile rapidly at the organizational level.
- Skill Search – SharePoint People Search automatically indexes expertise from the profile data, and in SharePoint People Search, we can find anyone with a specific skill set within the organization!
How to Configure My Sites in SharePoint 2016?
This article walks you through creating and configuring My Sites for SharePoint 2016 step-by-step. Although this article focuses on SharePoint 2016, the same steps apply to SharePoint 2013 as well.
At a high level, configuring My Sites in SharePoint 2016 involves the following steps:
- Create a dedicated web application & My Site host site collection
- Add a wildcard inclusion managed path to the web application
- Enable self-service site creation for the web application
- Create a permission policy & Grant everyone permission to access the My Site web application
- Configure My Site settings for the User Profile service application
Prerequisites:
Before creating My Sites in SharePoint, you need to have the following services adequately configured.
- User Profile Service Application: SharePoint My Sites depends on UPS! The User Profile Service Application will map the My Sites to the User Profiles. If it hasn’t been created, create one.
- Managed Metadata service application: My Site users Keywords! So, have MMS created & configured before setting up My Sites.
- Search service application – Not mandatory, but best practice for People search results!
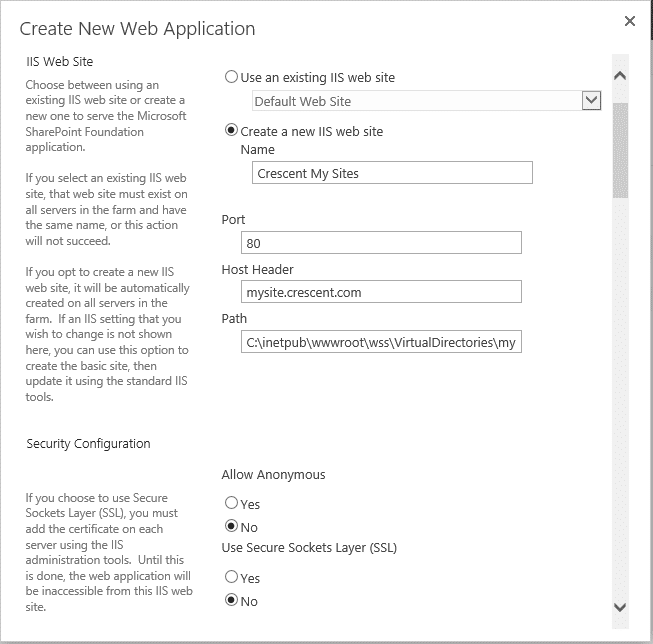
Step 1: Create a New web application for My Sites
Although you can use an existing web application, it’s best to create a dedicated one for My Sites for security, performance, etc. So, To start with, let’s create a dedicated web application to host our My sites in SharePoint 2016.
- Open the SharePoint Central Administration website.
- From Application Management >> Click the Manage Web Applications >> Click New to Create a New Web Application.
- Provide a Name, Port, and Host Header, and fill in the rest of the new web application form. Hit OK to create a new web application.
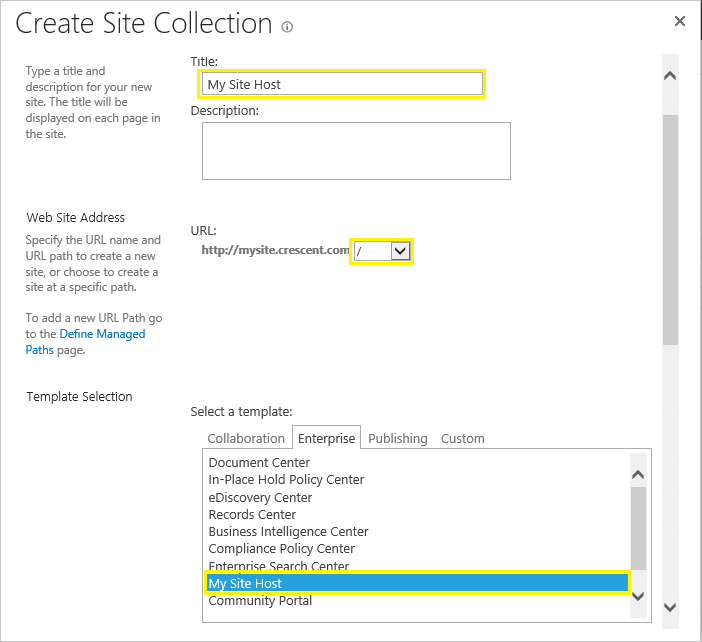
Create My Site Host Site Collection in SharePoint 2016:
Once the web application is created, proceed with creating a site collection at the web application’s root.
- From SharePoint 2016 Central Administration, select Application Management and then select Create site collections
- Select the Web application we created in the previous step.
- Provide a name and description of the site collection.
- Choose “My Site Host” as a template.
- Provide a primary site collection administrator.
- Leave the quota option default.
- Click the OK button to create the site collection.
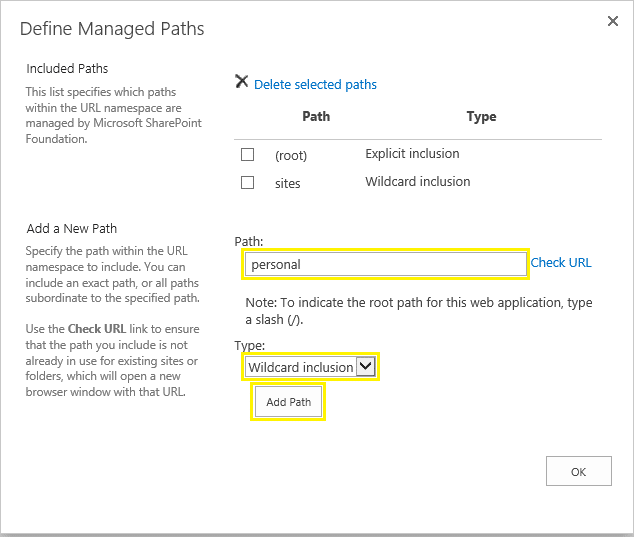
Step 2: Add a new managed path to the My Site Web Application
Managed paths define the location to host site collections within a web application. In our environment, When SharePoint users provision their My Sites, we would like them to reside at https://mysite.crescent.com/personal/name-of-person/. So, We defined a wildcard-managed path for “/personal/” as follows:
- From SharePoint Central Administration >> Manage Web Application >> Select the My Site Host Web Application you just created.
- In the ribbon, click the Managed Paths button >> Define Managed Paths dialog, add a new path called “personal” (or “my” or whatever you like!), and make it Wildcard inclusion. Click “Add Path” and then OK once done.
- Optionally, You can delete the OOTB “Sites” managed path from the My Site web application.

Step 3: Enable self-service site creation for the web application
The self-service site creation option enables end-users to create their own My Site collection automatically.
- Select your web application from the Manage Web Applications page of the Central Administration site.
- Click on the “Self-Service Site Creation” button for the web application

- Select “On” for Site Collections and “Prompt users to create a team site” under Start a Site. Provide the managed path we created (“/personal”). Leave the rest default.


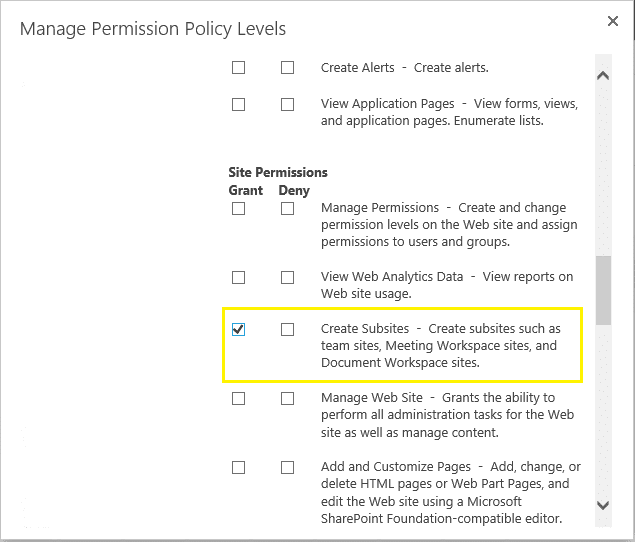
Step 4: Add Permission Level Policy & User Permission to My Site Web Application (Optional):
Perform this step only when you want your users to create subsites under my site collection. Create a permission-level policy with “Create Subsites” rights.
- Select your My Site web application and click on the “Permission Policy” button from the ribbon. In the “Manage Permission Policy Levels”, click on the “Add Permission Policy Level” link.
- Under Permissions, scroll to Site Permissions, and select the Grant option for “Create Subsites – Create subsites such as team sites, Meeting Workspace sites, and Document Workspace sites”. Now, the new permission policy level should appear among other policy levels.

- You need to grant that policy level to all users. Highlight your My Site web application, and click the “User Policy” button on the ribbon.
- Click on the “Add users” link >> Choose All zones and enter the users as “Everyone”. Click OK to commit your changes.


Step 5: Configure My Site URL in the User Profile Service Application
Alright, now you have a My Site Web Application, My Site Host root site collection, wildcard managed path, and self-service enabled for the web application. The only thing remaining is to set up the My Site URL on the User Profile Service Application so that the user profile service knows where to create new site collections for users of My Sites.
- Go to Central Administration >> Application Management >> Manage service applications.
- Select your User Profile Service Application >> On the Manage User profile service page, in the My Site Settings section, click on the “Set up My Sites” link.

- Enter the URL of the My Site host location you created and click Save.
- Specify other settings like Personal Site Location, Site Naming Format, Secondary Owner, etc.

Each My Site exists as a separate site collection to provide security isolation in SharePoint.
Optional: Set up intervals for the activity feed timer job
- Go to the SharePoint 2016 Central Administration
- Click on “Monitoring” in the left navigation
- Click on “Timer Job” >> Review job definitions
Find “User Profile Service Application – Activity Feed Job”, and set up the activity feed sync time according to your needs. By default, it’s set to run every 10 Minutes.
Create My Sites in SharePoint 2016
We completed all the configurations to get My sites up and running. Let’s perform a quick test.
- Go to any of the SharePoint sites on the farm and select the “About Me” link from the welcome menu.
- If all is fine, you will be redirected to your personal My Site home page, where you can edit your personal details, such as your profile picture and contact information.


My Site Quota & Content Database Sizing – Best Practices:
Setup Storage Quota for My Sites! By default, this setting is unlimited. But you don’t want your SQL disks to get filled by My Sites, isn’t it?
By default, The maximum number of site collections created per content database is 5000. If you plan for 10,000 My Sites of 100 GB each, you’ll need 1000 TB of disk space! So, plan to adhere to the content database sizing recommendation – 200 GB or less per content database for better performance.
Conclusion
Configuring My Sites in SharePoint is a vital step in empowering your users with personalized and collaborative spaces. By following the step-by-step instructions outlined in this article, you can successfully set up and manage My Sites in SharePoint Server 2016 and SharePoint 2013. Remember to align your My Site configuration with your organization’s specific requirements, consider best practices for optimal performance and user adoption, and continuously monitor and maintain your My Sites to ensure a smooth and productive experience for your users.
Technet reference: Configure My Sites in SharePoint Server 2016
SharePoint My Sites are personalized sites in SharePoint that serve as a central hub for users to manage and store documents, content, and social information related to them. They offer a private space for individual users and a public profile that others in the organization can view, facilitating collaboration and knowledge sharing.
Typically, User’s My Site will be automatically created for users when they first click on the My Site link or their name/profile picture in SharePoint. However, the ability to create My Sites depends on the permissions set by your SharePoint administrator.
To access your My Site, click on your profile picture or name in the top-right corner of any SharePoint page and select “About me” from the dropdown menu. This will take you to your My Site.
To share documents on your My Site, navigate to your OneDrive for Business library, select the document you want to share, and click on the “Share” button. You can then specify the users or groups you want to share the document with and set the appropriate permissions.
By default, your My Site is private, and only you have access to it. However, you can choose to share specific content, such as documents or your profile information, with other users or groups within your organization.
To update your profile information, go to your My Site and click on “Edit Profile” or “Update Profile” (depending on your SharePoint version). You can then update your contact information, profile picture, skills, interests, and other details.
Yes, My Sites facilitate collaboration through features like document sharing, newsfeeds, and social interactions. You can share documents, post updates, and engage in conversations with colleagues through your My Site.
Yes, the content on your My Site, including documents and profile information, is searchable within SharePoint. Other users can find your content through SharePoint’s search functionality, subject to the permissions you’ve set.
When you leave the organization, The ownership is transferred to the employee’s manager. Then, the My Site and its content will be deleted gradually, depending on your organization’s policies.
Yes, SharePoint My Sites are available in SharePoint Online as part of Microsoft Office 365 under the name OneDrive. They function similarly to My Sites in SharePoint Server, providing a personalized space for users to store documents and content and interact with social features.
Do you have restart any services after you make changes for this to take affect? thanks.
Not something I’m aware of!
What happens to the content of on-premise my sites when you configure hybrid OneDrive and Sites?
Web site Address is default in create site collection?
It fills the web application URL by default.
you can change this.
go to look and feel on site settings
like by default url
Https://Servername:80/sites/siteurl.aspx
to
Https://Servername:80/personal/site1.aspx