How to Manage Windows Registry in PowerShell?
The Windows Registry is a crucial component of the Microsoft Windows operating system, serving as a centralized database that stores configuration settings for various software applications, user preferences, and system settings. It plays a pivotal role in maintaining the stability and performance of the system. As an IT professional or system administrator, mastering Windows Registry management is essential for troubleshooting issues and optimizing system performance. In this guide, we’ll explore how PowerShell can help you manage your Windows registry effectively. Ready to get started?
Table of contents
- Understanding the Windows Registry
- Benefits of Using PowerShell for Registry Management
- Creating a Registry Key Using PowerShell
- Creating a Registry Value Using PowerShell
- Renaming a Registry Key Value Name in PowerShell
- Updating the Value of a Registry Key Using PowerShell
- Query a Registry Key Using PowerShell
- Get Registry Key Value Using PowerShell
- Deleting a Registry Value Using PowerShell
- Deleting a Registry Key Using PowerShell
- Deleting a Registry Key if it Exists Using PowerShell
- Exporting a Registry Key Using PowerShell
Understanding the Windows Registry
Before delving into PowerShell techniques for managing the Windows Registry, it is important to have a solid understanding of its structure and organization. The Windows Registry is organized into a hierarchical structure similar to a filesystem, comprising keys, subkeys, and values. Each key represents a container that can hold subkeys and values. Subkeys are used to organize further and categorize the settings, while values store the actual data. The name of a Registry value is a string, which can be one of several data types, including strings, integers, binary data, and more. The Registry is organized into five main root keys, including HKEY_CLASSES_ROOT, HKEY_CURRENT_USER, HKEY_LOCAL_MACHINE, HKEY_USERS, and HKEY_CURRENT_CONFIG.

Benefits of Using PowerShell for Registry Management
PowerShell, a powerful scripting language developed by Microsoft, provides a comprehensive set of commands and functionalities for managing the Windows Registry. It offers several advantages over traditional methods, such as the ability to automate repetitive tasks, perform bulk operations, and leverage the power of scripting for complex scenarios. PowerShell provides a set of cmdlets, or commands, for working with the Registry, which makes it easy to retrieve, create, and modify Registry values. PowerShell also allows for remote registry management, making it an invaluable tool for administrators managing multiple systems.
Creating a Registry Key Using PowerShell
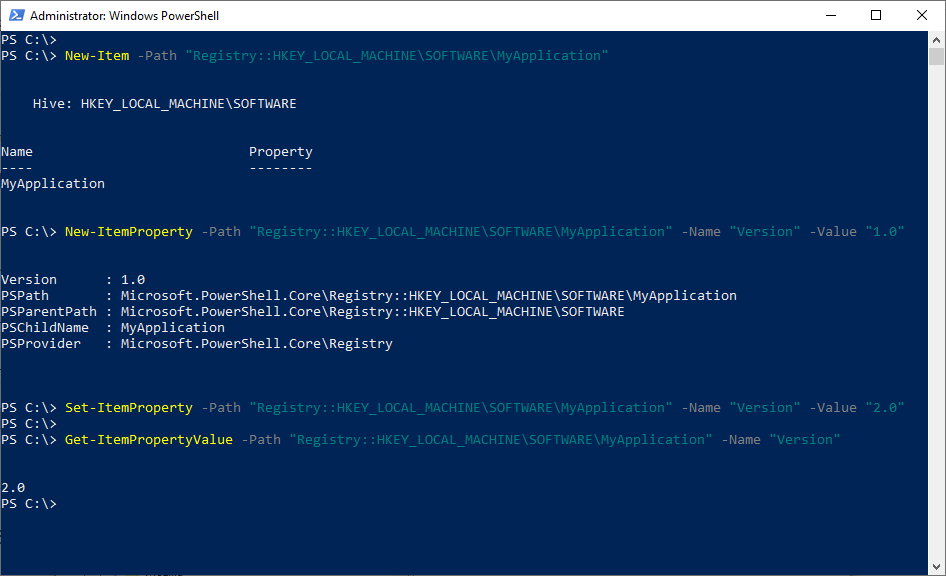
Creating a new registry key using PowerShell is a straightforward process. The New-Item cmdlet is used to create a new registry key by specifying the path of the key as the argument. PowerShell will then create the key if it does not already exist. This is particularly useful when deploying software or configuring system settings that require the creation of specific registry keys.
To create a registry key using PowerShell, use the following command:
New-Item -Path "Registry::HKEY_LOCAL_MACHINE\SOFTWARE\MyApplication"
This creates a new key on a given path. Make sure you run PowerShell as Administrator! Otherwise, you’ll get an error: “New-Item : Requested registry access is not allowed.”
Checking if a Registry Key Exists Using PowerShell
One common task in Windows Registry management is checking if a specific registry key exists. This can be easily accomplished using PowerShell. The Test-Path cmdlet determines if a path, including a registry key path, exists. By specifying the registry path as the argument, PowerShell will return a boolean value indicating whether the key exists. This information can be used in conditional statements or as part of a larger script to perform further actions.
To check if a registry key exists using PowerShell, use the following command:
$Key = "HKEY_LOCAL_MACHINE\SOFTWARE\Microsoft\Windows\CurrentVersion\MyApp"

If(Test-Path -Path "Registry::$Key") {
    Write-host -f Green "Key Exists!"
}
Else {
    Write-host -f Yellow "Key doesn't Exists!"
}
Creating a Registry Value Using PowerShell
Registry values store the actual data within a registry key. PowerShell provides the New-ItemProperty cmdlet to create a new registry value. The cmdlet requires specifying the path of the key, the name of the value, and the value data. This enables administrators to configure specific settings or customize software behavior by creating or modifying registry values.
To create a registry value using PowerShell, use the following command:
New-ItemProperty -Path "Registry::HKEY_LOCAL_MACHINE\SOFTWARE\MyApplication" -Name "Version" -Value "1.0"
Similarly, to create DWord or QWord values, use the “PropertyType” parameter.
New-ItemProperty -Path "HKLM:\SOFTWARE\MyApp" -Name "Enabled" -Value "1" -PropertyType DWord
Checking if a Registry Value Exists
To check if a registry value exists within a registry key using the Registry PSDrive, we can use the Get-ItemProperty cmdlet. For example, to check if the Version value exists in the HKLM:\SOFTWARE\MyApp registry key, we can run the following command:
$Value = Get-ItemProperty -Path 'HKLM:\SOFTWARE\MyApp' -Name 'Version' -ErrorAction SilentlyContinue
If ($value) {
    # Value exists
    Write-host -f Green $Value.Version
}
else {
    # Value does not exist
    Write-host -f Yellow "Value doesn't Exists!"
}
In this example, we use the Get-ItemProperty cmdlet to retrieve the value of the specified registry value name. If the value exists, it will be assigned to the $value variable, allowing you to perform actions accordingly. Here is another version to check if a specific value exists in a given key in the particular hive:
$RegPath = "HKLM:\SOFTWARE\MyApp"
$RegValue = "Version"

$RegistryKey = Get-Item -Path $RegPath -ErrorAction SilentlyContinue
if ($RegistryKey.GetValueNames() -contains $RegValue) {
    # Value exists
    Write-host -f Green "Value Exists!"
}
else {
    # Value does not exist
    Write-host -f Yellow "Value Doesn't Exists!"
}
Renaming a Registry Key Value Name in PowerShell
You can use the Rename-ItemProperty cmdlet to rename an existing Registry value. For example, to rename the “Enabled” key value name to “IsEnabled” in the HKEY_LOCAL_MACHINE\SOFTWARE\MyApp Registry key, use the following command:
Rename-ItemProperty -Path "HKLM:\SOFTWARE\MyApp" -Name "Enabled" -NewName "IsEnabled"
This command renames the “Enabled” key value to “IsEnabled” in the HKEY_LOCAL_MACHINE\SOFTWARE\MyApp Registry key.
Updating the Value of a Registry Key Using PowerShell
Modifying the value of a registry key is a common task in Windows Registry management. PowerShell provides the Set-ItemProperty cmdlet to change the value of a specific registry key. By specifying the path of the key, the name of the value, and the new value data, PowerShell will update the value accordingly.
To change the value of a registry key using PowerShell, use the following command:
Set-ItemProperty -Path "Registry::HKEY_LOCAL_MACHINE\SOFTWARE\MyApplication" -Name "Version" -Value "2.0"
Query a Registry Key Using PowerShell
Retrieving the value of a registry key is often necessary for troubleshooting or verification purposes. PowerShell offers the Get-ItemProperty cmdlet to retrieve the value of a specific registry key. You can also specify the path of the key and the name of the value, PowerShell will return the corresponding value data.
To get the value of a registry key using PowerShell, use the following command:
Get-ItemProperty -Path "Registry::HKEY_LOCAL_MACHINE\SOFTWARE\MyApp"
Similarly, to get all subkeys of a specific registry key, use:
Get-ChildItem -Path "HKLM:\SOFTWARE\MyApp" -Recurse | Select PSPath, PSChildName
This command retrieves a list of subkeys in the specified Registry key.
You can also search for a specific key and filter using the registry provider and Get-ChildItem cmdlet:
CD HKCU:\SOFTWARE

Get-ChildItem -Recurse -Path . | Where-Object -Property Name -Like '*Browser*' | Select-Object -Property PSPath
This script searches for a specific key in the particular registry hives using the wildcard “*browser*” on the given path.
Get Registry Key Value Using PowerShell
Querying a registry key allows you to check if a specific value exists within the key. PowerShell provides the Get-ItemPropertyValue cmdlet to query a reg key and retrieve the value of a specific value name. Specify the path of the key and the value of the key using name parameter, PowerShell will return the corresponding value data if it exists.
To query a registry key using PowerShell, use the following command:
Get-ItemPropertyValue -Path "Registry::HKEY_LOCAL_MACHINE\SOFTWARE\MyApplication" -Name "Version"
To get all values from a particular key, You can use PowerShell as:
CD HKLM:\SOFTWARE\Microsoft\Windows\CurrentVersion

Get-ItemProperty .
Output:
ProgramFilesDir          : C:\Program Files
CommonFilesDir           : C:\Program Files\Common Files
ProgramFilesDir (x86)    : C:\Program Files (x86)
CommonFilesDir (x86)     : C:\Program Files (x86)\Common Files
CommonW6432Dir           : C:\Program Files\Common Files
DevicePath               : C:\WINDOWS\inf;C:\Program Files (x86)\Samsung\
MediaPathUnexpanded      : C:\WINDOWS\Media
ProgramFilesPath         : C:\Program Files
ProgramW6432Dir          : C:\Program Files
SM_ConfigureProgramsName : Set Program Access and Defaults
SM_GamesName             : Games
PSPath                   : Microsoft.PowerShell.Core\Registry::HKEY_LOCAL_MACHINE\SOFTWARE\Microsoft\Windows\CurrentVersion
PSParentPath             : Microsoft.PowerShell.Core\Registry::HKEY_LOCAL_MACHINE\SOFTWARE\Microsoft\Windows
PSChildName              : CurrentVersion
PSDrive                  : HKLM
PSProvider               : Microsoft.PowerShell.Core\Registry

Deleting a Registry Value Using PowerShell
In addition to deleting keys, PowerShell also provides the ability to delete specific registry values. The Remove-ItemProperty cmdlet is used to remove a specific registry value by specifying the path of the key and the name of the value. PowerShell will then delete the value from the registry.
To delete a registry value using PowerShell, use the following command:
Remove-ItemProperty -Path "Registry::HKEY_LOCAL_MACHINE\SOFTWARE\MyApplication" -Name "Version"
Deleting a Registry Key Using PowerShell
Removing unnecessary or obsolete registry keys is essential for maintaining a clean and optimized system. PowerShell provides the Remove-Item cmdlet to delete a specific registry key. By specifying the path of the key, PowerShell will remove the key and all its subkeys and values.
To delete a registry key using PowerShell, use the following command:
Remove-Item -Path "Registry::HKEY_LOCAL_MACHINE\SOFTWARE\MyApplication" -Recurse
Deleting a Registry Key if it Exists Using PowerShell
Deleting a registry key only if it exists is a common scenario in scripting and automation. PowerShell allows for conditional deletion using the Test-Path cmdlet in conjunction with the Remove-Item cmdlet. By checking if the key exists and then deleting it, PowerShell ensures that only existing keys are removed.
To delete a registry key if it exists using PowerShell, use the following command:
if (Test-Path -Path "Registry::HKEY_LOCAL_MACHINE\SOFTWARE\MyApplication") {
    Remove-Item -Path "Registry::HKEY_LOCAL_MACHINE\SOFTWARE\MyApplication" -Recurse
}
else {
    Write-host "The Specified Registry Key doesn't exists!"
}
Exporting a Registry Key Using PowerShell
Exporting registry keys is a useful technique for backup purposes or transferring settings between systems. However, PowerShell does not have a native cmdlet to export registry keys directly to a .reg file. The standard method to export a registry key to a .reg file uses regedit.exe through the user interface.
We have the Reg Export built-in command to export and import the specific keys and values to a file, which can then be stored in a secure location for future use.
To export a registry key using PowerShell commands, use the following script:
$RegPath = "HKLM\SOFTWARE\MyApp" # registry key to export
$ExportPath = "C:\Temp\export.reg" # path to the .reg file

# Export Registry Key and Values
Reg export $RegPath $ExportPath
Similarly, to restore the registry backup, use:
Reg import "C:\Temp\export.reg"
Conclusion
Mastering Windows Registry management is a crucial skill for IT professionals and system administrators. In this step-by-step guide, we have learned how to use PowerShell to retrieve, create, and modify Registry values. PowerShell provides a comprehensive set of commands and functionalities for efficiently managing the Windows Registry. Whether it’s checking if a registry key exists, creating or modifying registry keys and values, exporting or backing up the registry, or deleting unnecessary keys or values, PowerShell empowers administrators with the tools to automate and streamline registry management tasks.
Now that you have gained knowledge and insights into Windows Registry management using PowerShell, it’s time to put your skills into practice. Remember to handle errors, specify the full registry path, and consider permissions too. Always be cautious and make sure you understand what you’re doing before making changes to the registry. Happy scripting!