SharePoint Online: How to Grant Permissions to a Document?
Requirement: Share a document in SharePoint Online.
Permissions are hierarchical in SharePoint Online, from the Top-level Site collection to the file level. When documents are created in the libraries, they inherit the permissions of that library by default. However, This inheritance can be broken, and permissions can be applied directly to the files. To set unique permissions on documents, you need to configure permissions on the file level. In this blog post, we will explore how to share files in SharePoint to enhance file sharing within your organization.
Understanding File Sharing in SharePoint
Before we jump into the nitty-gritty of how to share files, let’s take a moment to understand the basics of file sharing in SharePoint.
Why Share Files in SharePoint?
SharePoint is all about collaboration and teamwork. By sharing files in SharePoint, you enable your colleagues to access, view, edit, and collaborate on documents seamlessly. It eliminates the need for endless email attachments and version confusion, making your work life a whole lot easier.
SharePoint Permission Levels
When it comes to sharing files in SharePoint, permissions play a crucial role. SharePoint offers different permission levels that determine what actions users can perform on a file. Here are the common permission levels you should know:
- Read: Users with this permission can view the file but cannot make any changes.
- Contribute: Users can view, add, update, and delete files.
- Edit: Similar to Contribute, but users can also manage lists and document libraries.
- Full Control: Users have complete control over the file and can perform all actions, including managing permissions.
Understanding these permission levels will help you grant the right access to the right people when sharing files.
How to share a document in SharePoint?
Let’s say you’re working on a project proposal in SharePoint, and you need to share the document with your team members for their input. Here’s how you can share the file:
- Navigate to the document library where the file is stored.
- Right-click on the file and click on the “Share” option (You can also select the file and click on the “Share” button on the toolbar).

- Enter the email addresses or names of your team members.
- Set the appropriate permissions for each team member (e.g., Edit for those who need to make changes, Read for those who only need to review).
- Optionally, you can add a message like, “Hey team, please review the attached project proposal and provide your feedback by the end of the week.”
- Click “Send” to share the file with your team.


By using these methods, you can effectively restrict access to a document in SharePoint and ensure that only authorized individuals can view or edit it.
How to Provide Access to a File in SharePoint Online?
We have a business requirement to provide access to a specific file in SharePoint. To set explicit permissions on SharePoint Online files, we need to break the permission inheritance first (stop inheriting permissions) and then add a user or group to the file. Here’s how:
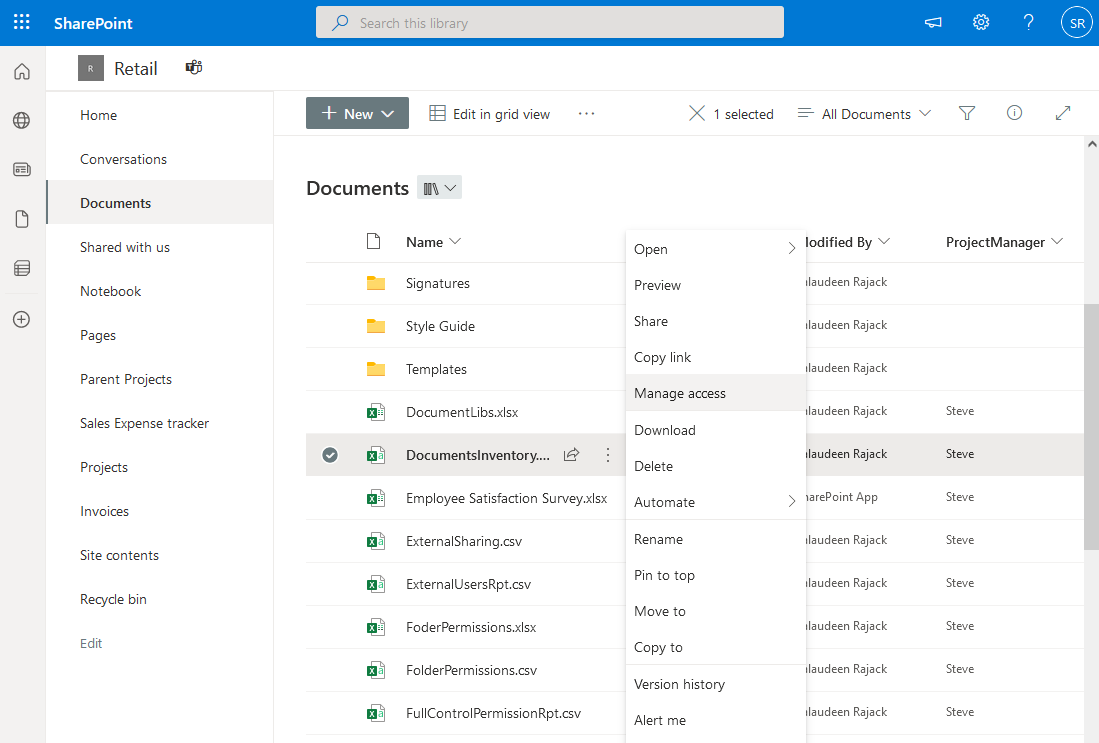
- Go to the SharePoint Online library where the file is stored >> Select the file for which you want to provide unique permissions.
- Right-click on the file to which you would like to grant permission. Then click on “Manage access” from the context menu (you can also use “Manage Access” from the information panel).

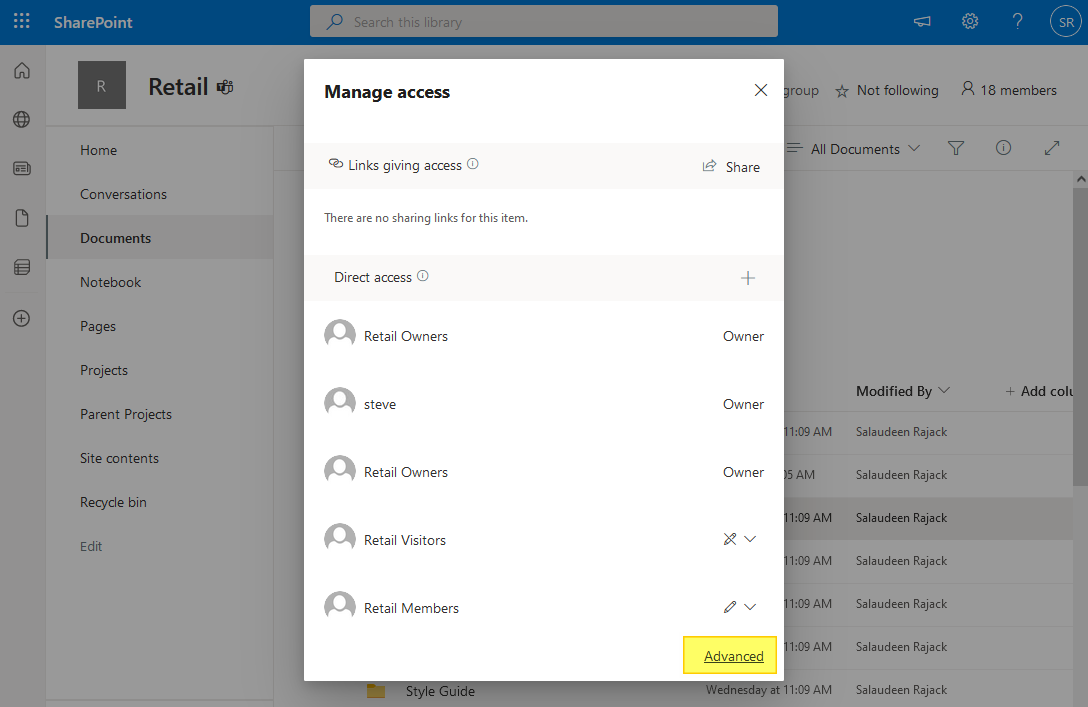
- On the Manage access page, click on the “Advanced” link.

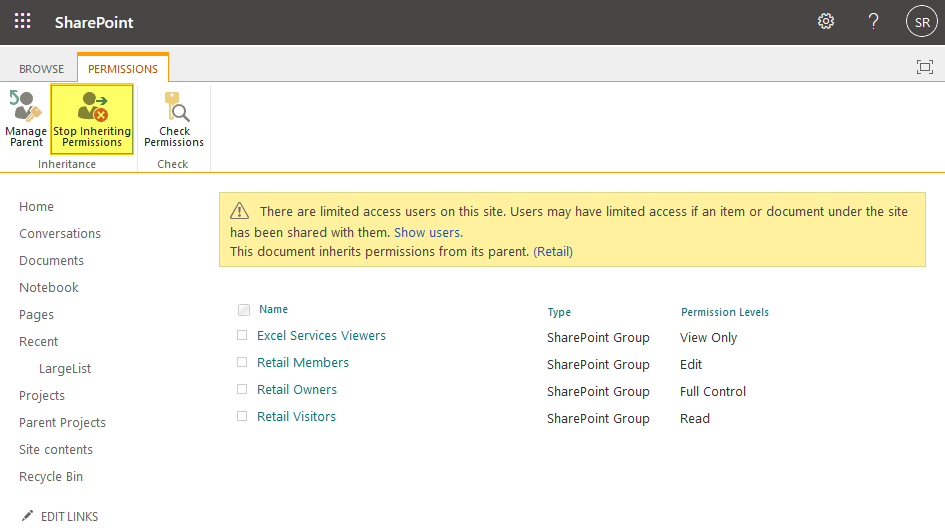
- On the Permissions tab, in the Inheritance group, click the “Stop Inheriting Permissions” button. Confirm the prompt.

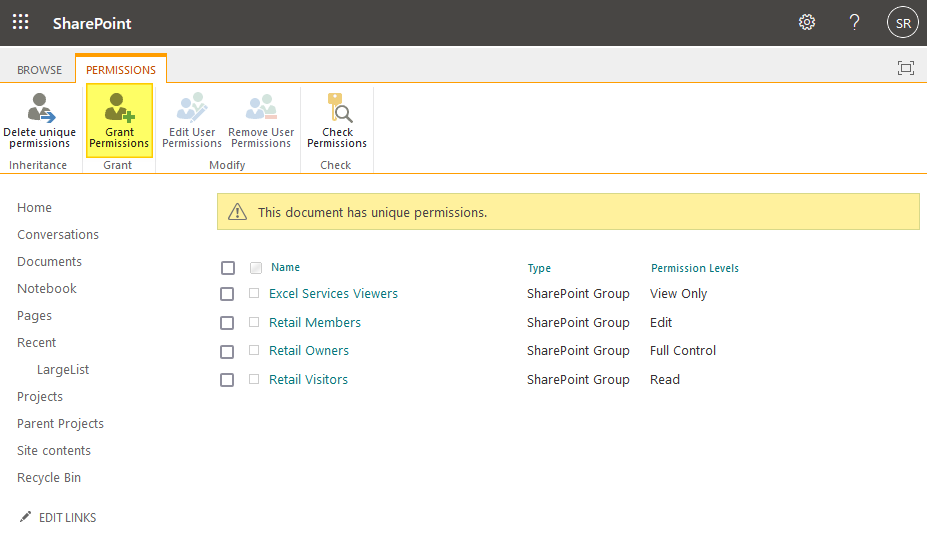
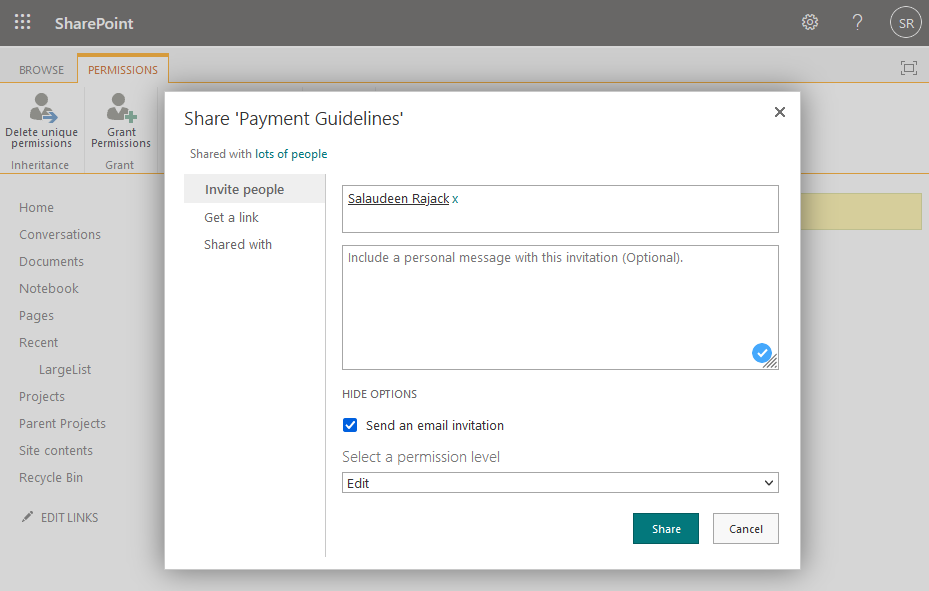
- Now, from the ribbon, click on the “Grant Permissions.” button.

- In the Share popup, enter names or email addresses. Click the Show Options button. In the Select a permission level list box, select the appropriate permission level, such as Edit.

- Click Share.
Having too many Item level permissions often leads to performance issues! So, be careful.
SharePoint Online: Set Document Permissions using PowerShell
How to grant file-level permission for SharePoint Online? Here is my PowerShell to grant permissions to a document in SharePoint Online.
#Load SharePoint CSOM Assemblies
Add-Type -Path "C:\Program Files\Common Files\Microsoft Shared\Web Server Extensions\16\ISAPI\Microsoft.SharePoint.Client.dll"
Add-Type -Path "C:\Program Files\Common Files\Microsoft Shared\Web Server Extensions\16\ISAPI\Microsoft.SharePoint.Client.Runtime.dll"

#Config Variables
$SiteURL = "https://crescent.sharepoint.com/sites/Retail"
$ListName ="Documents"
$FileServerRelativeURL="/sites/Retail/Shared Documents/Classified/Payment Guidelines.pdf"
$UserID="Steve@crescent.com"
$GroupName="Retail Members"
$PermissionLevel="Edit"

#Get Credentials to connect
$Cred = Get-Credential

Try {
    #Set up the context
    $Ctx = New-Object Microsoft.SharePoint.Client.ClientContext($SiteUrl)
    $Ctx.Credentials = New-Object Microsoft.SharePoint.Client.SharePointOnlineCredentials($Cred.UserName,$Cred.Password)

    #get file from url
    $File = $Ctx.web.GetFileByUrl($FileServerRelativeURL)
    $Ctx.Load($File)
    $Ctx.Load($File.ListItemAllFields)
    $Ctx.ExecuteQuery()

    #Check if the File has unique permissions
    $ListItem = $File.ListItemAllFields
    $ListItem.Retrieve("HasUniqueRoleAssignments")
    $Ctx.ExecuteQuery()
    If(!$ListItem.HasUniqueRoleAssignments)
    {
        $ListItem.BreakRoleInheritance($false, $false) #keep the existing permissions: No -  Clear list items permissions: No
        $ctx.ExecuteQuery()
    }

    #Get the User
    $User = $Ctx.Web.EnsureUser($UserID)
    $Ctx.load($User)
    $Ctx.ExecuteQuery()

    #Get the Group
    $Group =$Ctx.Web.SiteGroups.GetByName($GroupName)
    $Ctx.load($Group)
    $Ctx.ExecuteQuery()

    #Get the role
    $Role = $Ctx.web.RoleDefinitions.GetByName($PermissionLevel)
    $RoleDB = New-Object Microsoft.SharePoint.Client.RoleDefinitionBindingCollection($Ctx)
    $RoleDB.Add($Role)

    #Assign permissions
    $UserPermissions =  $ListItem.RoleAssignments.Add($User,$RoleDB)
    $GroupPermissions = $ListItem.RoleAssignments.Add($Group,$RoleDB)
    $ListItem.Update()
    $Ctx.ExecuteQuery()

    Write-host -f Green "Permission granted to File Successfully!"
}
Catch {
    write-host "Error: $($_.Exception.Message)" -Foregroundcolor Red
}
This script grants permission on the Item level for a given user and group.
PnP PowerShell to Set File Level Permission
To change the permission for files in SharePoint Online using PowerShell, use: Set-PnPListItemPermission cmdlet.
#Config Variables
$SiteURL = "https://crescent.sharepoint.com/sites/Retail"
$ListName ="Documents"
$FileServerRelativeURL="/sites/Retail/Shared Documents/Classified/Payment Guidelines.pdf"
$UserID="Steve@crescent.com"
$GroupName="Retail Members"

 Try {
    #Connect to PnP Online
    Connect-PnPOnline -Url $SiteURL -Interactive

    #Get the File as List Item
    $File = Get-PnPFile -Url $FileServerRelativeURL -AsListItem

    #Get the Group
    $Group = Get-PnPGroup | where-Object {$_.Title -eq $GroupName}

    #Grant Edit permission to User - Remove all existing permissions
    Set-PnPListItemPermission -Identity $File.ID -List $ListName -AddRole "Edit" -User $UserID -ClearExisting

    #Grant permission to Group
    Set-PnPListItemPermission -Identity $File.ID -List $ListName -AddRole "Read" -Group $Group
}
Catch {
    write-host "Error: $($_.Exception.Message)" -foregroundcolor Red
}
You can get all available permissions to add or remove using the Get-PnPRoleDefinition cmdlet. We can grant permission to all list items as in: SharePoint Online: Grant Permission to All Items in a List or Library using PowerShell
Conclusion
In conclusion, sharing files in SharePoint is a fundamental aspect of effective collaboration within an organization. By understanding the various sharing options, permission levels, and methods to restrict access, users can ensure that files are shared securely and efficiently with the appropriate individuals.
This comprehensive guide has provided a detailed walkthrough of the file-sharing process in SharePoint, including step-by-step instructions and real-world examples. Whether you are a beginner or an experienced SharePoint user, mastering these techniques will enable you to streamline your workflow, enhance collaboration, and maintain the security of your files.