Create a Clickable Image Map in SharePoint Online
Requirement: Create an image map in SharePoint Online modern page.
How to create an image map SharePoint Online?
An image map is a graphical way of dividing a single image into multiple sections, each with its own hyperlink. By creating an image map in SharePoint, you can add hyperlinks to specific regions of an image. This can be useful for creating navigation menus, showing relationships between different parts of an image, or just for providing links to different areas of your site. If you have ever tried to create an image map in SharePoint Online, you know that it can be a bit tricky. To create an image map in SharePoint Online, follow these steps:
- Create an Image Map
- Upload the Image and ASPX file to SharePoint Online
- Insert the image map to the SharePoint page using the Embed web part
Step 1: Create an Image map
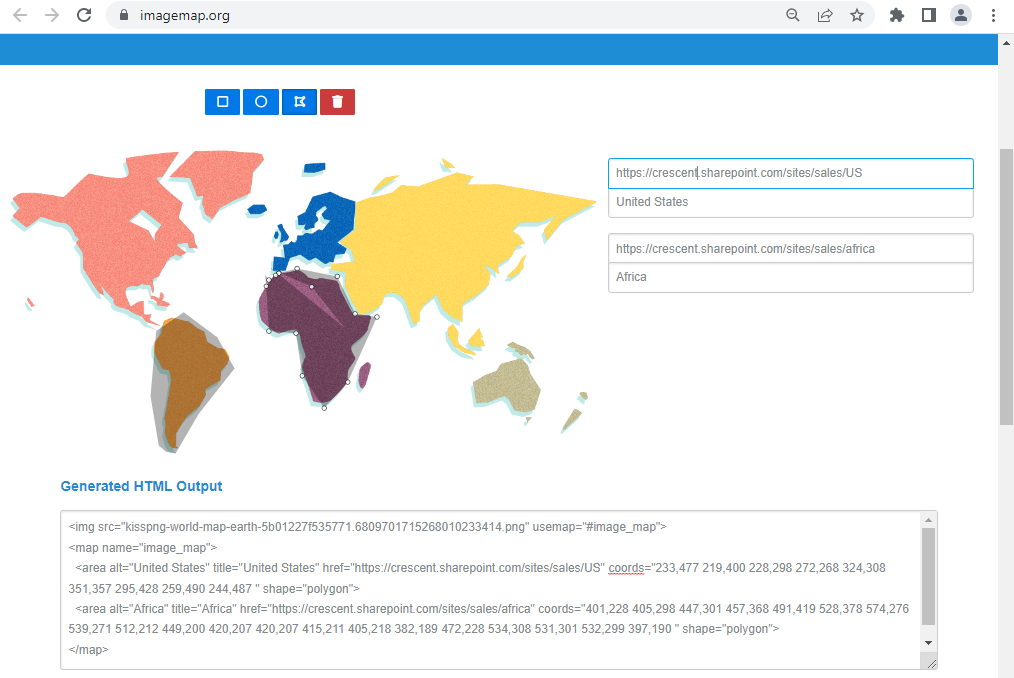
You can create an image map using an image editor like Adobe Photoshop or SharePoint Designer. You can also use Online tools like https://imagemap.org/. Insert an image, and you can add hotspots by drawing lines around a specific portion of the image, and then You can define the target URL for each hotspot. Make sure to leave enough space between each section so that users will be able to click on the individual areas without accidentally clicking on another one as well. Once you’re happy with your grid, save the generated code as ImageMap.ASPX (or any file.ASPX).
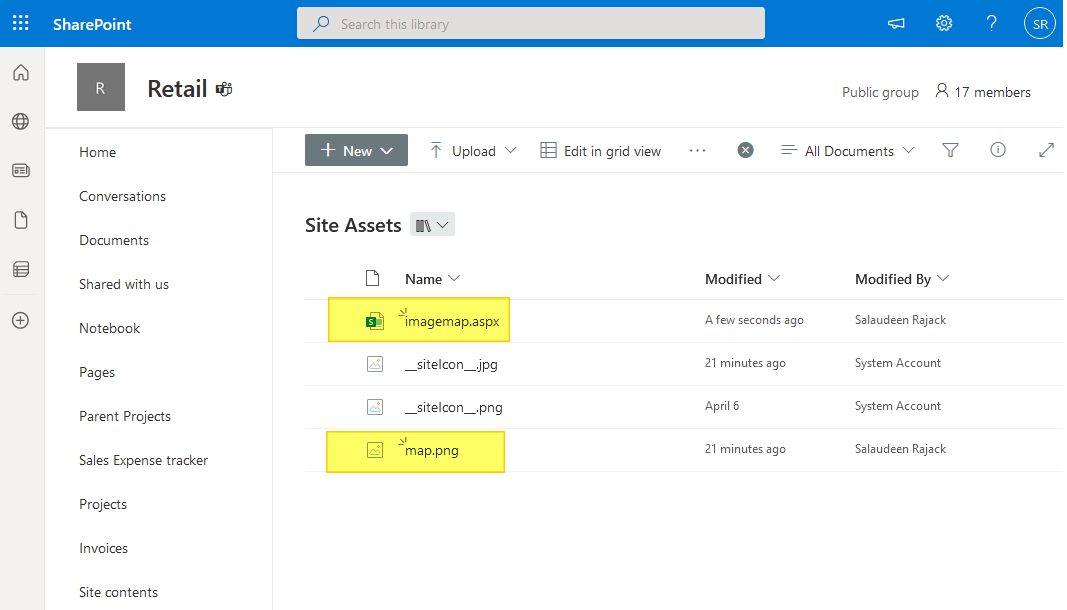
Step 2: Upload the Image and ASPX file to SharePoint
Once you are ready with the image map code, upload the image you used for the image map, and update the code you copied in the previous step with the image reference from SharePoint. And then upload the aspx file to any of your SharePoint Online libraries like “Site Assets”.
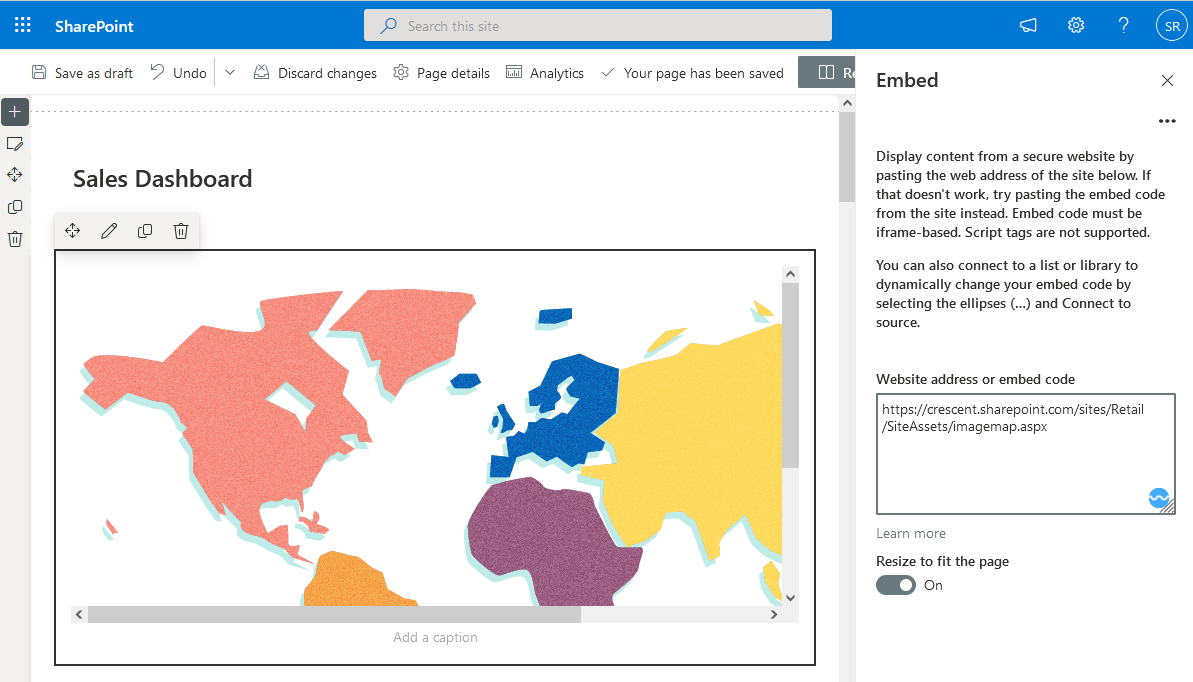
Step 3: Insert the Image map to SharePoint Online Modern Page
Finally, we have to add the image map to a SharePoint Online page using the Embed web part.
- Navigate to the SharePoint Online page where you want to add an image map. Click on “Edit” and insert the “Embed” web part on the relevant portion of the page.
- Edit the web part and set the embed code to the URL of the ASPX page you have uploaded, ImageMap.aspx in our case.

- Save and publish the page.
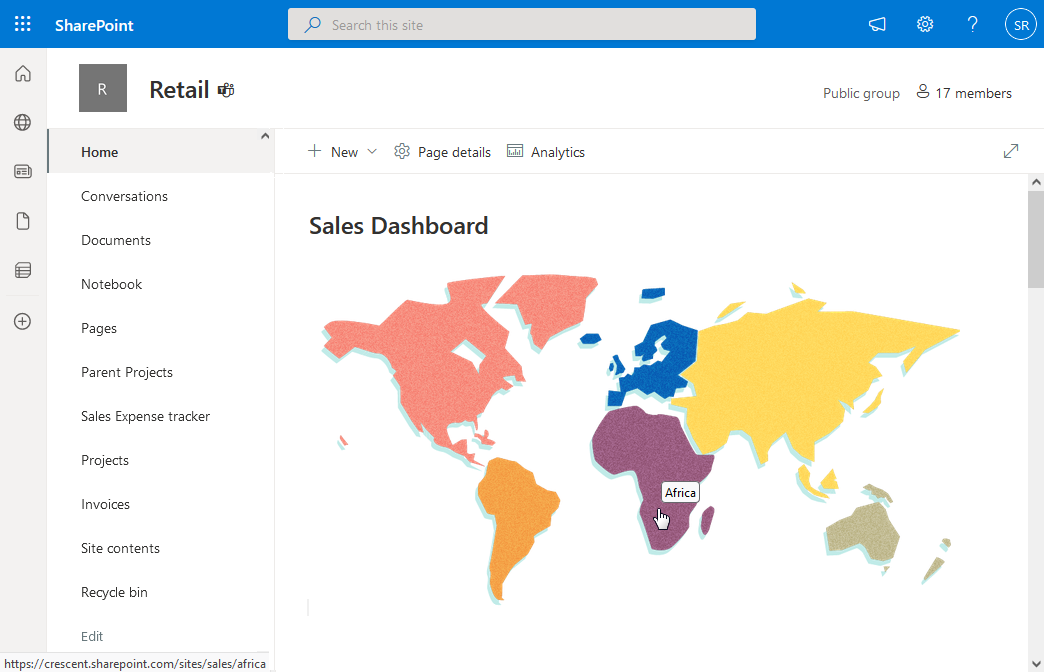
Here is the visually appealing SharePoint Image map in action:
In Classic sites and SharePoint On-premises, you can use the script editor web part to add an image map: How to Create Image Maps with SharePoint Designer?
Place your HTML code in a file and save it as FileName.ASPX, and then you can use the Embed web part to display its contents. Alternatively, you can use the Modern script editor web part to add HTML/JavaScript/CSS code to your modern Sharepoint Online pages.
To enable SharePoint Designer, activate the custom script for the SharePoint Online site collection.
More info: Connect SharePoint designer to SharePoint Online
So I have followed the directions several times and ensured Custom Scripts are on but still getting the File Not Found Error. Is there any other way to investigate why I am getting the error?
Still working? When I upload the .aspx file to the SiteAssets library and try to access it, it shows “File not found” error. Custom scripts are enabled.
Great idea. Doesn’t work for me with information shown. A video would be great.
I agree. Please add a video! I’m so close to success, yet so far. I think it’s this part in step 2 that I have incorrect. “and update the code you copied in the previous step with the image reference from SharePoint.” What is the image reference? Is that just “name.jpg”?
It means the path of the image, such as https://YourTenant.SharePoint.com/sites/YourSite/Images/Imagemap.png
Dear, Salaudeen Rajack, this content is great! The only issue I have is making the ASPX file. I am on Mac and can’t get the gist of transforming in HTML code into an ASPX file. I copy the code from imagemap.org to TextEdit, and then get stuck due to not being able to save it as ASPX. Any tips? Thank you
If this is a “subsite”, e.g. https://tenant.sharepoint.com/sites/MySite, you need to use the SharePoint Management shell and execute the command “Set-SPOSite https://tenant.sharepoint.com/site/MySite -DenyAddAndCustomizePages 0” as well in addition to enabling custom script on the tenant. That object is set to Enabled by default.
Thank you sharing the article. I am someone new to sharepoint and I have very little programming knowledge. So I went to the imagemap.org page and uploaded the image I want. Now after drawing everything I want on the image, I can’t figure out a way to save it. Can I please get some help on how to save it to the .aspx file? Thanks!
I’m trying to save the generated HTML code to a .aspx file on a Macbook. I’m using TextEdit but even when I save the file with extention .aspx, when I upload to the SharePoint Site Assets folder it comes in as a .txt file.
Can you help me take the HTML code generated with https://imagemap.org/ and save it to a .aspx file (on a Macbook).
Cheers 🙂
Use any basic text editors like TextEdit in Mac. Choose the Format > Make Plain Text so that you get a text file. Be sure to uncheck Hide Extension when you save, and provide the .aspx extension manually.
It’s not accepting the extension manually – I’ve hidden the extension but it’s saving as a .txt and not changing (also on mac)
Hi,
Is this post still valid? I am getting error like this link https://social.technet.microsoft.com/Forums/getfile/925129.
we have the custom scripts setting enabled as well.
Yes, It is. Make sure you enable the custom script before uploading the ASPX file. If it’s already uploaded, delete and re-upload.
Yes custom scripts are enabled before and following your exact steps giving me same error as before. Its saying file not found. For some reason apx file is not found although its been uploaded to site assets library.
I have the same problem!