How to Update PowerShell – Quick Guide!
PowerShell 7 is undoubtedly the most significant release of PowerShell since its inception. This new version has significant improvements over its predecessor, PowerShell 5.1, and it’s faster, more powerful, and more flexible. While it is still relatively new, many users are switching to PowerShell 7. If you’re yet to upgrade to PowerShell 7, it’s time to make the move! To take full advantage of its capabilities and ensure access to the latest features and cmdlets in scripts, it’s important to keep PowerShell updated. In this comprehensive guide, we’ll cover various methods to update PowerShell to the latest version and how to install or upgrade to PowerShell 7. Let’s get started!
Table of contents
- Understanding the Different Versions of PowerShell
- Updating from PowerShell 3, 4 to PowerShell 5.1
- Introduction to PowerShell 7
- Why should we update to PowerShell 7?
- Prerequisites for upgrading to PowerShell 7
- Step-by-step guide: How to update PowerShell on Windows 10/11?
- Common issues and troubleshooting during the upgrade process
- Conclusion and next steps in your PowerShell journey
Understanding the Different Versions of PowerShell
Before we dive into updating PowerShell, it’s important to understand that there are two distinct versions of PowerShell:
- Windows PowerShell: This is the classic version of PowerShell, with the latest and final version being 5.1. Windows PowerShell is no longer being actively updated, as Microsoft has shifted its focus to PowerShell Core.
- PowerShell Core: This is the new, open-source, cross-platform version of PowerShell, with the current version being 7.3. PowerShell Core is built on .NET Core and is designed to be compatible with most Windows PowerShell scripts and cmdlets.
While the version numbering for PowerShell Core continues from 5.1 (6.0, 6.1, 7.0, 7.1, etc.), the two platforms are distinct and require separate update processes.
Checking Your Current PowerShell Version
Before updating PowerShell, it’s essential to determine which version you currently have installed. To do this, follow these simple steps:
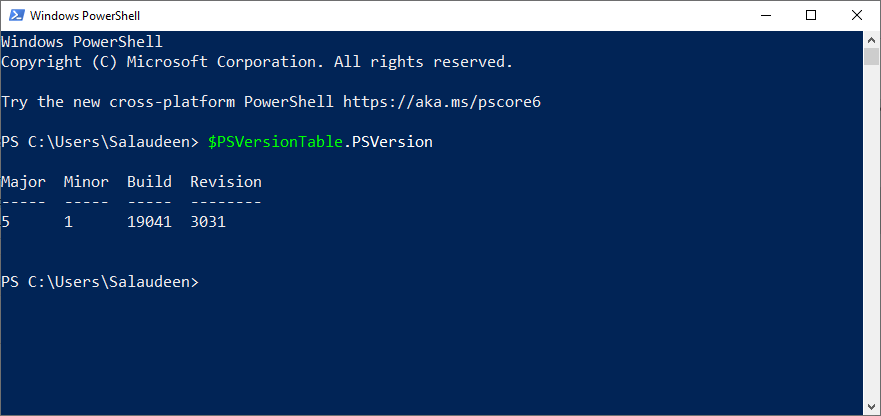
- Open Windows PowerShell.
- Type the following command and press Enter:
$PSVersionTable.PSVersion
This command will display your current PowerShell version in the console.
Updating from PowerShell 3, 4 to PowerShell 5.1
PowerShell 5.1 is installed on Windows systems by default and is part of the Windows Management Framework 5.1 (which requires the .NET Framework 4.5.2 or later). It automatically updates with Microsoft Update, so ensure your system is up to date to have the latest version of PowerShell 5.1. If you are using an older version of PowerShell (such as PowerShell 3 or 4 on Windows Server 2012 R2, 2012, 2008 R2 SP1, Windows 8.1, and Windows 7 SP1), you can update to PowerShell 5.1 by installing the Windows Management Framework 5.1
Introduction to PowerShell 7
PowerShell 7, also known as PowerShell Core 7, is the latest version of PowerShell and can be installed alongside PowerShell 5.1. With the release of PowerShell 7, Microsoft has introduced a wealth of new features, performance improvements, and bug fixes, making it a must-have update for IT professionals, developers, and automation enthusiasts.
In this comprehensive guide, we will explore the benefits of updating to PowerShell 7, the key differences between PowerShell 7 and previous versions, the prerequisites for upgrading, and detailed step-by-step instructions on how to update PowerShell on various platforms. We will also delve into the new features and improvements introduced in PowerShell 7, and provide resources to help you master this powerful tool.
Let’s begin our journey toward mastering PowerShell 7!
Why should we update to PowerShell 7?
There are numerous reasons to consider updating to PowerShell 7, as it offers significant enhancements to its predecessors. Here are some compelling reasons to upgrade:
- Cross-platform compatibility: PowerShell 7 is built on .NET Core, which allows it to run on Windows, macOS, and Linux. This enables you to use the same PowerShell scripts and modules across different operating systems, streamlining your workflows and making your automation efforts more efficient.
- Improved performance: PowerShell 7 boasts enhanced performance, thanks to the underlying .NET Core runtime. This means faster script execution, reduced memory usage, and better overall performance, allowing you to accomplish your tasks more efficiently.
- New features and improvements: PowerShell 7 introduces a wealth of new features, cmdlets, and improvements, such as enhanced PowerShell remoting, improved error messages, and support for ternary operators. These enhancements make PowerShell 7 more powerful, versatile, and user-friendly.
- Long-term support: PowerShell 7 is a long-term support (LTS) release, meaning it will receive updates and bug fixes for an extended period. This ensures that your PowerShell environment remains stable, secure, and up-to-date.
- Compatibility with Windows PowerShell: PowerShell 7 offers a high level of compatibility with Windows PowerShell, allowing you to continue using your existing scripts and modules with minimal modifications. This makes the transition to PowerShell 7 smoother and less disruptive.
- Enhanced security: PowerShell 7 includes several security improvements, such as the new
-NoLogoswitch, which prevents the display of potentially sensitive information in the PowerShell console, and improved logging capabilities, which help you monitor and audit your PowerShell activities. - Pipeline parallelization: PowerShell 7 introduces the
ForEach-Object -Parallelcmdlet, which enables parallel execution of script blocks across multiple cores and threads. This can significantly improve the performance of scripts that process large amounts of data. - Additional cmdlets and modules: PowerShell 7 includes several new cmdlets and modules, such as the
ConvertFrom-JsonandConvertTo-Jsoncmdlets for working with JSON data, and theMicrosoft.PowerShell.GraphicalToolsmodule for building graphical user interfaces (GUIs). PowerShell 7 includes improved error messages.
Prerequisites for upgrading to PowerShell 7
Before upgrading to PowerShell 7, you should ensure that your system meets the following requirements:
- Supported operating systems: Ensure that you are running a compatible operating system. PowerShell 7 supports Windows 7, 8.1, 10, and 11; macOS 10.13 and later; and various Linux distributions, including Ubuntu, Debian, CentOS, Fedora, and more.
- .NET Core 3.1: PowerShell 7 requires .NET Core 3.1 to be installed on your system. You can download the latest version of .NET Core from the Official website.
- Backup your existing PowerShell configuration: Before upgrading, it is recommended to back up your existing PowerShell configuration, including profiles, scripts, and modules, to ensure a smooth transition and minimize the risk of data loss.
Step-by-step guide: How to update PowerShell on Windows 10/11?
There are several methods to install or update PowerShell Core 7 on your Windows system:
Method 1: Using Winget Command
Winget is a command-line package manager introduced in Windows 10, which allows you to download and install software packages from a centralized repository. To install or update PowerShell Core 7 using Winget command-line tool, follow these steps:
- Open a PowerShell terminal window with administrative privileges.
- To search for the available PowerShell versions, run the following command:
winget search Microsoft.Powershell
- To install the desired PowerShell Core version, use the following command:
winget install --id Microsoft.PowerShell
This will download and install the latest stable PowerShell Core release. Similarly, If you want to update your existing PowerShell 7 version to the latest build, You use:
winget upgrade --id Microsoft.PowerShell

Method 2: Using GitHub to Download PowerShell 7 Installer
PowerShell Core can be installed or updated by downloading the installer package from the GitHub website. Follow these steps to download and install PowerShell Core from GitHub:
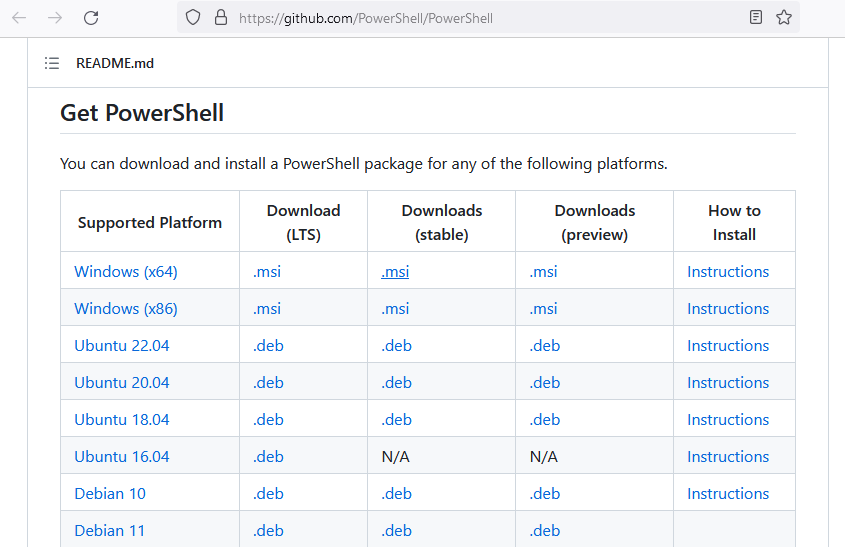
- Visit the GitHub PowerShell page and select the latest release version.

- Scroll to the Assets section and download the appropriate MSI package or zip package for your operating system.
- Run the installer package and follow the installation wizard to complete the process. During installation, you can enable WSUS or Windows update to update PowerShell.


How to Update PowerShell 7 to the Latest Build?
If you have installed PowerShell 7 with an MSI, You can upgrade to the latest build by downloading and installing the latest MSI from the GitHub PowerShell page to update PowerShell 7.
Method 3: Using Microsoft Store
PowerShell Core can be installed or updated through the Microsoft Store on Windows 10 and Windows 11 systems. To install or update PowerShell Core using the Microsoft Store, follow these steps:
- Open the Microsoft Store app on your PC.
- Search for the “PowerShell” app.

- Click the Get or Update button to download and install the app on your system.

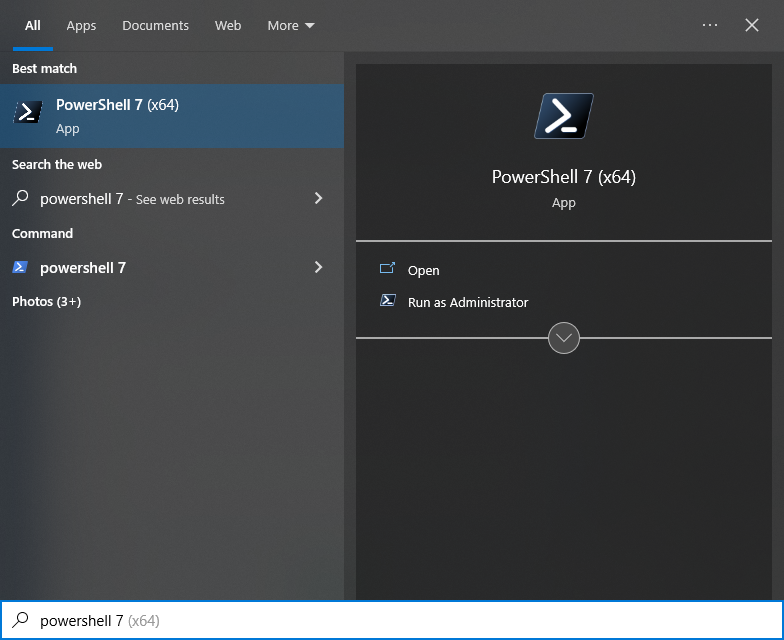
Launch PowerShell 7
After the installation, To access PowerShell 7, open the Start Menu, search for “PowerShell 7,” and select the PowerShell 7 option.
Please note that you can’t use PowerShell ISE with PowerShell 7 yet! So, use Visual Studio Code.
Verify the PowerShell 7 Version:
Open a new PowerShell console and type Get-Host. The “Version” property should display “7.x.x” (where “x” represents the version number). Ensure your existing scripts and modules work correctly in PowerShell 7. If you encounter any issues, refer to the PowerShell 7 migration guide for assistance.
Upgrading PowerShell on other platforms (Mac, Linux)
PowerShell 7 can also be installed on macOS and Linux. The installation process for these platforms is similar to Windows, with some platform-specific differences:
- macOS: Download the PowerShell 7 PKG installer from the PowerShell GitHub repository and run it. Follow the on-screen prompts to complete the installation. Verify the installation by opening a new terminal and typing
pwsh. You can also use Homebrew by runningbrew install --cask powershell. - Linux: Installation on Linux varies depending on your distribution. Follow the official documentation for detailed instructions on installing PowerShell 7 on your specific Linux distribution. For example, on Ubuntu or Debian, you can use the following commands:
sudo apt-get updateandsudo apt-get install -y powershell
Common issues and troubleshooting during the upgrade process
While upgrading to PowerShell 7 is generally a straightforward process, there are some common issues that users may encounter. Here are some tips for troubleshooting common issues:
- Installation errors: If you encounter errors during the installation process, ensure that you have met all the prerequisites, such as installing .NET Core 3.1, and that you are using the correct installer for your system.
- Compatibility issues: If your existing scripts and modules do not work correctly in PowerShell 7, refer to the PowerShell 7 migration guide for guidance on updating your code.
- Performance issues: If you experience performance issues, such as slow script execution or high memory usage, ensure you are using the latest version of PowerShell 7 and .NET Core, and consider optimizing your scripts for parallel execution.
- Security issues: If you encounter security issues, such as unauthorized access or data breaches, review your PowerShell security settings and ensure that you are following best practices for secure scripting.
In most cases, updating PowerShell should not affect your existing scripts. However, it’s always a good practice to test your scripts with the new version of PowerShell to ensure compatibility before deploying them in a production environment.
Conclusion and next steps in your PowerShell journey
Updating to the new version of PowerShell is essential to ensure access to the latest features and improve script compatibility. While PowerShell 5.1 is still commonly used, PowerShell 7 offers advanced capabilities and cross-platform support. By following the methods outlined in this article, you can quickly install or update Windows PowerShell 5.1 and PowerShell Core 7 to the latest versions and enhance your scripting experience.
In this article, we have explored the benefits of updating to PowerShell 7, the prerequisites for upgrading, and detailed step-by-step instructions on how to update PowerShell on various platforms. By upgrading to PowerShell 7, you can take advantage of its cross-platform capabilities, improved performance, and new features and improvements.
Updating PowerShell ensures that you have access to the latest features, bug fixes, and security improvements. Newer versions of PowerShell often include performance enhancements and compatibility with the latest operating systems.
To check your current PowerShell version, open a PowerShell window and run the following command: $PSVersionTable.PSVersion. This will display the version number of the installed PowerShell.
While Windows PowerShell 5.1 is still installed by default on Windows client and server operating systems, Microsoft recommends using PowerShell Core 7 when possible, as it is the platform that will receive ongoing development and updates. However, testing your existing scripts and modules for compatibility with PowerShell Core 7 before fully transitioning is important.
After installing PowerShell Core 7, you can check the version by opening a PowerShell Core window and running the $PSVersionTable.PSVersion command.
Yes, PowerShell Core 7 is installed alongside Windows PowerShell, allowing you to use both versions on your system. This lets you gradually transition to PowerShell Core 7 while maintaining access to Windows PowerShell for compatibility purposes.
Yes, updating PowerShell typically requires administrator privileges. On Windows, you should run the Microsoft Store app as an administrator. On macOS and Linux, you need to use sudo or have root access to update PowerShell using the package manager.
To revert to an earlier version, uninstall the current version and reinstall the version you wish to return to. For PowerShell Core, simply switch to the earlier version if multiple versions are installed.
Windows PowerShell is the classic version of PowerShell, while PowerShell Core is the new, open-source, cross-platform version of PowerShell. Windows PowerShell is no longer being actively updated, as Microsoft has shifted its focus to PowerShell Core.