How to Convert User Mailbox to Shared Mailbox in Office 365?
Introduction
Office 365 is a cloud-based platform that provides a suite of productivity tools, including email, calendars, and file sharing. As an Office 365 administrator, you are responsible for managing user accounts, groups, and resources such as mailboxes. With the increasing number of employees and the need for teamwork, shared mailboxes are becoming more popular. Shared mailboxes allow multiple users to access and manage the same mailbox, streamlining communication and collaboration. In this blog post, we’ll learn how to convert regular mail users to shared mailboxes in Office 365 using Microsoft 365 Admin Center and Exchange Online Admin Center. This transition is often beneficial for scenarios where multiple users need access to the same mailbox.
PowerShell is a command-line tool that automates Office 365 management tasks. With PowerShell, you can create and manage user accounts, groups, and resources, including mailboxes. We will also see converting mail users to shared mailboxes using PowerShell.
Table of contents
- Understanding Shared Mailboxes in Office 365
- Benefits of Converting Mail Users to Shared Mailboxes
- How to Convert a User Mailbox to Shared Mailbox from Microsoft 365 Admin Center?
- Convert user Mailbox to Shared Mailbox from Exchange Online Admin Center
- How to Convert to Shared Mailbox using PowerShell?
- PowerShell Script for Converting Multiple Mail Users to Shared Mailboxes
- Post-conversion Considerations
- Best Practices for Managing Shared Mailboxes in Office 365
- Wrapping Up
Understanding Shared Mailboxes in Office 365
Before we dive into the process, it’s important to understand what shared mailboxes are and why you might want to use them. Shared mailboxes in Office 365 are mailboxes that multiple users can access and manage. Shared mailboxes are typically used for team collaboration, such as a customer support mailbox or a project mailbox, where a team of people monitors and sends emails from a common address. With shared mailboxes, users can view, send, and reply to emails and access shared calendars and contact information.
Shared mailboxes are different from regular mailboxes in that they do not have a password and do not require a license. Instead, shared mailboxes are associated with a user account and can be accessed by users who have been granted access. Shared mailboxes have a maximum size of 50 GB and can be accessed by up to 500 users. If you need more than 50 GB or to have an archive, you need to license for Shared Mailbox.
Benefits of Converting Mail Users to Shared Mailboxes
Converting mail users to shared mailboxes can provide several benefits for your organization. Firstly, shared mailboxes allow multiple users to access and manage the same mailbox, reducing the need for forwarding emails or copying messages. This can save time and improve communication, especially for teams collaborating on projects or customer support.
Secondly, shared mailboxes do not require a license, which can save your organization money. Instead of purchasing a license for each user who needs access to a mailbox, you can convert the mailbox to a shared mailbox and grant access to multiple users.
Lastly, converting mail users to shared mailboxes can help to streamline your Office 365 management. By reducing the number of mailboxes you need to manage, you can save time and simplify your management tasks.
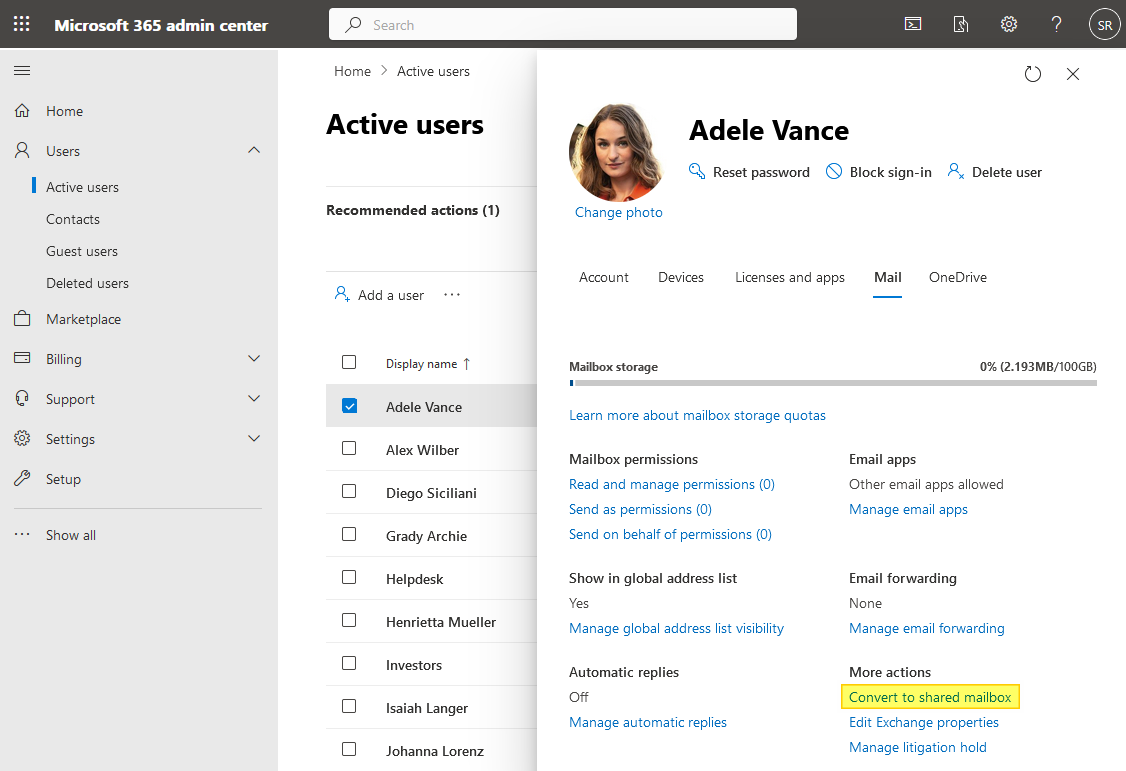
How to Convert a User Mailbox to Shared Mailbox from Microsoft 365 Admin Center?
To convert a regular mailbox to a shared mailbox in the Office 365 admin center, you can follow these simple steps:
- Go to the Microsoft 365 Admin Center and sign in with your administrator credentials.
- In the left navigation pane, select Users > Active users.
- Select the user whose mailbox you want to convert to a shared mailbox.
- Click “Convert to shared mailbox” under the Mailbox tab in the user details pane.

- In the Convert mailbox window, click Convert.


Convert user Mailbox to Shared Mailbox from Exchange Online Admin Center
Alternatively, you can also convert a user mailbox to a shared mailbox from the Exchange admin center by following these steps:
- Log in to the Exchange admin center.
- Go to Recipients > Mailboxes.
- Select the user mailbox you want to convert.
- In the toolbar, click the “Convert to shared mailbox” button.

- Click Confirm, and you’ll see the “Mailbox converted successfully” message shortly.

Both methods accomplish the same result, so you can choose the one you find more convenient. After converting the user mailbox to a shared mailbox, all existing email and calendar data will be retained and can be accessed by any users with delegated access to the mailbox.
How to Convert to Shared Mailbox using PowerShell?
Converting a mailbox to a shared mailbox using PowerShell is a straightforward process. The first step is to connect to your Office 365 environment using PowerShell. Once you have connected to Office 365, you can use the Set-Mailbox cmdlet to convert a mailbox to a shared mailbox.
The Set-Mailbox cmdlet has a parameter called -Type, which allows you to specify the type of mailbox you want to create. To convert a mailbox to a shared mailbox, you need to set the -Type parameter to “Shared”.
Preparing for the Process in PowerShell
You might think this conversion process is complicated, but it becomes much more manageable with PowerShell. However, before we dive into the conversion, there are a few prerequisites you need to fulfill.
- Admin Access: You should have Office 365 administrator rights. This is because converting mail users to shared mailboxes involves changing user permissions, which require administrative privileges.
- Install the Exchange Online Management Module: You need to Install the PowerShell module for Exchange Online on your system with Install-Module -Name ExchangeOnlineManagement
- Check the Mail User: The mail user you wish to convert should not have any active mailbox holds or litigation holds. Also, remove all existing forwarding addresses.
Now that we understand the prerequisites, let’s move on to the conversion process.
Convert to Shared Mailbox using PowerShell – Step by Step
Here, we will divide the process into two steps: connecting to Office 365 using PowerShell and then converting the mail user to a shared mailbox.
Step 1: Connecting to Exchange Online using PowerShell
Launch PowerShell as an administrator. This can be done by searching for “PowerShell” in your computer’s search bar, right-clicking on the Windows PowerShell app, and selecting “Run as administrator”. To connect to Exchange Online PowerShell, type the following commands:
# Import the module you installed
Import-Module ExchangeOnlineManagement

# Connect to Exchange Online
Connect-ExchangeOnline -UserPrincipalName admin@yourdomain.com -ShowProgress $true
A login prompt will appear. Enter your Office 365 admin credentials. You’re now connected to your Office 365 environment.
Step 2: Converting the Mail User to a Shared Mailbox
Now that you’re connected to Exchange Online, it’s time to convert the mail user to a shared mailbox. Enter the following command, replacing “user@domain.com” with the email address of the mail user you want to convert.
Set-Mailbox -Identity user@domain.com -Type Shared
This Set-Mailbox cmdlet modifies the properties of an existing mailbox, And voila! The mail user has now been converted to a shared mailbox.
Verifying the Conversion
To ensure that the conversion has successfully taken place, you can use the Get-Mailbox cmdlet. Here’s the command to confirm:
Get-Mailbox -Identity user@yourdomain.com | Format-List RecipientTypeDetails
If the conversion was successful, the output of the above command should display “SharedMailbox”. Here is the complete script:
# Import the module you installed
Import-Module ExchangeOnlineManagement

# Connect to Exchange Online
Connect-ExchangeOnline -UserPrincipalName salaudeen@Crescent.com -ShowProgress $true

# Convert to Shared Mailbox
Set-Mailbox -Identity Helpdesk@Crescent.com -Type Shared

# Verify the Mailbox type
Get-Mailbox -Identity Helpdesk@Crescent.com | Format-List RecipientTypeDetails
PowerShell Script for Converting Multiple Mail Users to Shared Mailboxes
If you have multiple mailboxes that you need to convert to shared mailboxes, you can save time by creating a PowerShell script. To create a PowerShell script for converting mail users to shared mailboxes, you can use the Get-Mailbox cmdlet to get a list of all the mailboxes you want to convert. You can then use a ForEach loop to iterate through the list of mailboxes and convert each mailbox to a shared mailbox using the Set-Mailbox cmdlet.
Here is an example of a PowerShell script for converting multiple mail users to shared mailboxes:
#Array for Mailboxes
$Mailboxes = @("Steve@Crescent.com","LeeG@Crescent.com","LynneR@Crescent.com")

#Loop through Array
ForEach ($Mailbox in $Mailboxes)
{
    #Convert User Mailbox to Shared Mailbox
    Set-Mailbox -Type Shared -Identity $Mailbox
    Write-host -f Green "Converted to Shared Mailbox:"$Mailbox
}
To get all shared mailboxes in your Office 365 environment, use the PowerShell command:
Get-Mailbox -RecipientTypeDetails SharedMailbox
Similarly, to get all user mail boxes, you can use the RecipientTypeDetails as “UserMailBox”. It is important to note that converting a mailbox to a shared mailbox can take some time, especially if the mailbox is large. Be sure to plan accordingly and schedule the conversion during off-peak hours to minimize any disruption.
Post-conversion Considerations
While the PowerShell command has done the heavy lifting, there’s a little more to consider after the conversion.
- Assigning Permissions: After the conversion, you will need to assign permissions to users who need access to the new shared mailbox. This can be done via the Office 365 admin center or with PowerShell.
- Reconfigure Outlook: Users might need to remove and re-add the mailbox in their Outlook client for the changes to take effect.
Checking Storage Limits: Keep in mind that shared mailboxes have a default storage limit of 50 GB in Office 365.
Best Practices for Managing Shared Mailboxes in Office 365
When managing shared mailboxes in Office 365, there are a few best practices that you should follow. Firstly, it is important to grant access to the shared mailbox using security groups rather than individual users. This can simplify your management tasks and ensure that the correct users have access to the mailbox. Also, The ‘Full Access’ permission isn’t always necessary for everyone. Utilize ‘Send As’ and ‘Send on Behalf’ permissions judiciously for users who primarily need to send mail from the shared mailbox.
Secondly, you should regularly review the access to your shared mailboxes and remove any users who no longer require access. With changing roles, personnel transitions, or organizational restructures, it becomes critical to review and adjust shared mailbox permissions periodically. This can help to ensure the security of your mailbox and prevent unauthorized access.
Lastly, you should consider educating all team members to understand the use and management of shared mailboxes. Provide clear instructions on accessing the mailbox, sending emails, and adhering to the established usage guidelines.
Wrapping Up
In conclusion, converting mail users to shared mailboxes can provide several benefits for your organization, including improved communication and collaboration, cost savings, and streamlined Office 365 management. With Microsoft 365 Admin Center and PowerShell, you can complete the process of converting mailboxes to shared mailboxes, saving time and simplifying your management tasks. By following best practices for managing shared mailboxes and using other useful PowerShell commands, you can ensure that your Office 365 environment is secure and efficient.
Let’s recap what we’ve learned:
- We understood what a shared mailbox is and how it can benefit your organization.
- We went through the prerequisites needed before starting the conversion process.
- We learned how to convert to a shared mailbox using Office 365 admin center and Exchange Online Admin centers.
- We learned how to convert a mail user to a shared mailbox using a PowerShell script.
- And finally, we discussed the considerations you should take into account post-conversion.
I hope this beginner’s guide to converting mail users to shared mailboxes in Office 365 has been helpful. Stay tuned for more beginner-friendly guides on Office 365 administration.